Media Asset Management
Media Management Asset (MAM)#
The Media Asset Management, short MAM, is used to manage unstructured data and enables process-oriented document management.
Media assets are imperia documents
Unstructured content such as image, audio and video files, as well as PDF and Office documents, can be used as imperia managed documents on a system. Unstructured documents are an integral part of the process-oriented content management. The upload is workflow-based. There are workflow plug-ins available for that. Additional plug-ins to manipulate metadata can be added. Since assets are imperia documents, they are versioned and archived automatically. Thus, you always have access to older versions of an asset and the associated history change.
Media assets can be freely structured
The Media Asset Management is very flexible in terms of structuring media objects. For example, the content of a category structure can be mapped in the Media Asset Management without redundancies. Directories in MAM are imperia categories and you can set access permissions to content within them.
Media assets and link management
References to assets can be tracked. Referenced assets can be deleted only after further confirmation.
Media-Assets and the publishing process
Normally, imperia assets are published together with the documents they are referenced in as a relative link to the document root, e.g.:
<a href="/image.jpg">
<img src="/here/there/image.jpg">
but not <img src="../here/there/image.jpg"> nor
<img src="http://here/there/image.jpg"> nor
<img src='here/there/image.jpg'>.
Note
There is no difference if the HTML tag is visible in the DOM or hidden in e.g. a HTML- or PHP comment.
But you can also Enable Independant Assets Publishing.
Working with Asset Categories#
An asset category has all the characteristics of a conventional document section in imperia. You can store the settings of an asset category metadata that is available for all assets therein. Assets in a category follow a defined workflow and by default receive the filename specified in the category's settings. You can define templates for assets upload and the creation of asset categories. See Creating an Asset Category for more information about the properties of asset categories. Individual media files can also be found in the Archive of the corresponding category.
For each asset category, there is a directory on the file system where the documents, or assets, this category contains are stored. But this is only one of many characteristics of media files and no longer decisive for structuring and management.
Creating an Asset Category#
Prerequisite
To create a new asset category, you need to be member of a group that is listed in the section “groups that may change this section” (see Category Property 'Permissions'). If this is not the case, the menu items are grayed out.
- First, select the category in which you want to create new subcategories in the category tree of the MAM.
- Then call the function File → Create category.... If no custom template for creating categories is set, you are redirected to the New Category dialog. From here, the process is similar to creating a new document category (see Create new (document) category).
-
Specify the following properties for the new asset category:
-
Category information, see Category Information
Category name
The name of the new category. The category will be listed under this name in the MAM, the Category Management and the Archive.Description
Enter an optional description of the category in this input.Directory
Specify the directory or path to where assets are located on the server.Filename
Specify a default filename for assets in the new category. For uploading assets, this entry is irrelevant, as the filename is entered during the upload.Subcategories only
Select this option, if the category should contain only subcategories and no assets.Documents and subcategories
Selecting this option will allow both subcategories and assets to be created within the new category.Enable assets?
This option allows the creation of assets in the relevant category. It must be selected only in the main categories. For all underlying subcategories it is automatically selected.Disable multiple documents
This option sets the maximum amount of documents in this category on 1 when selected. It is not automatically selected for all underlying subcategories. -
Meta files, templates and workflow, see (Category-) Meta Files, templates and workflows
Workflow entry point
Select a workflow, that regulates the asset upload.Meta file
Because the workflow for asset upload contains no MetaEdit step, no meta file is required. A dummy must be entered in this field.Template
Select a template for asset upload. Either the default template may be used, or a custom one can be created. Refer to File Upload (Media Asset Management). -
Edit permissions, see (Category-) Permissions
Note
These settings are equivalent to the global and category-related permissions of the Media Database from older imperia versions.
Specify which groups have access to the new category and the assets within.
Select groups that may read this category (r)
groups that have this privilege see the content of the relevant asset category. It allows the use of assets, contained therein, in documents. In addition, a user must also have read permissions for a category to have access to their subcategories.Select groups that may create documents in this category (c)
This permission allows assets creation in this category.Select groups that may delete documents in this category (d)
This permission allows assets and subcategories deletion in this category.Select groups that may change this category (w)
Users with groups that are listed here may create subcategories and change the category's settings.Save the newly created category by clicking on OK. You will be taken to the MAM, where the new category is available.
-
Editing an Asset Category#
- Select the category you want to edit in the category tree of the MAM.
- Then call the function File → Edit category.... You are taken to the Edit Category dialog. The options are essentially the same as in the Create new category).
- There, you may also include the meta information. For further information on categories' meta information, refer to Property 'Metainfo'.
- Make the desired changes and click OK to save them.
Deleting an Asset Category#
Note
- Only empty categories may be deleted.
- If you attempt to delete a category that contains assets or subcategories, an error message will be displayed.
- Select the category you want to delete in the category tree of the MAM.
- Then call the function File → Delete category....
The Asset Category will be deleted directly.
Moving Assets and Asset Categories#
Moving assets and asset categories in imperia 10 is done in the same way as restructuring documents and categories (see Restructuring Categories and Documents).
Importing Assets from a Folder or Zip File#
If a large number of assets has to be imported, this can be done either via the command line or through the UI.
The command line tool is more powerful; smaller numbers of assets without special requirements can be imported comfortably through the interface.
Preparation and Configuration#
Following adjustments must be made before importing:
- Set the
system.confvariableMAM_GET_UPLOAD_FILENAME=1.By default, zip files are imported from the/spooldirectory inside the/sitedirectory. Another directory can be used, but it has to be specified in thesystem.confvariableMAM_SPOOL_PATH. - Create the directory from which files are to be imported, and provide read permissions of the web server in this directory.Directory permissions can be set for the spool directory and subdirectories directly through “Spool Chmod”.
Examples:
-
"MAM_SPOOL_PATH" = "/mam_import"
The
MAM_MAX_SPOOL_SIZEvariable sets the maximum size of the imported assets. The value has to be in bytes. If this variable is not set, there is no limit to the import size. -
"MAM_MAX_SPOOL_SIZE" = "104857600" (Example limited to 100 MB)
To specify the library to be used for unpacking, use the
PLUGIN_ARCHIVE_ZIP_BINvariable. If the variable is empty, the system will attempt to use the Perl moduleArchive::Zip, if installed. -
"PLUGIN_ARCHIVE_ZIP_BIN" = "/usr/bin/unzip"
Note
Please note that
ZIPfiles should not exceed a certain file size, for this will cause problems when unpacking. For 32-bit systems, this is 2 GB and for 64-bit ones - 4 GB.
Importing via the Command Line Tool#
To call the command line script for importing assets, proceed as follows:
- Go to the root directory of the server.
- Call
site/bin/mam_spool_import.plwith the appropriate parameters. - To see the available parameters, call the command line script for importing assets without the appropriate parameters (see following examples) or write the following into the command line:
perl mam_spool_import.pl -hThis will open the “help” of the script, where all the available options are listed and explained.
Examples:
-
mam_spool_import.pl -c /1/15/143 -u 1 -f "company.jpg" -f "agb.zip" -f "logo.png"
The files
company.jpg,agb.zipandlogo.pngwill be uploaded to the 1/15/143 category by the user that has ID 1. The zip file is not unpacked. -
mam_spool_import.pl -c /12 -u 1 -e -l -f "images.zip"
The archive
images.zipis unpacked and the files are uploaded to the /12 MAM category or its subcategories. The directories contained in the zip archive with the name of the category are compared and the assets sorted into the existing categories. Not existing categories can be created. -
mam_spool_import.pl -c /12 -u 1 -l -d -w -f "importDirectory"
The files contained in the
site/spool/importDirectorydirectory will be uploaded into the /12 MAM category or its subcategories. The directories contained in the folder that contain the category's names are compared and the assets sorted into the existing categories. Not existing categories can be created. Existing assets will be overwritten.
Importing via the GUI#
To call the graphical interface of the MAM import, proceed as follows:
Open the MAM import dialog form File -> Import. The following dialog opens:
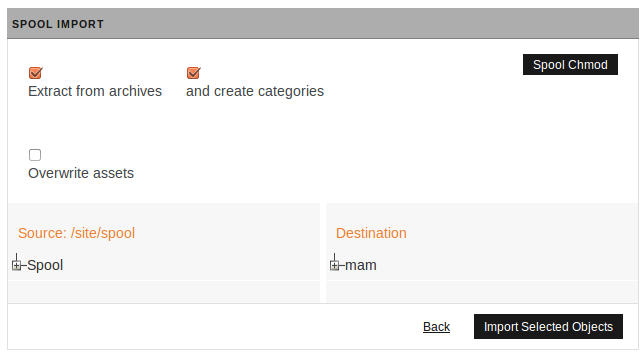
The dialog is divided into two sections.
In the dialog's heading, the following options are available:
-
Extract from archives
If this option is selected, the zip file will be unpacked. This option is selected by default.
-
and create categories
Directories contained in a folder that contains the categories' names are compared and the assets sorted into the existing categories. If this option is selected, the non-existing categories will be created. The option is selected by default.
-
Overwrite assets
If assets with the same name exist, they will be overwritten if this option is selected.
-
Spool Chmod
The button Spool Chmod takes you to the permissions dialog (see following figure) for importing assets from a directory. You can only change permissions for a single directory.
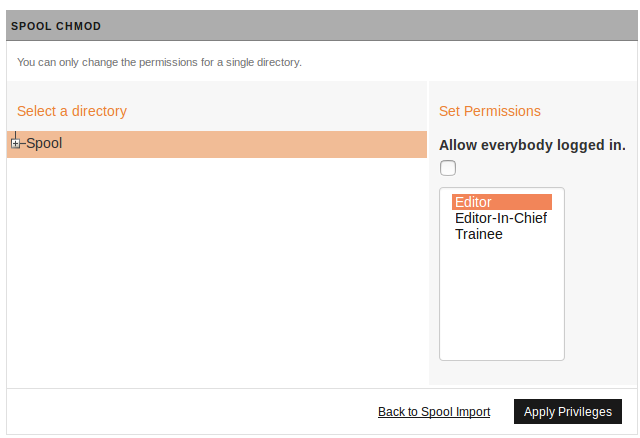
- On the left, there is a list with directories from which assets may be imported. Select the directory you wish to change the permissions to.
- On the right, there is a list of the groups in a system. Select the groups that should have permissions to import from the relevant directory. To select more than one group use the Ctrl key.
- Save the changes via the Apply Privileges button or exit without saving, using the Back to Spool Import button.
At the bottom of the dialog, the following options are available:
-
Source
Select the source for the import. Click on the desired directory to mark it.
-
Destination
Select the destination of the import. Click on the desired category to mark it.
Click on the Import Selected Objects button to start the import. A status report will be displayed at the end of the import.
Media Asset Management Configuration#
Apart from the user-specific settings of the MAM (see Configuring the User Interface of the Media Asset Management in the user manual), there are some general configuration options. These settings are made via configuration variables in site/config/system.conf.
Defining Global Filters#
As described in Searching in the Media Asset Management in the user manual, search filters can be saved. However, these only apply to individual users. The superuser group has the option to define and store filters that can be used by all users on a system. To save a filter as a global one, use the Save as global filter check box. The system stores these in the variable MAM_SAVED_FILTERS.
Making Assets' Metakeys Global available#
The Media Asset Management allows storage of arbitrary metadata to assets. In order to retrieve this metadata in documents, the metakeys must be globally available. Use the following variable:
"GLOBAL_METAKEYS" = "Metafieldname01,Metafieldname02,MetafieldnameNN"
The listed fields will be included in the index and can be used for filters.
Adding User Fields#
Global asset meta fields are displayed as columns in the “list” view and in the “details” dialog of an asset in the MAM. To add custom fields, set them as value of the system.conf variable MAM_ADD_USER_FIELDS. Syntax:
            //The code is wrapped for representation reasons
"MAM_ADD_USER_FIELDS" = "Metafieldname01:Columnheading01,MetafieldnameNN
                            :ColumnheadingNN"
Sorting the Category Tree#
The default sorting of the categories in MAM's navigation tree is by order of creation. Use the following system.conf variable to change the order to alphabetical:
"MAM_CAT_ORDER_BY_NAME" = "1"
Specifying a Template for Asset Categories' Creation#
If a custom template is used for the creation of asset categories, enter its name in the variable MAM_CATEGORY_TEMPLATE. Enter the name without the path or file extension:
"MAM_CATEGORY_TEMPLATE" = "Templatename"
Asset categories creation templates are saved under site/templates. The syntax for asset category templates is similar to other imperia templates. An example template can be found under site/config/templatecatmeta.htms.sample.
Defining Default Number for Multiupload#
The option File → Multiupload ... allows the creation of multiple assets in one operation. The default number of assets is set with the variable MAM_MULTIUPLOAD_SIZE.
Example:
"MAM_MULTIUPLOAD_SIZE" = "5"
Configuring Multiupload Options#
The MAM_MULTIUPLOAD_OPTIONS variable is used to set up multiupload options. The specification of the options are in the form of a comma-separated list of numbers.
Example:
"MAM_MULTIUPLOAD_OPTIONS" = "2,3,4,5,6,7,8,9,10"
Note
For a number of approximately 15 assets, performance degradation is expected. This is just a guideline. Depending on the system conditions, it may happen even sooner.
Configuring the Links Style#
The variable MAM_LINKS_STYLE defines the link styles in the columns of the “list” view.
Syntax:
"MAM_LINKS_STYLE" = "[Option]"
These three options are available:
ICON
Small icons appear in the columns.
TEXT
Text links appear in the columns.
ICON,TEXT
Both icons and text appear in the columns. This is the default setting.
Making Asset Details Fields Read-Only#
A user can change the meta information of an asset or add and delete fields, using the Asset Details dialog. By default, the fields directory and filename are read only to ensure the data integrity of assets and documents that refer to it. To make other fields read only, use the MAM_READ_ONLY_FIELDS variable. Specify the fields that should not be editable, as a comma-separated list. Here is an example:
"MAM_READ_ONLY_FIELDS" = "height,width"
The example above makes the fields “height” and “width” read only. All fields form the Asset Details dialog can be read only. Uppercase and lowercase letters are irrelevant. However, there shouldn't be any spaces before or after the commas for multiple field names.
Hiding Fields#
As described in Configuring the User Interface of the Media Asset Management in the user manual, columns can be displayed and hidden in the list view. Columns may also be hidden from the list view and the IconBox view in general. To do this, use the MAM_HIDDEN_FIELDS variable. Syntax:
"MAM_HIDDEN_FIELDS" = "Regex,FieldID"
As value, fill the fields that have to be hidden as a comma-separated list with no spaces. Fields can be specified with their ID. The following table lists the available fields and associated IDs:
Note
The Icon field can only be hidden in the list view.
| Column Name (list view) | FieldID |
|---|---|
| No. | __mam_select |
| Insert | __mam_insertion |
| Zoom | __mam_zoom |
| Icon | __mam_icon |
| Title | __mam_title |
| Filename | __mam_filename |
| Directory | __mam_directory |
| Filesize | __mam_filesize |
| Details | __mam_details |
| Info | __mam_info |
| References | __mam_references |
| Delete | __mam_delete |
| Created by | __mam_createdby |
| Last Editor | __mam_editedby |
| Created at | __mam_createdat |
| Template | __mam_template |
| Dimensions | __mam_dimensions |
| User action | __mam_action |
| User variants | __mam_variants |
| Archive | __mam_archive |
| Re-import | __mam_reimport |
| Change Actions | __mam_change |
| Category | __wf_category |
Determining Data Storage for Binaries#
So that assets are versioned, imperia creates a copy of the asset file and archives it. Depending on the data storage selected in the system settings, imperia stores binary data in the file system or BLOB fields in a database. If you are using a SQL data storage and do not want your imperia to store the binary asset data in the database, set the BINARY_DOCTREE_PLUGIN variable to File65.
Configuring Assets' Filenames#
By default, imperia sets the names of newly created assets under the filenames defined in the settings of the relevant asset category. As with all imperia categories the default value is index.html. However, asset documents are a special case because imperia automatically adapts the file extensions to the respective MIME type of an asset. For example, a PDF file is not saved as index.html, but rather as index.pdf
In case this default file naming method does not meet your needs, there are two variables that can influence it.
Note
In addition to the options described here for influencing the default filename of assets, the behavior can be changed by a corresponding input field in the upload template or through workflow plug-ins. For details, please refer to Syntax Reference in the programmers manual.
MAM_GET_UPLOAD_FILENAME
Set this variable in order to enable a filename input field during upload, as shown in the following screenshot:
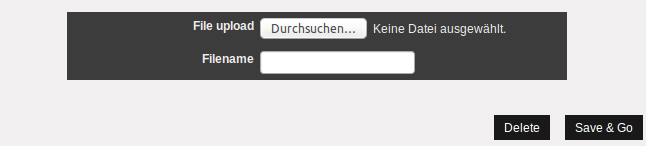
The input field is preset with the default filename from the category settings. Enter the desired filename. Alternatively, remove the default so that the original filename of an asset is copied automatically.
The filename input field is visible only during the first run of the assets' workflow. In a re-import it no longer appears. In addition, it takes precedence over a defined in an upload template filename form field.
MAM_UNIQUE
Set this variable (=1) to ensure that newly created assets do not overwrite other assets due to coinciding names. imperia then stores all of its assets, including the related variants in a separate subdirectory of the relevant asset category.
Note
If you do not want to enable this behavior globally, you can use the __imperia_mam_unique variable. It can be placed in the meta information or in the workflow (for example, with the Meta-Setter). Please note that the variable must be set before the upload step for it to be effective.
DISABLE_8BIT_FILENAMES
Currently, imperia does not support the use of 8-bit characters in filenames. For this reason, special characters, spaces, asterisks, the dollar sign, etc. are converted to underscores in filenames.
Until now it was possible to upload MAM assets with such file or directory name. This then led to broken links when inserting assets into HTML pages. The reason for this was that imperia cannot find out for sure, the format in which characters are encoded in an operating system.
Set the system.conf variable DISABLE_8BIT_FILENAMES to force the MAM upload to save 8-bit file and directory names in “safe” character set.
"DISABLE_8BIT_FILENAMES" = "1"
Note
Do not use this option if the file system character set is UTF-8, unless you really want to force Latin-1 filenames.
To ensure that characters like German umlauts or Cyrillic characters are transferred correctly even with mass imports through imperia's interface, set the MAM_SPOOL_CHARSET variable.
MAM_SPOOL_CHARSET
When using the MAM's mass import, the operating system's character set must be specified in order to achieve a correct implementation of special characters in imperia's interface and log files.
If imperia is run on Windows® development server, a value auto can be set. imperia will then determine the font automatically. By default, MAM_SPOOL_CHARSET is set to UTF-8. When entering an empty string, “windows-1252” is assumed. If the character set of the operating system is UTF-8, no conversion is necessary. In this case, comment out MAM_SPOOL_CHARSET or delete the row from the system.conf.
Note
When importing from zip archives, the description of file and directory names is not possible since a reliable detection of the character set used by the zip tool when packing the archive is not conceivable. Therefore, if possible, directly set the character encoding of the archive to UTF-8.
For zip files, generated under Windows®, you need to set the MAM_OEM_CODEPAGE to the OEM code page settings of your system.
For example, with German, the variable is set as follows: "MAM_OEM_CODEPAGE" = "cp850"
Under Windows-based imperia installations, you can set the variable to “auto”. In this way, the system will automatically detect the OEM code pages of your system.
Enable Independant Assets Publishing#
Normally imperia assets transfer to a target system only when other documents refer to them. If assets have to be published independently, set the following variable in site/config/system.conf:
"MAM_ENABLE_PUBLISH" = "1"
Assets can now be published automatically or manually. They also appear in the list of published documents.
Subsequently Defining Asset Actions#
This function is only available in the list view. If the actions available to an asset have to be changed later on, click on the link in the Change actions column of the relevant asset. The Asset Actions dialog opens, where actions can be enabled or disabled. Click Save to enable the changes.
Managing Access Permissions for Asset Categories#
The access permissions for asset categories are set by using the Category Manager.
Call it from Menu -> Structure -> Categories. The assignment of permissions can be done either via the Modify Permissions dialog or the Edit Permissions section of the Category Management dialog. The procedure is described in detail in the chapters Category Permissions. Only the individual permissions are described here.
-
groups that may read this category (r) or Read (r)
This permission allows a group to see assets in the relevant category and use them in documents. In order to also have write permission to a subcategory, the group(s) must also have read permissions to parent categories. -
groups that may create documents in this category (c) or create documents (c)
groups with this permission can upload new assets. This permission also includes asset types creation and asset's metadata change. -
groups that may delete documents in this category (d) or delete (d)
Only groups with this permission can remove or move assets from a category. -
groups that may change this category (w) or write (w)
With this permission, users can modify the settings and create new categories and subcategories. This permission does not apply to assets already in the category.
Configuring the List View#
It is possible to add more columns to the list view of the MAM. Also, added columns may be removed or the columns' order may be changed.
Adding and Deleting New Columns#
The adding of new columns is useful to display certain information of uploaded assets at a glance – for both images and documents (i.e. this feature can also be used in the Doc.browser
- for images (relies on ImageMagick): Image Height, Image Width, Image DPI (
__imperia_ac_info_dpi), Image Colorspace (__imperia_ac_info_colorspace) - for PDFs (relies on PDF::API2): PDFPages (
__imperia_ac_info_pdf_pages)
Adding
- To add a column go to Columns -> Add field.... The following dialog opens:
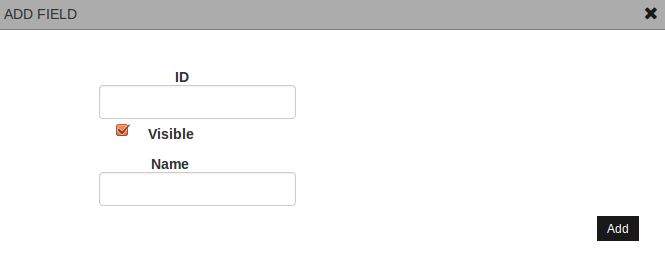
- Specify the settings for the new column and save it by clicking on Add.
- ID: Enter the name of the asset meta field. Its content is displayed in the new column.
- Name: Enter the column title.
- Visible: Select this check box if the new column should be visible by default.
Deleting
Note
Please consider that you only may delete subsequently added columns.
- To delete an additional column go to Columns -> Customize. Following dialog opens:
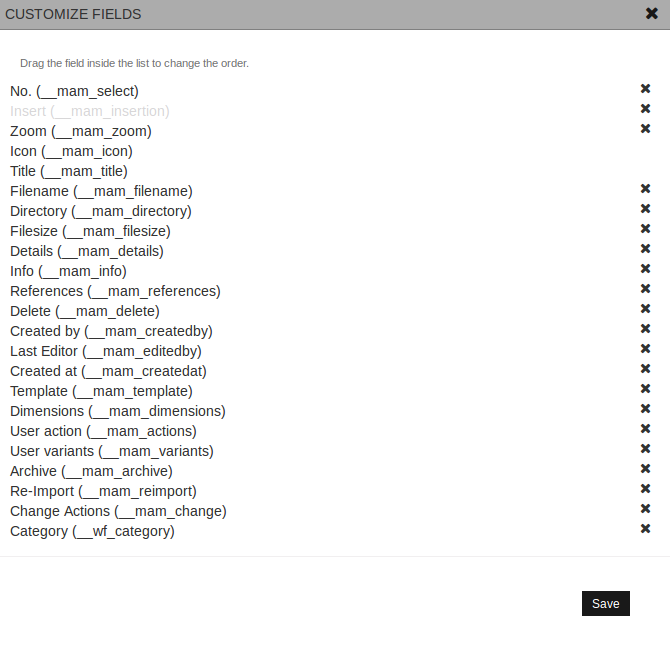
- Click on on the right of the appropiate column name.
- Save your changes.
Changing the Column's Order#
- To change the display order of columns go to Columns -> Customize (as shown above Deleting).
- Drag and drop the desired column in the desired place.
- Save the changes.
References#
imperia assets are treated as documents.
They can be processed separately, published and deleted. Therefore, it is necessary to follow any links in other documents, to ensure that, for example, no images, referred to by one or more documents, will be deleted.
imperia stores references to existing assets and gives a warning message if a user tries to delete a referenced asset. References to an assets can be shown in the Media Asset Management.
Depending on the set MAM view, proceed as follows:
IconBox view#
- Change the view to IconBox under View -> Iconbox.
- Click on the desired asset.
- References are displayed in the information panel on the right preview (you may need to open the side bar by using the arrow).
List view#
In the list view (default view), references are available in the “References” column. This column may not be displayed (see Configuring the User Interface of the Media Asset Management in the user manual).
-
If there are no references to an asset, “Not referenced” appears in the column.
-
If an asset is referenced, there is a link to the “References” dialog in the column:
- Click this link to open the following dialog:

- The dialog contains an overview of all references to the selected asset and its possible variants.
- Finished and in-progress documents are listed separately from each other.
- The “Document” column contains the names of the documents that use this asset.Documents' names in the list are linked to the corresponding documents. Click on this link to open a preview of the document in a new window.
- The “Referenced version” column contains the used asset version.
- Click this link to open the following dialog:
Input in a Template#
In order to enable users to access the Media Asset Management, the template code must contain the following line:
<img src="IMPERIA:defimage1" alt="IMPERIA:default1" height="100" width="100" />
<input name="IMPERIA:default1" type="text" />
Note
The specification of width and height is optional.
Further information on the integration of a MAM call in templates see in File Upload (Media Asset Management) in the programmers manual.
Multiupload (flash)#
In contrast to standard multiupload, this version allows users to select multiple files in a directory at the same time. Since the implementation is based on Adobe Flash, a reasonably current version of Flash must be installed.
Compatibality#
imperia flash upload is compatible to following variants of the flash player:
-
Linux Flash v9.0.124.0 (Browser blocks during upload, see restrictions below)
-
Mac Flash v9.0.115.0 and higher (slow upload with version 9.0.124.0)
-
Windows Flash v9.0.115.0 and higher
Restrictions#
Due to an error in the flash player for Linux, the browser blocks during the upload of files and doesn't respond to user input. As soon the upload process is completed, it unblocks.
Categories' settings#
With the category meta variable __imperia_swf_upload_template you can define the template for the flash multi upload.
Enter the file name of the template (without pre- or suffixes. The template setting within the categories' settings is reserved for the normal single and multi upload. The relevant instructions for the templates' flash-multi upload will be described in Flash Multiupload (Media Asset Management) in the programmer manual.
It isn't allowed to include interactive plugins in the workflow, except the semi interactive upload plugin of the standard workflow in the MAM.
Note
As soon as there is an interactive plugin, the flash upload aborts.
When changing into such a category, the additional option under File -> Multiupload (Flash) will be activated (grayed out by default).
Representation of MIME Types#
Each asset type in the MAM is represented by a different icon. Only web-viewable forms (*.gif, *.jpg, *.png) display a thumbnail instead of an icon.
| Icon | Mime-Types |
|---|---|
 |
Default |
 |
Application MS Excel |
 |
Application MS Word |
 |
Application Octet stream |
 |
Application PDF |
 |
Application MS Powerpoint |
 |
Application x-compress |
 |
Application x-director |
 |
Application x-gtar |
 |
Application x-gzip |
 |
Application x-shockwave-flash |
 |
Application x-zip-compressed |
 |
Application zip |
 |
Audio Basic |
 |
Audio Mpeg |
 |
Audio x-pn-realaudio |
 |
Audio x-pn-realaudio-plugin |
 |
Audio x-realaudio |
 |
Audio x-wav |
 |
Audio Default |
 |
Image Default |
 |
Text Default |
 |
Text Html |
 |
Video Quicktime |
 |
Video Default |