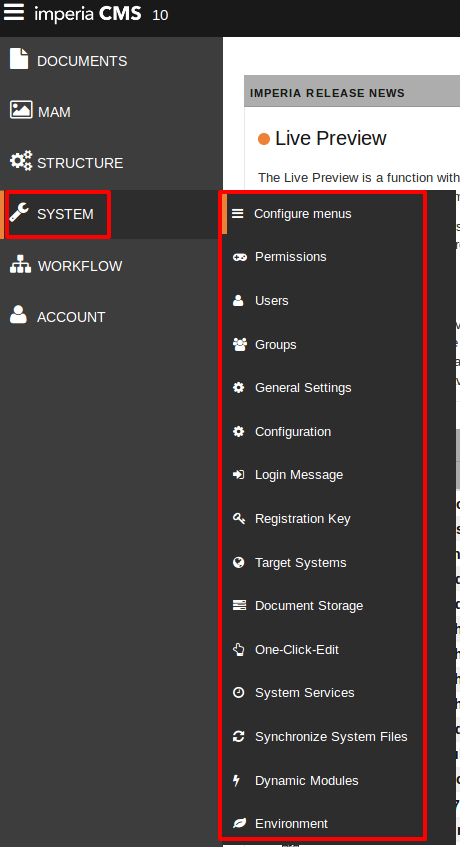
System Administration
All relevant system administration menus and dialogs can be opened via the System folder, see following figure:
Initial Startup and Login#
1. Open imperia
- Enter the following link in the address bar of your browser for the initial start of imperia:
http://<your production server>/imp/The following login mask will open: - During imperia's installation the user superuser is created including the password superuser.
- Start imperia by logging in with “superuser” in both the Name and Password fields of the login mask.
The menu opens.
Caution
- The superuser has access to all features and menus and can maintain the system and create new users and roles.
- The superuser has all permissions in a system.
- Work under this user only if you have proper knowledge about the menu items!
2. Configure imperia
Once you are logged in, complete imperia's configuration by following these steps:
- Change the default password for the superuser.
- Install a target system, if this is not already done, refer to Target Systems.
- Enter the license data to ensure that all functions are enabled, see next chapter.
Licensing#
The license unlocks the features you purchase with imperia. You will receive a registration key and the name of the licensee with the software. Both are entered in System->Registration Key . Pay attention to upper and lower case letters or spaces.
This data has to be replaced every time additional features or modules are purchased.
To register imperia you need:
-
The
regkey.binfile -
The name of the licensee
-
A 24-digit registration key
Procedure
1. regkey.bin file
- Copy the
regkey.binfile to thesite/configdirectory on your develop system. The file is located on your installation CD. - Then, start imperia and log in as a user with administrative privileges, in doubt use superuser.
2. registry key
- Open SYSTEM -> Registry Key. This will take you directly to the input dialog.
- Enter the licensee and registration key in the corresponding fields of the dialogue. Pay special attention to upper and lower case letters and the exact spelling of the name of the licensee.
- Click OK to save your entries. Back will abort the procedure without saving.
Maintenance Modes#
For some administrative tasks, it makes sense to put the production system in a maintenance mode. In maintenance mode, users cannot access the system without having to stop the web server.
imperia offers two different maintenance modes, which restrict access to the system to varying degrees.
Maintenance Mode without Superuser Access#
Once this maintenance mode is activated, all users (including the superusers) are redirected to the login screen where they can log in again when the maintenance mode is turned off.
-
To enable this maintenance mode, set the following variable in the
site/config/system.conffile:"AUTH_PLUGIN" = "MaintenanceNoLogin"Please note
- You must add this variable in the
site/config/system.confmanually, because it is not automatically created during the installation. - The double quotation marks in the
site/config/system.conffile are no longer necessary, but are retained in this documentation for compatibility reasons.
- You must add this variable in the
-
To exit the maintenance mode, either enter the default value of this variable to
Password, comment it out (with a # sign) or delete it.
This mode is useful, for example, if you want to create a database backup in an SQL data storage and want to prevent changes to the content during the backup.
Maintenance Mode with Superuser Access#
Unlike the above mentioned maintenance mode, in this mode only the superuser can log in the system.
Please note
Only the actual superuser can log in in this mode; not users that have adopted the superuser role.
- The activation can be made either in the General Settings dialog (see Superuser Authentication Plug-in) or by editing the
system.conffile:"AUTH_PLUGIN" = "Superuser" - To put the system back to normal operation, proceed as with the maintenance mode without superuser access or disable the corresponding option in General Settings.
SQL Export#
Data export from an SQL database does not work through a target system in imperia 10, as the publisher in imperia 10 has to track for transparency with the target system.
Since imperia 10, publishing in an SQL database is done in two steps through the MessageCheck plug-in:
- In the first step, the metadata is converted by a template (imperia or view) in XML.
- In the second, the XML data is compared with the database.
Please note
If errors occur during the data processing, the processing is canceled. Notifications about this record are retained and can be further processed.
Configuration#
- Add the following line to the
site/config/system.conffile:EXPORTS = sampleIn this way, the attached export “sample” is activated. - Next, edit the configuration file for this export - the one called
site/config/export/sample.conf: Search for the DSN; that is thedb_connectvariable. The path must be changed so that the attached sample databasesite/sample.sqliteis found. - To have the sample run, restart the Hermes.
Test#
Once a document is closed, published or deleted, the database is updated. The sample database has the following structure:
CREATE TABLE uris ( uri TEXT PRIMARY KEY,
                    directory TEXT,
                    filename TEXT,
                    template TEXT);

CREATE TABLE summaries ( node_id TEXT PRIMARY KEY,
                         title TEXT,
                         summary TEXT);
Use /usr/bin/sqlite3 to test if everything works.
In the site/exports/view/export.xml file define how metadata is mapped to the database.
Adjustments#
-
To rename your export from “sample”, change the
EXPORTSvariable defined insite/config/system.confand rename the configuration filesite/config/exports/sample.conf. Additional information can be found in the Perl documentation:perldoc site/modules/core/Dynamic/MessageCheck/Export.pm perldoc site/modules/core/Dynamic/Hermes/Export.pm -
The template file
site/export/view/export.xmluses the new imperia View language. If you prefer to use the conventional imperia template language with XX syntax instead of imperia View language renamesite/export/view/export.xmltosite/export/view/export.htmland change the variable “renderer” insite/config/exports/*.conf.Please note
Pease remember that in this case variables in templates should be interpolated with
XX-TEXT, so that the resulting XML is well formed. With the View language that is the default escape.
Error Handling#
Errors are recorded in the site/export directory. These are usually repaired or deleted. Deletion is mostly harmless because errors are generated again during the next run (after correcting the templates).
Annotations#
If you want to manage exports in your MySQL, you have to change the DSN in the db_connect variable to site/config/export/*.conf. Find the exact syntax with the command “perldoc DBD::mysql” or at
http://search.cpan.org/~capttofu/DBD-mysql/lib/DBD/mysql.pm#DESCRIPTION
Normally, it looks like this:
db_connect = dbi:mysql:database=NAME_DER_DB;host=IP_ODER_NAME
The username and password are configured in the same file.
For more details, please see the Chapter Move Sites in this documentation.
System Services#
System services are automatically started by imperia at specific times to perform SiteActives and generate overview pages.
The execution of system services can be carried out either on the basis of fixed a) times or b) events. The SiteActive uses the variables that you have set for the system service to generate the overview pages, for example, when a specific day has started (time-based system service) or or whenever a new post is generated (event-based system service) or. From these posts the header image, title, teaser and date are read out and used to generate an overview page by the SiteActive.
a) Time-based system services This service takes place at certain intervals, e.g. hourly, daily, monthly, in certain periods (in minutes or hours), on certain days or at a certain time.
b) Event-based system service This service is performed by defining one or more directories to be monitored by the Hermes daemon. Once a document is added, deleted, or edited in one of the monitored directories, the Hermes daemon performs the SiteActive.
The Hermes daemon reads out from the configuration of the system services, which template is used for the execution of the SiteActivity and where the generated file is to be stored under which name. The Hermes daemon then transfers these parameters to the CGI script, which can also be called manually.
Both services can be set independently or combined. But in both cases you should take into consideration that the Hermes Daemon doesn't run the SiteActives too seldom or too often: Example: If a SiteActive is performed with both of these options, but with a large time interval (e.g. monthly), the SiteActive is more likely to be triggered by the event-based system service because, for example, dead links caused by deleted items can occur during this interval. However, if changes occur very often in the monitored directory together with a time-based system service with a short interval (e.g. 5 minutes), it may happen that the Hermes daemon performs the SiteActive several times within a run.
The configuration of the system services that run on your imperia are taken from the Menu -> System -> System Services dialog. imperia stores the system services configurations in the site/config/imperia.schedule file on your develop system. This file has to be present on all target systems you want to run the system services on. To transfer the configuration file go to Menu -> System -> Synchronize System Files .
Prerequisites
- The Hermes daemon has to be running both on the development and target systems in order to perform the System Services.
- In order to configure the already running system services in imperia, go to Menu->System->System Servicesdienste.
- imperia stores the configuration of the system services in the file
site/config/imperia.scheduleof your development system.- This file has to be stored in every target system.
- Therefore, you have to synchronize the schedule files. To do so, go to Menu->System->Synchronize System Files.
Creating a new Schedule File#
In order to keep an overview of your different system services you are able to create different lists - so called Schedule Files - where you can store them.
For example: Create a basis list for overviews and another one for certain subpages, e.g. blogs; i.e. you create a schedule file for all 'normal overview pages' and a schedule file for the blog's tags and its archive.
Please note
- By default, all system services are saved in the standard system file '
imperia.schedule' which is stored insite/config/imperia.schedule. - Newly created files are saved as for example: 'newfile.schedule'
- There are also two
system.confvariables that indicate which file is to be considered:- SCHEDULE variable = "blog.schedule:overview.schedule:neueliste.schedule" (files are separated by
:) - SCHEDULE_ALWAYS-Variable =
1ensures that the files are executed.
- SCHEDULE variable = "blog.schedule:overview.schedule:neueliste.schedule" (files are separated by
- Like System Services, Schedule Files also have to be synchronized, see Synchronize Files.
In order to create a new Schedule File, perform the 2 main steps as follows:
1. Create new Schedule file
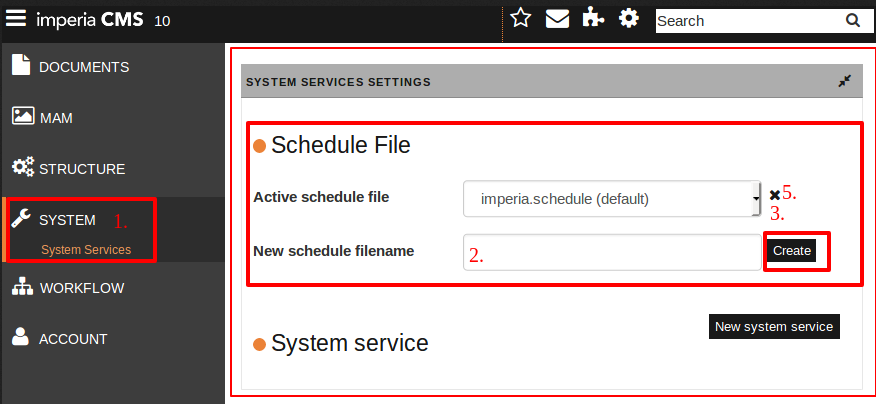
- Under Menu -> System -> System Services open the SYSTEM SERVICE SETTINGS.
- In the Schedule File dialog, type in the new schedule filename.
- Click Create. The new Schedule File is now created.
2. Make new Schedule file available In order to make the schedule file available in all target systems, you have to synchronize it. 4. Therefore, click Menu->System->Synchronize System Files. Now, whenever you create a new System Service (see next chapter), you can select the schedule file beforehand in which you want the System Service to be executed. 5. To delete the Schedule File: in the drop down list Active schedule file select the file and click . A notification window appears where you delete it permanently.
Important
When you delete the Schedule File, you also delete all added System Services.
Creating a new System Service#
In this chapter you will learn how to create time- or event-based system services. The process contains 2 steps:
-
Create new System Service and set the parameters.
-
Synchronize System Service to target systems.
Caution
Executing a system service at short intervals or executing a lot of system services can lead to significant load on the server.
PREREQUISITES
-
In order to execute time driven system services, you need to set the
SCHEDULE_ALWAYSsystem variable. -
In case you have more than one Schedule File, select the desired one before you create the new System Service, see chapter before.
1. Create new System Service and set the parameters
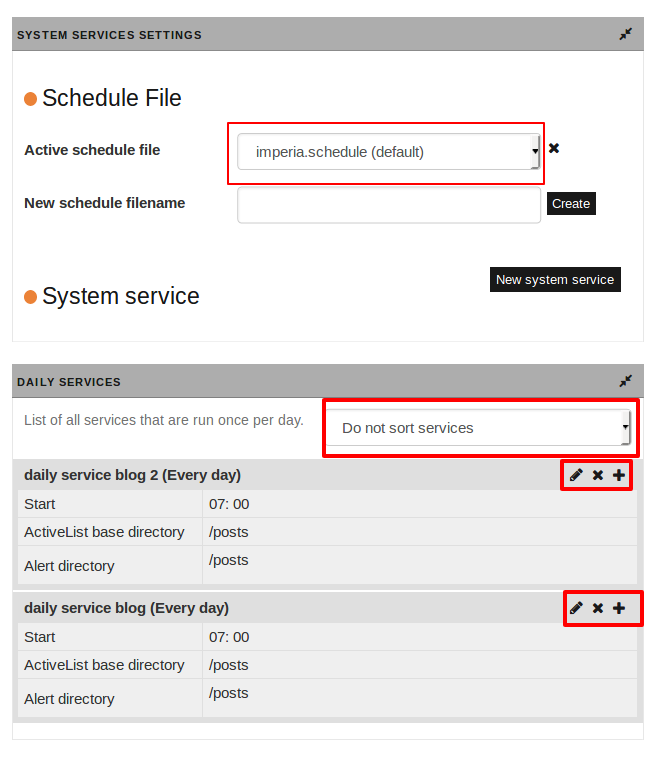
- Call Menu -> System -> System Services to open the SYSTEM SERVICES SETTINGS. There, you will also find the already created System Services, sorted by their interval, see following figure:
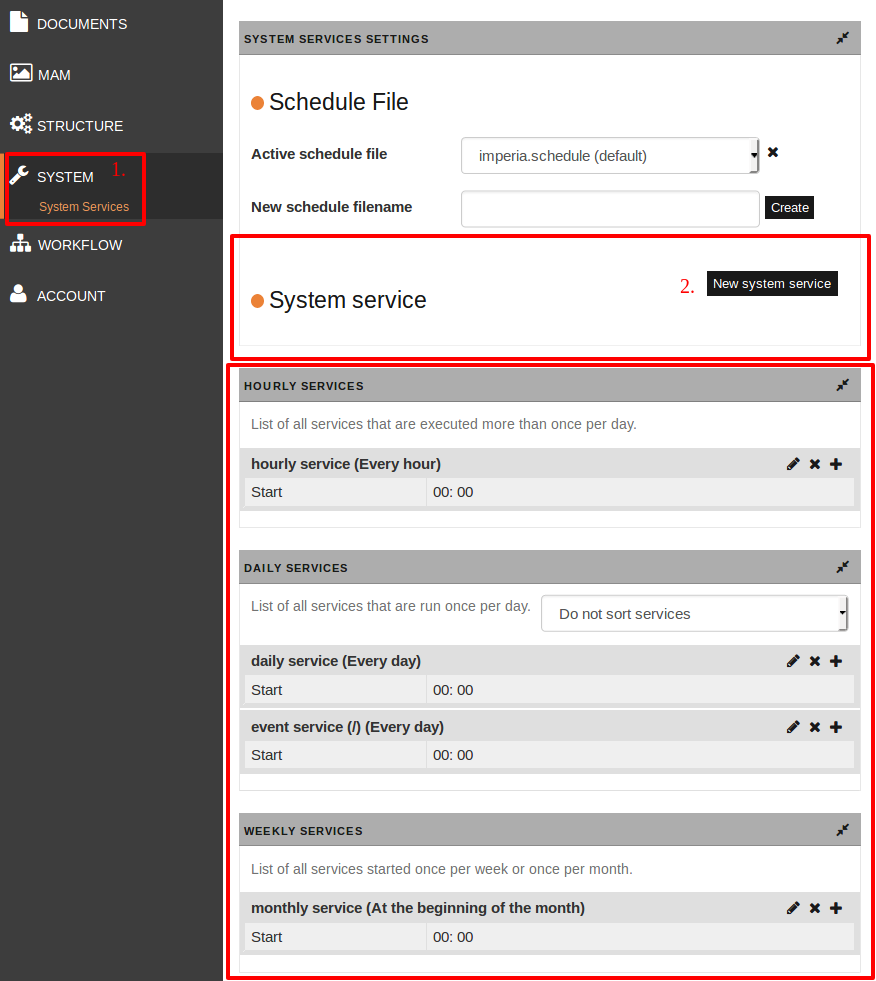
- HOURLY SERVICES: Here the services are listed that are executed several times a day (hourly, per minutes).
- DAILY SERVICES: Here both the daily as well as event-based system services are listed.
- WEEKLY SERVICES: Here both the weekly as well as the montly executed services are listed.
-
Click New system service to create a new system service. The following dialog appears:
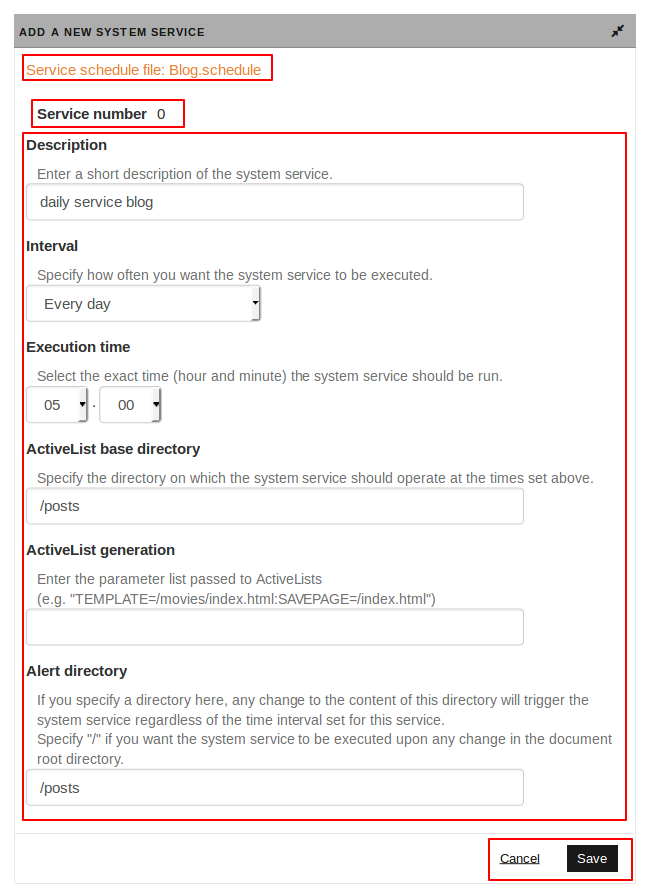
- At the top, you will find the selected Schedule File (by default, 'imperia.schedule' is selected) as well as the 'Service number' - the ID of the system service (automatically incremented).
- 'Description':The Description field is used for a brief description of the service that appears in the list of system services as a service heading.
- 'Interval':Use the drop down menu to specify the execution interval of time-dependant system services.
- 'Execution time':The two drop down menus are used to set a specific time for the service to start and run regularly.
- 'ActiveList base directory': Specify the directory on which the system service should operate. Example 'blog': In this case it would be
/posts, meaning that the ActiveList using this variable in order to find all documents (or 'all posts') under /posts. -
'ActiveList generation': Enter the parameters needed for the execution of the SiteActive.
- The different parameters are separated by colons
:. - Mandatory parameters are:
- Indication of a template:
TEMPLATE=/directory/file/name - SAVEPAGE:
SAVEPAGE=/directory/file/name
- Indication of a template:
- Optionally, other variables may be defined as key-value pairs. These variables may be referenced as
FF-variables when working with the SiteActive's code. - Example for an entry in the ActiveList generation field:
imp
    TEMPLATE=/movies/index.html:SAVEPAGE=/index.html:foo=bar:myvar=myvalue
- The different parameters are separated by colons
-
'Alert directory':Set the directory that has to be watched by the Hermes for this system service.In most cases, the alert directory is the same as the base directory (here
/posts) as the overview pages normally update as soon as a new post is entered. But you can also enter a superordinated directoy here (e.g./), meaning that ActiveList is executed with every change.- IMPORTANT:The system always interprets the path to
TEMPLATE,SAVEPAGEand alert directory, starting from the document root of your imperia system. - If you want to monitor multiple directories, enter them as a comma-separated list in the field:
/dir1,/dir2,/dir3,/dir4/news/ - If certain files or directories have to be excluded from the monitoring, use an exclamation mark:
/dir1,!/dir1/print.html,/dir2/news,!/dir2/news/archive - The driving force for the system services in this case are the
notification filesin/site/incoming. The Hermes runs trough this directory and checks if there are suitable system services in the path data. If there is a match, the Hermes runs the system service and deletes thenotification file.
- IMPORTANT:The system always interprets the path to
- Click Save to save the changes or Cancel to exit without saving.
2. Synchronize System Service to target systems
Go to Menu->System ->Synchronize system files to transfer the changed settings to the relevant target system(s).
Now you have created a new System Service in the selected Schedule File that will be automatically executed at specific times or events in the development as well as in the target systems.
Changing System Services#
To change an existing system service, proceed as follows:
- Call the system services dialog from Menu->System->System Services.You will find the list with all available system services.
- Make sure to be in the desired Schedule File.
-
Then you can
- select the sorting type.
-
change a system service: Click the pen icon next to the desired system service. The Edit System Service dialog opens, see chapter above.Make the desired changes. Save your changes via Save, or Cancel them.
-
delete an existing system service. In order to do so, click next to the system service you wish to delete. No conformation appears when deleting system services.
Important
As for new system services any changes or deleting of existing ones have to be synchronized, too. Go to Menu->System ->Synchronize system files to do so.
All changes of the system service are successfully implemented and transferred to all systems.
Document Storage#
Apart from document storage in a file system, imperia supports different SQL databases (RDBMS):
- Oracle 8i (or higher)
- MS-SQL (2005 version or higher)
- PostgreSQL 8.2 (or higher)
- MySQL (from 5.X version)
Other databases as Informix or SyBase may be used after enquiry. The necessary changes to the settings of a document storage can be done for a fee.
Prerequisites
For the next chapter, we assume that both the installation of the RDBMS server and the client have already been successfully completed.
Differences and Restrictions to the File System#
Analytics View
The feature Analytics View works at the moment only with File65.
Please note
- In order to use Analytics View you have to activiate the Hermes plug-in "Analyzer" in the Hermes-config.
- This plug-in triggers the specific Analyzer, e.g. the Analyzer Piwik.pm that you will find in
site/modules/core/Dynamic/Analyzer/Piwik.pm(reads out the data from Piwik). - Please ensure that you have entered a start date for the first import. This is written in the config under
data_start. - In the file Piwik.pm you will also find a configuration example.
1. Configura Analytics View
- Configure the access to your Web Analyses Tool in the file
site/config/analyzers.conf(you will find an example with comments undersite/config/analyzers.conf.sample). - For each webpage you want to import the Analytics View, create the a section
<site>. You will find all configuration variables described underperldoc Dynamic::Analyzer::Piwikandperldoc Dynamic::URIMapper::Default.
2. Add Analytics View to the Menu
- Add the menu item "Analytics View" via the Menu Configuration.
- Set the access rights for the Controller:
document/performanceview.
Prerequisites for the configuration of the RDBMS document storage#
The prerequisite for the configuration of the RDBMS document storage in a data base is the installation of the following modules that are not part of the standard perl distribution:
-
DBI: The DBI is the standard database interface module for Perl. It defines a set of methods, variables and conventions that provide a consistent database interface independent of the actual database being used
-
DBD::: Represents the specific database driver. That means, another specific database driver is required - depending on the database to be used.
(Source: http://dbi.perl.org/).
Please note
- For many Linux distributions, you can install those perl modules via the package management.
- For Windows system you can install the perl environment 'Strawberry-Perl' that already includes the above mentioned drivers. Alternatively, you can download the modules via CPAN and compile it by yourself.
Configuration of the RDBMS document storage#
After installation, the document storage is set to the File65 plug-in. This may be changed from Menu-> System->Document Storage. The different types of document storage are realized by different plug-ins.
The following plugins are available:
-
File65
-
MySQL
-
PostgreSQL
-
ODBC_MSSQL
-
Oracle
In the following you will find the documentation of how to change the plug-in, e.g. to MySQL:
Please note
The following parameters are permanently written in the file /site/config/repositories/default.conf
-
Open the page PLUG-INS from Menu->System->Document Storage
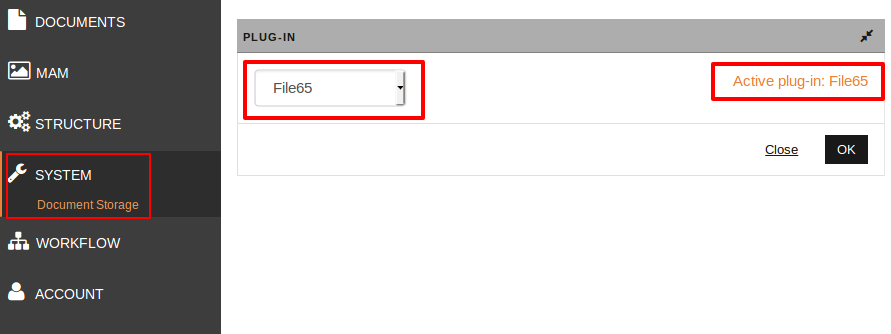
- on the left side you will find the drop down menu with available plug-ins.
- on the right side the current plug-in is displayed.
-
Choose the desired plug-in from the drop down menu.The page will change to the corresponding configuration dialog (in the following example the plug-in "MySCL" was chosen):
 In this dialog you have following options:
- Database Name (required):Name of the database. The database must be created manually.
- Database User (required):Name of the user who is allowed to use the database. This user must be created manually and have the appropriate permissions to the specified in “Database Name” database.
- Password for Database User (required):Password for the database user.
- Database Hostname (required, if no DBI connect string is defined):Name of the host on which the database is installed. If necessary, the corresponding domain must also be filled.
- Database Server Port: Specify this port only if it is different from the default port of the different RDBMSs.
- Maximum size for type ‘TEXT’: Maximum possible input into a column of ANSI SQL type "TEXT" or VARCHAR for MSSQL server.
- DBI Tracing Level:This is the degree of the information content of the DBI trace. The higher the number entered here, the more information stored in the trace log file. The default setting should be
0(no trace). For the development of new database plug-ins, we recommend3, because settings1and2do not work correctly due to an internal problem of the DBI module. - DBI Tracing Filename: These are the absolute path to and the filename of the trace log file.
- LongTruncOk: Should not be set, as in a case of an error, very long strings are displayed without showing the actual error message.
- LongReadLen: This is the maximum length of a string, which can be read. Default value is 2 million.
- Max. number of executed statements before re-connect:This item specifies the maximum number of SQL statements before the connection to the database is closed.
- Other fields: With the help of the empty inputs at the end, you may set your own parameters.
-
To save the changes use the OK button and the Close button to exit without saving.By clicking OK, the warning page will be then displayed, containing important instructions for the configuration of the plug-in.
Important
Please read the instructions carefully in order to complete the configuration.
 4. Click OK in order to close the warning dialog.
Informations on other plug-ins:
- PostgreSQL: The PostgreSQL plug-in provides the interface to the PostgreSQL database. Prerequisite is the version 8.x (and higher) for imperia.
- ODBC_MSSQL: The ODBC_MSSQL plug-in provides the interface to the MSSQL database via ODBC.
- Oracle: The Oracle plug-in provides the interface to the Oracle database.
Controller Permissions#
Permissions management in imperia is based on controller permissions. By that, you also define group access rights.
For more information on controller, read the chapter Model-View-Controller.
To open controller permissions:
To access the Permissions dialog go to System -> Permissions. The site PERMISSIONS opens, see following figure:
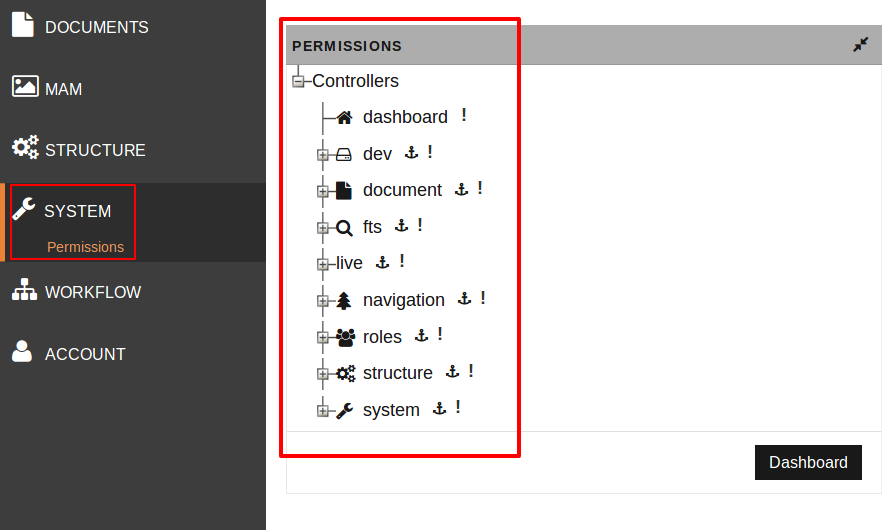 There you find the controllers sorted in a tree structure.
Every controller is displayed with different (or no) icons that represent different permission levels:
There you find the controllers sorted in a tree structure.
Every controller is displayed with different (or no) icons that represent different permission levels:
- : All permissions are taken over from the parent controller.
- : Allow everybody logged in
- No Icon: No configurition of the permissions. That means, the access is forbidden.
Changing the controller permissions#
To change the permissions for a given controller, proceed as follows:
Click on the name of the desired controller (e.g. “dashboard”).
The following dialog opens beneath the tree structure:
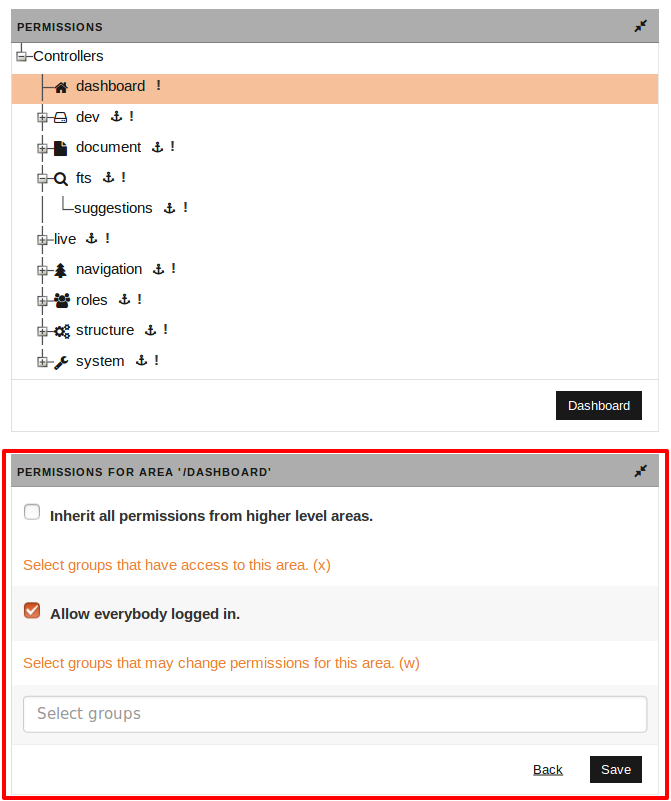
There, you have the following options:
- Inherit all permissions from higher level areas
- if you select this checkbox, the controller will inherit its permissions from the higher level controller (also for further changes).
- this selection will appear with an in the tree structure. This icon is a link, equivalent to the No fallback permissions set cehckbox
- a special case is the root controller, that cannot inherit any permissions. Instead, you will find the checkbox No fallback permissions set, which means that the controller's permissions cannot be inherited.
- Edit inherited controller
- The permissions of the inherited controller can be set independently from the parent controller, also when the checkbox Inherit all permissions from higher level areas is activated, see following figure
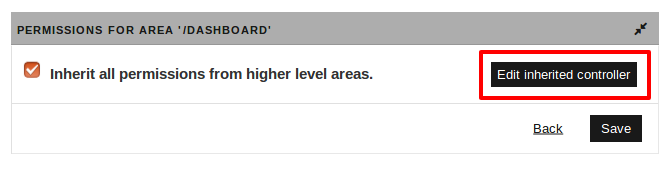
- There, you can change the fallback permissions for the selected controller, i.e. permissions additionally to the ones of the parent controller. To do so, click the button Edit inherited controller in order to edit the access rights. Following page will open:
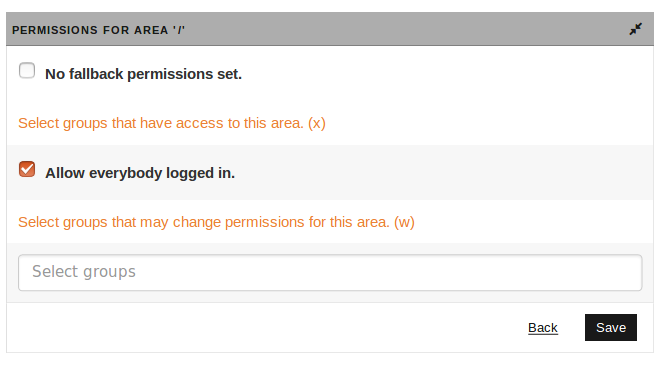
- No fallback permission set. (activited per default): If you deactivate this checkbox, you can change the access rights of the selected controller.
- Additionally, following options appear:
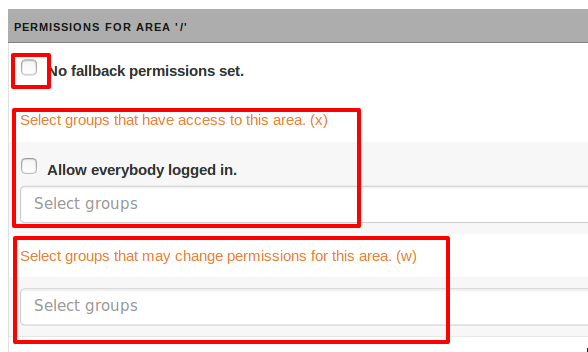
- "Select groups that have access to this area. (x)": You can either Allow everybody logged in or only certain groups to have access to the selected controller.
- "Select groups that may change permissions for this area (w)": Choose certain groups who are allowed to edit the controller's permission.
- Click Save to save your changes and to finish the configuration. These fallback permission will be marked by an in the tree structure, which also opens this configuration directly.
- The permissions of the inherited controller can be set independently from the parent controller, also when the checkbox Inherit all permissions from higher level areas is activated, see following figure
Permissions tree (Controller tree)
The labels of the nodes correspond to URIs. The URIs start after the leading /imp or after the defined in the system configuration variable DYNAMIC_URI_PREFIX prefix. All this paths correspond to a Perl module (a controller) in the file system. The mapping is as follows:
-
The base directory for all controllers is the
site/modules/core/Imperia/Controllerdirectory. The first character of each part of a controller's path is converted to uppercase, underscores are removed and the subsequent character is capitalized. For example, the path/document/foo_baris converted to/Document/FooBar. This represents the part of the path, valid for all files, relevant to a controller. -
Files associated with the permissions tree
/System/Permissions, correspond to predefined rules inmodules/core/Imperia/Controller/System/Permissions.*.The following files can be found in the permissions tree for each controller:Permissions.pm- the Perl module with the controller's code.Permissions.icon- an icon identifier (icons can be found in the/imperia/images/iconsdirectory).Permissions.docref- an identifier for the documentation, located under/imperia/documentation/imperia.Permissons.description- a short description of the controller.Permissions.acl- the Access-Control-List (ACL) for the controller.
-
If there is no Perl module, but a directory (e.g.
/document/media) as a node in the permissions tree, that means that files can be further added to this directory.
ACL of an Controller
The Access-Control-List (ACL) of a controller (or site area, etc.) can be accessed by clicking on the name in the permissions tree.
- The most important privilege is the right to execute a controller, simply called access.
- Write permissions allow you to edit permissions for this node in the tree.
- Read permissions are not safety related, they are relevant for the visibility of a node in the tree. The system enforces read access to everyone with write privileges.
Unlike other trees in imperia (especially the category tree), the permissions tree uses “true” inheritance for its privileges system. If a node has a parent node in the tree, its permissions can simply be inherited by selecting the appropriate checkbox. “True” inheritance because this relationship is permanent. In the category tree, for example, permissions of a parent category can be “inherited”, however subsequent permissions changes to the parent category are not adopted by the child node. The internal “inheritance” is achieved by deleting the ACL file associated with the controller.
Another new feature of the permissions tree are the so-called “free rides”. You can allow access to certain areas of the system for each logged in user via the appropriate checkboxes. Although it is theoretically possible, the user interface denies public “write” access to the permissions section. Internally, public access is implemented through the invalid “*” role id.
It is interesting that the main class of all controllers in imperia (Imperia::Controller) does not carry out authentication or authorization. Therefore, all imperia controllers should be derived from the Imperia::Lib::Controller class, which in turn inherits Imperia::Controller. Imperia::Lib::Controller implements the _auto() method, which is always called before the go() or dispatch() methods. If the _auto() method returns undef the request processing is stopped. This method also carries out the authentication and authorization:
- First, a user is authenticated - the password or another configured token is checked though the cookie.
- Then, the user's authorization is checked to make sure he or she has access permissions to the requested field.
-
The authorization request is carried out by the
_allowed()method, implemented inImperia::Controller. This method is a class method, so that it is not necessary to instantiate the controller in order to check the authorization. There are three optional arguments that can be passed to the_allowed()method:- The default path of the controller (e.g.
/system/permissions) - The access type. By default, it is set to “X”, for execution, in case no write (“W”) or read (“V”) permissions are required.
- The user ID, which generally corresponds to the current user. Strictly speaking, this argument is a role ID, either a (negative) group ID or a (positive) user ID.
- The default path of the controller (e.g.
General Settings#
To access the General Settings dialog go to Menu -> System -> General Settings.
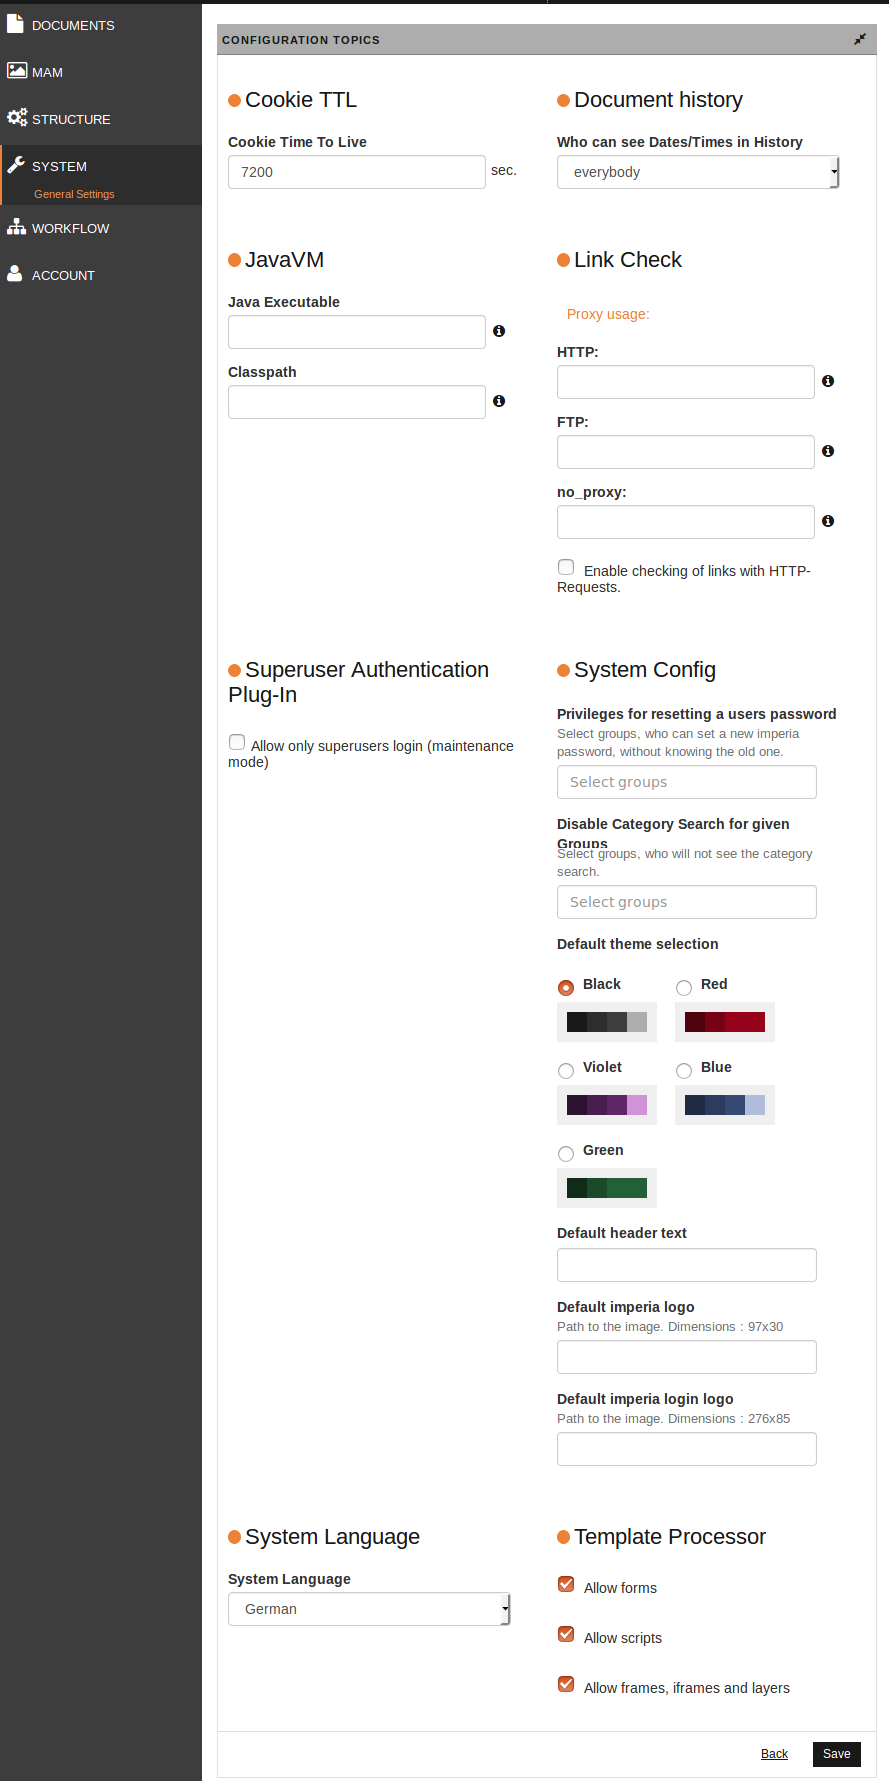
In the following all the different options will be explained to you.
To save the changes made to the sections use the Save button on the bottom. To exit without saving use Back.
Cookie TTL#
Enter the validity of the cookie in seconds. The default value is 7200 seconds. If users are idle for a period that is longer than this setting, they have to login to the system again.
Document History#
In this section you can define the display settings of the document history. You can define:
Who can see Dates/Times in History
Decide who can view the date and time in the document history. The choices are:
-
everybody - all groups.
-
nobody - the display of date and time is turned off generally.
-
superuser - only users who have access to the superuser group can see the date and time.
JavaVM#
The Java virtual machine is configured in this section. The following settings are available:
-
Java Executable: In this field, enter the path to the Java interpreter or the Java wrapper script (e.g.
/usr/lib/java/bin/java). -
Classpath: In this field, enter the classpath settings for the Java virtual machine on imperia's server. Leave this field blank if unsure.
Link Check#
This section configures the link check for external links.
- Activate the checkbox “Enable checking of links with HTTP-Requests” to activate the function.
- If your network uses a proxy server, make the appropriate adjustments in the various input fields.
Superuser Authentication Plug-in#
Check the box to put the system into maintenance mode with superuser access. Read also Maintenance Mode with Superuser Access.
System Config#
-
Privileges for resetting a user password: Select the groups that are allowed to change the user password.
Please note
Per default, everybody can change the password without knowing the old one.
Read also the corresponding System Configuration Variable
-
Disable Category Search for given groups: Select groups who aren't allowed to use the category search.
Wichtig
The groups then won't be able to use neither the Document Browser nor the MAM.
-
Default theme selection: Here you can set the theme for imperia.
Please note
Each user can set the theme individually under Look and Feel.
As the administrator you can set the theme for the entire systems, if the user didn't set an individually one.
-
Default header text: In diesem Abschnitt wird ein Header-Text eingefügt.
Please note
Each user can set additional text individually under Look and Feel.
-
Default imperia logo: Here you can set the logo for the login-screen.
-
Standard imperia login logo: Here you can set the logo for user interface in the upper left corner in imperia.
System Language#
This section sets the system language and the system charset.
The default language is English. Use the drop down menu to select a different language.
Regardless of the language, all data is stored and delivered in UTF-8. This applies to any screen output as well as all data entered by users.
Please note
Please note that when changing the system language, some parts of the UI may still be in English.
Template Processor#
By default scripts, layers, frames, iframes and forms in PREVIEW and EDIT modes are not supported. This behavior can be changed in this section. Select the corresponding checkboxes.For more information, read System configuration variable.
Login Message#
As the imperia system admin you have the possibility to create messages on the login screen that are displayed for all users.This can be useful for delivering organizational news, e.g. on planned system breakdowns, or to describes procedures, e.g. how to reset passwords.
Create new Login Message
- Open System -> Login Message. The following site opens:
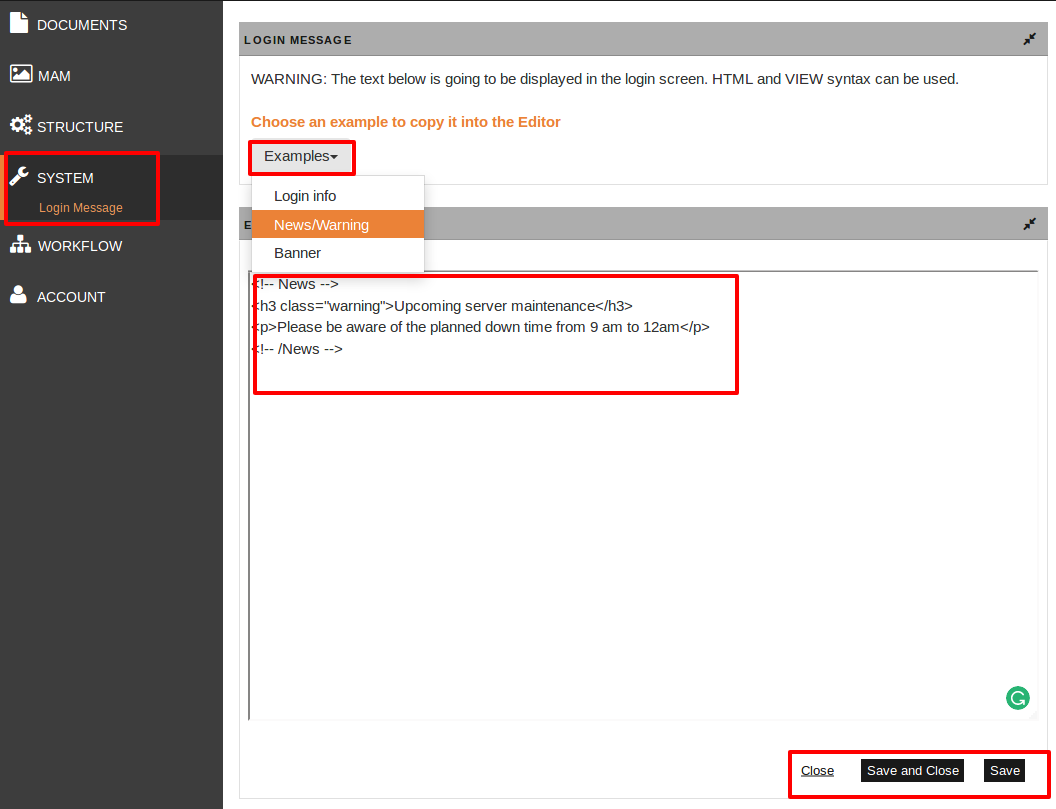
- You can choose a template for your template, see graphic.
- Edit or enter the message in the text editor.
- Save your changes.
As soon as you save the message, it will be displayed to all users when they login into imperia*, for example:

Delete Login Message
- Open again System -> Login Message.
- Delete the entered content in the editor. (simply by Del or Backspace).
- Save the changes.
The Login Message will be deleted automatically on the login screen.
Look and Feel#
As a user you can also individually set the look and feel of your imperia. For more information read the chapter Look and feel of the user manual.
System Configuration#
This chapter shows you how you can edit configuration files directly via the user interface.
Also, following important system configuration files will be introduced:e Konfiguration des Systems wichtig sind:
System Configuration via the User Interface#
imperia offers a user interface to change all configuration files. In this way it is not necessary to access the file system to change system settings that are not directly accessible from the user interface.
Prerequisite
This feature is only available to users with superuser privileges.
1. Configuration of the interface
Important
Create the file site/config/config.conf, unless it is not done yet. This file is used to control which files can be edited through the interface. You will find an example under site/config/config.conf.sample.
By default, all configuration files are editable. This may be limited by editing the config.conf file. This file contains a list of configuration files that can be edited via the user interface:
- To remove a file from this list, comment it with
#or delete it completely. - Conversely, to make a file editable, add it to the list or remove the comment characters in front of it.These are then indicated by .
- To control, which files can only be read through the interface, add a
*in front of the desired configuration file. These are then indicated by .
2. Editing the configuration files
- To access the files, go to Menu-> System->Configuration. You get an overview of the editable configuration files.
-
Click the desired file to edit it, unless it has the icon . The file will be shown in the internal editor (the same that is used for flex/dynamic modules and code-includes):
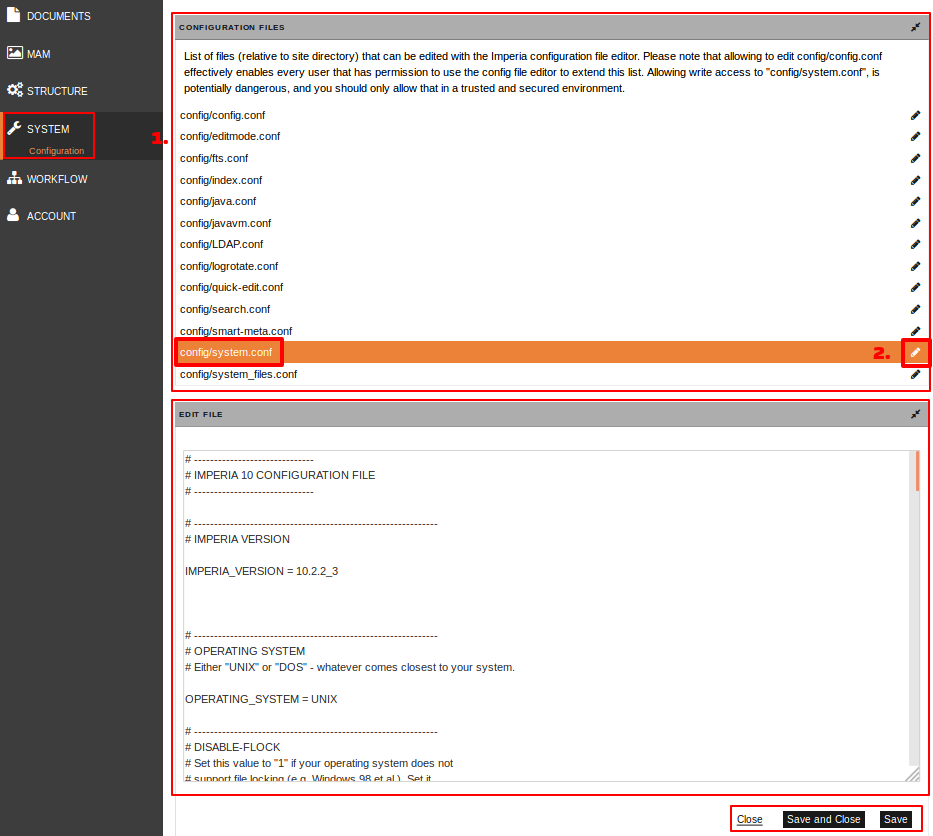
Please consider
- Only if you have edit rights, the file will be opened in the editor.
- If you only have read rights, only the content of the file will be shown when clicking on it; editing is not possible.
- In case you dont have any read or write rights, the files won't be opened at all.
-
Save the changes.
Dynamic Modules#
Dynamic modules that are configured in the dynamic.conf file are described in detail in the chapter Dynamic Modules in the programming documentation.
The internal editor can also be used to edit the dynamic.conf file, located under site/config. Proceed as follows:
- Go to Menu->System ->Dynamic Modules.
The internal editor opens.
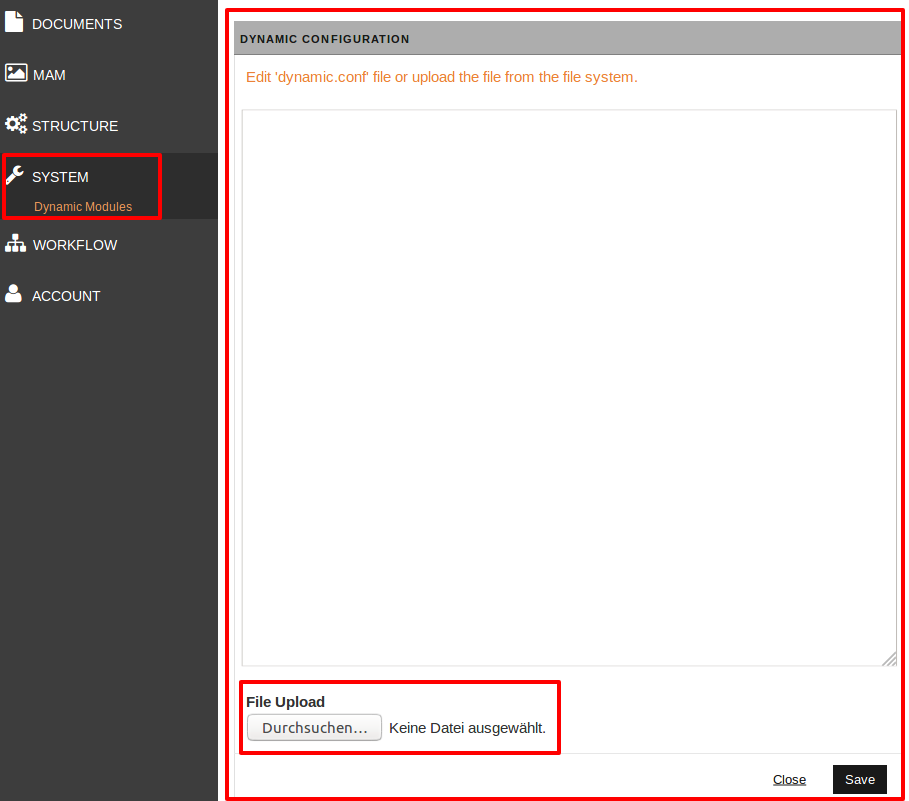
- You can insert or upload the code in the text box. If you upload a file, it is saved then as
dynamic.confand the existing file is overwritten. - Save the changes by clicking on the Save button on the bottom.
Link Consistency Check Configuration#
Tip
You can find a sample configuration in site/config/linkmanager.conf.sample.
1. Location of the linkmanager
The link consistency check configuration is done in the linkmanager.conf file, located in the site/config directory.
-
Links on multiple systems can be checked.
-
The settings are always done within a block enclosed in tags:
<SERVER myServer> [Settings for the system] </SERVER> -
Replace the field
myServer, enter a unique name within the configuration file for that system. -
Settings are always listed in the following scheme:
Directive = "value"
2. Setting of the linkmanager
The following is a description of the individual directives for the configuration:
-
SERVERNAMEEnter a name for the system. This name is displayed in the title bar of the report with the results of the link consistency check for that particular system.
SERVERNAME = "Livesystem" -
SERVER_URLEnter the URL of the system on which the LCC is to perform HTTP-requests to check the links.
`SERVER_URL = "http://www.myserver.com"` -
SETTYPE_HTMLThis directive contains a list of files that are to be treated as HTML files. Enter the appropriate file extensions as a regular expression. The alternative file extensions are separated by the pipe character ("|").
SETTYPE_HTML = "\..?htm.?|\..?php" -
SETTYPE_CSSThis directive contains a list of files that are to be treated as cascading style sheet files. Enter the appropriate file extensions as a regular expression. The alternative file extensions are separated by the pipe character ("|").
SETTYPE_CSS = "\.css/i" -
EXCLUDE_FILEEnter a regular expression for files that should not be controlled by the link consistency check. Files whose names match the pattern will be skipped.
EXCLUDE_FILE = "^print" -
EXCLUDE_DIREnter a regular expression for directories that should not be checked by the link consistency check. Directories whose names match the pattern will be skipped.
EXCLUDE_DIR = "test" -
EXCLUDE_FULL_DIRThis directive allows you to specify full paths to be left out of the link consistency check. Only paths that match the entered value will be skipped.
EXCLUDE_FULL_DIR = "/site" -
AUTHBASIC_loginWhen you have secured a target system with basic authentication, the authentication data has to be entered in the link consistency check configuration. This data is used by the LCC to check the access links to a certain system. If the authentication data is not entered, all the references will be classified as defective in the report. The “401 Authorization required” error message will be displayed in the HTTP errors column.
AUTHBASIC_login = "login" -
AUTHBASIC_passwordEnter the login password for protected areas of the system to be tested.
AUTHBASIC_password = "password" -
ROOT_PAGESThis directive defines the starting pages for the LCC. A link consistency check is done on all the references of the pages, entered here. This directive corresponds to “Referenced objects” in the report.List several pages in a space separated list:
ROOT_PAGES = "/index.html.de /index.html.en" -
HTTP_PROXYIf access to the system is done via a proxy server, the URL must be entered in this directive.
HTTP_PROXY = "http://proxy:3128"Important
The LCC evaluates the following directives only if an HTTP proxy is defined.
-
HTTPS_PROXYSets the proxy for encrypted data transfer with SSL.
HTTPS_PROXY = "http://proxy:3128" -
FTP_PROXYWith this directive the proxy for the FTP protocol is set up.
FTP_PROXY = "http://proxy:3128" -
NO_PROXYThe URLs to be accessed directly are specified here.
NO_PROXY = "http://www.mynoproxy.de"
-
Synchronize Files#
This feature allows you to transfer modified system files to various target systems. Example: This is necessary if system services (SiteActives) that relate to the Hermes daemon on a target system were amended. Those and other configuration files need to be transferred to the various target systems.
To make a transfer, proceed as follows:
1. Prerequisites
- Create the file
/site/config/system_files.conf. - Put in it the paths to the files that have to be copied, starting with the SITE directory. By default, there is also a
/config/imperia.schedulefile, in which the system services are stored.
2. Sychronize Files
- Go to Menu->System->Synchronize System Files. It opens the Transmit System Files dialog.
- Select the target systems on which to transfer the modified system files from the Configured target systems list.
- Click Copy.
The transfer is carried out and a log is diplayed.
Desktop Views#
As an administrator, you can also define system-wide desktop views and make them available for all users or only certain groups.
You will find a detailed description on how to create desktop views in the user manual.
Please note
- The changes you make on Perl modules will be saved on the system update securely. The system configuration variables are to be found in the Configuration Glossary.
- All user-defined desktop views can also be deleted. The system side delivered Desktop views cannot be deleted.
In order to make new desktop views available, proceed as follows
- Open Document->Desktop.In the upper right corner you will find the drop down menu with all system- and user-defined desktop views as well as the button Manage views:
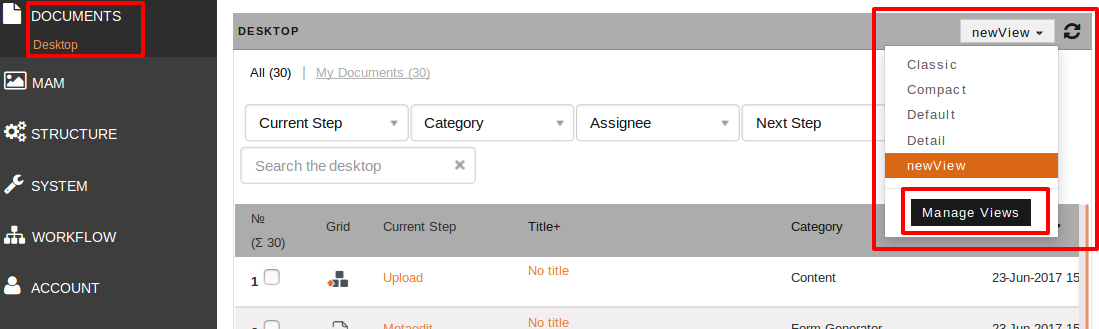
- Click the button Manage Views. The page DESKTOP VIEW MANAGER opens. There you will find again all system- and user-defined desktop views and the buttons:
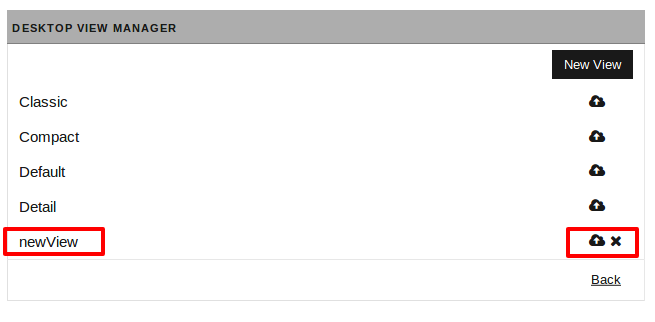
- In order to make a view available, click at the end of the line of the desired view. A new page opens:
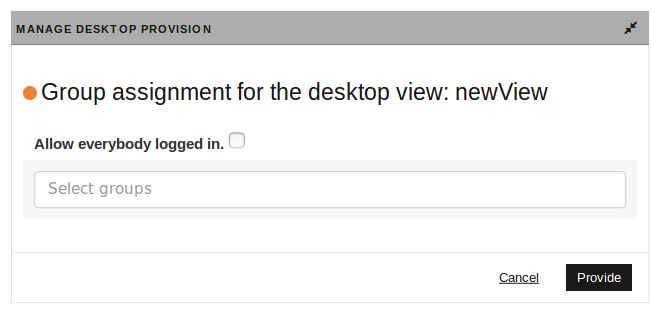
- There you can either allow everybody logged in to use this view or you can select certain groups to provide the view to.
- Click Provide to make the view available.
The desktop view is now available to all assigned groups.
Tracking Changes#
The administrative settings for tracking changes are limited to the determination of the colors with which the changes are outlined. These colors can be defined in a separate style sheet.
The following changes can be displayed:
-
added text (default - green and underlined)
-
deleted text (default - red)
-
added tables, table cells, and anchor (default - light green).
-
deleted tables, table cells, and anchor (default - orange).
-
changed images (default - in an orange frame).
-
inserted line breaks (default - text in the new line is shown in gray).
-
references to an IFrame (default - IFrames are represented in an orange frame).
There are two ways to change the colors that are used for the representation of the changes:
Within the template
- by style data,
- by creating meta variables that contain the color values. For more information read Setting Default Colors for Tracking Changes in the programmer manual.
Within the stylesheet
If the default colors for tracking changes are changed in the style sheet, this applies to all documents on the entire production system.
The stylesheet is located in the docroot_of_the_production_sys/imperia/skin/html/css/diff.css file.
The following CSS styles are available:
- imperiaPlusSpan: Determines the appearance of added text.
- imperiaMinusSpan: Determines the appearance of deleted text.
- imperiaPlusSpan table, td, a: Determines the appearance of added tables, table cells, and anchors.
- imperiaMinusSpan table, td, a: Determines the appearance of deleted tables, table cells, and anchors.
- imperiaPlusSpan img iframe: Determines the appearance of added images and iframes.
- imperiaMinusSpan img iframe: Determines the appearance of deleted images and iframes.
- imperiaNewlineChangesSpan: Determines the appearance of wrapped text.
- imperiaImageChanged: Determines the appearance of altered images.
- imperiaIFrameChanged: Determines the appearance of changed IFrames.
Request Logging#
imperia normally logs HTTP requests to the site/logs/access.log file.
Example:
[Fri Sep 14 12:52:19 2012] [1347616339.25099] [UFL@U38AAAEAABx3lhAAAAAE] [info]
Query params: __imperia_node_id: /51000/58585/59497
[Fri Sep 14 12:52:19 2012] [1347616339.25178] [UFL@U38AAAEAABx3lhAAAAAE] [info]
Path uri: /imp/document/info
[Fri Sep 14 12:52:19 2012] [1347616339.25178] [UFL@U38AAAEAABx3lhAAAAAE] [info]
Method: GET
[Fri Sep 14 12:52:19 2012] [1347616339.25632] [UFL@U38AAAEAABx3lhAAAAAE] [info]
Login: john_doe
-
Each log entry consists of the date and time, a high resolution timestamp, a unique identifier for the request and the log level (here: info).
-
The first line gives the request parameters (if any).
-
The second line shows the controller path.
-
The third line gives the type of request (GET or POST).
-
The fourth line gives the login of the user who initiated the request.
You can change the default behavior using system variables. The following system variables are supported:
-
IMPERIA_LOG_TARGET— either “stderr” for standard error (normally the web server error log), or “internal” for the default location, or an absolute path to a custom file. -
IMPERIA_LOG_LEVEL— “none” (alias “error” ) for no request logging, “info” (the default setting), or “debug” for verbose output.
Alternatively, instead of system variables you can set environment variables with the same name.