Categories
With the help of categories, a project is divided into various subjects. The most commonly used partitioning strategy is the differentiation by topics or subjects. Each subject is assigned to a separate category and in turn (sub)categories are created for individual topics. Subcategories can be nested arbitrarily.
The categories can either have only subcategories or subcategories and documents. Categories, containing only subcategories are used to structure the category tree.
Category Manager#
Using the Category Manager
Prerequisites
- The Category Manager is accessable only by groups with the according permission on this module.
- As a user you can change to the group that ownes this permission (provided that you are added to this group), see chapter Change Group or contact the system administrator (Superuser).
To open the Category Manager, proceed as follows:

- The categories are sorted in a tree structure. This tree structure is also used for the archive and when creating new documents. For each scenario it can be defined which branch of the category tree is permanently fold out.
- On the right side, at the end of the line of each category you find the functions for creating, edit, delete categories as well as for editing meta information and permissions.
-
In the upper left corner you find the search field where you can search specific categories:
Important
If you don't possess the appropiate access rights of the category, it will not be shown to you in the search.
- When searching all branches of the category tree, branches will be extended up to the search term.
- Categories of the same level with no found search term won't be shown in the category tree.
- Parent categories are greyed out if the search term is not included.
Editing the properties of a category
A category has different properties that on the one hand are given automaticall,y but on the other hand can also be manually assigned and changed. For a better overview, the properties are divided into three sections (see Create new category):
1. To open and edit the properties, click directly on the category or select at the end of the line of the category.The properties dialog will be opened beneath the category manager; additionally, in the categories' tree the currently selected (sub)category will be displayed with orange frame, see figure beneath Category Manager. 2. There, you can edit the (properties of the) category as desired. In the following section 'Create new category' the options and entry fields will be explained to you.
Create new category#
1. Choose level of category
In the category tree, new categories can be added either as a a) top-level category, i. e. root element, or b) as a subcategory of a parent category.
a) In order to create a new top-level category, click in the upper right corner the button New Top-Level Category as shown in the figure beneath Category Manager. b) In order to create a subcategory, go to the desired parent category and click at the end of the category's line. Subcategories are added directly beneath their parent categories.
2. Enter properties of category
After adding the new category, the page CATEGORY will be displayed. There, you find the entry fields and options for the properties of a category.Category properties may also be used in templates. For more information read the chapter Access Category Properties in the programming documentation.
The categories and options are divided into three sections:
-
section Category Information: See Property 'Category Information'.
-
section Edit Permissions: See Property 'Permissions'.
- section Meta File, templates, workflow: See Property 'Meta File, templates, workflow'.
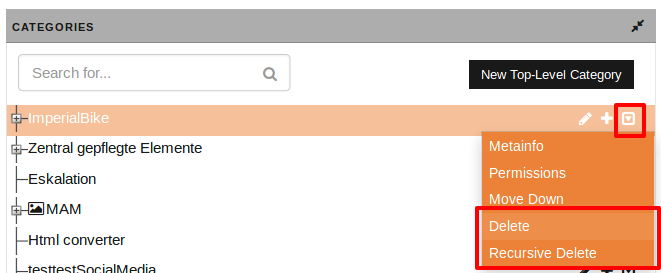
Delete category#
The options 'Delete' and 'Recursive Delete' are to be found at the end of the line of every category:
Delete
Please note
Here, you can only delete empty categories, i.e. with no documents nor subcategories. Deleting filled categories will be prevented by an error message.
- Open the the menu of the desired category.
- Select 'Delete'. The category will be deleted.
Recursive Delete
Warning
With this option, documents and subcategories will also be deleted in this category as well as in the archive and from the target systems!
- In order to delete a category including all content (subcategories/documents/assets), select Recursive Delete. A new dialog will be displayed:
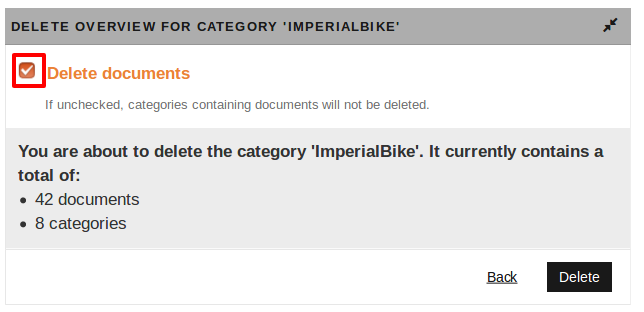
- If the checkbox Delete documents is not selected only categories without documents will be deleted.
- The dialog also gives information about the numbers of the to be deleted documents and subcategories within this category.
- Confirm the deleting by clicking the button Delete or cancel by Back.After confirming the deleting dialog, you will be directed to the result page with an overview of the deleted documents.
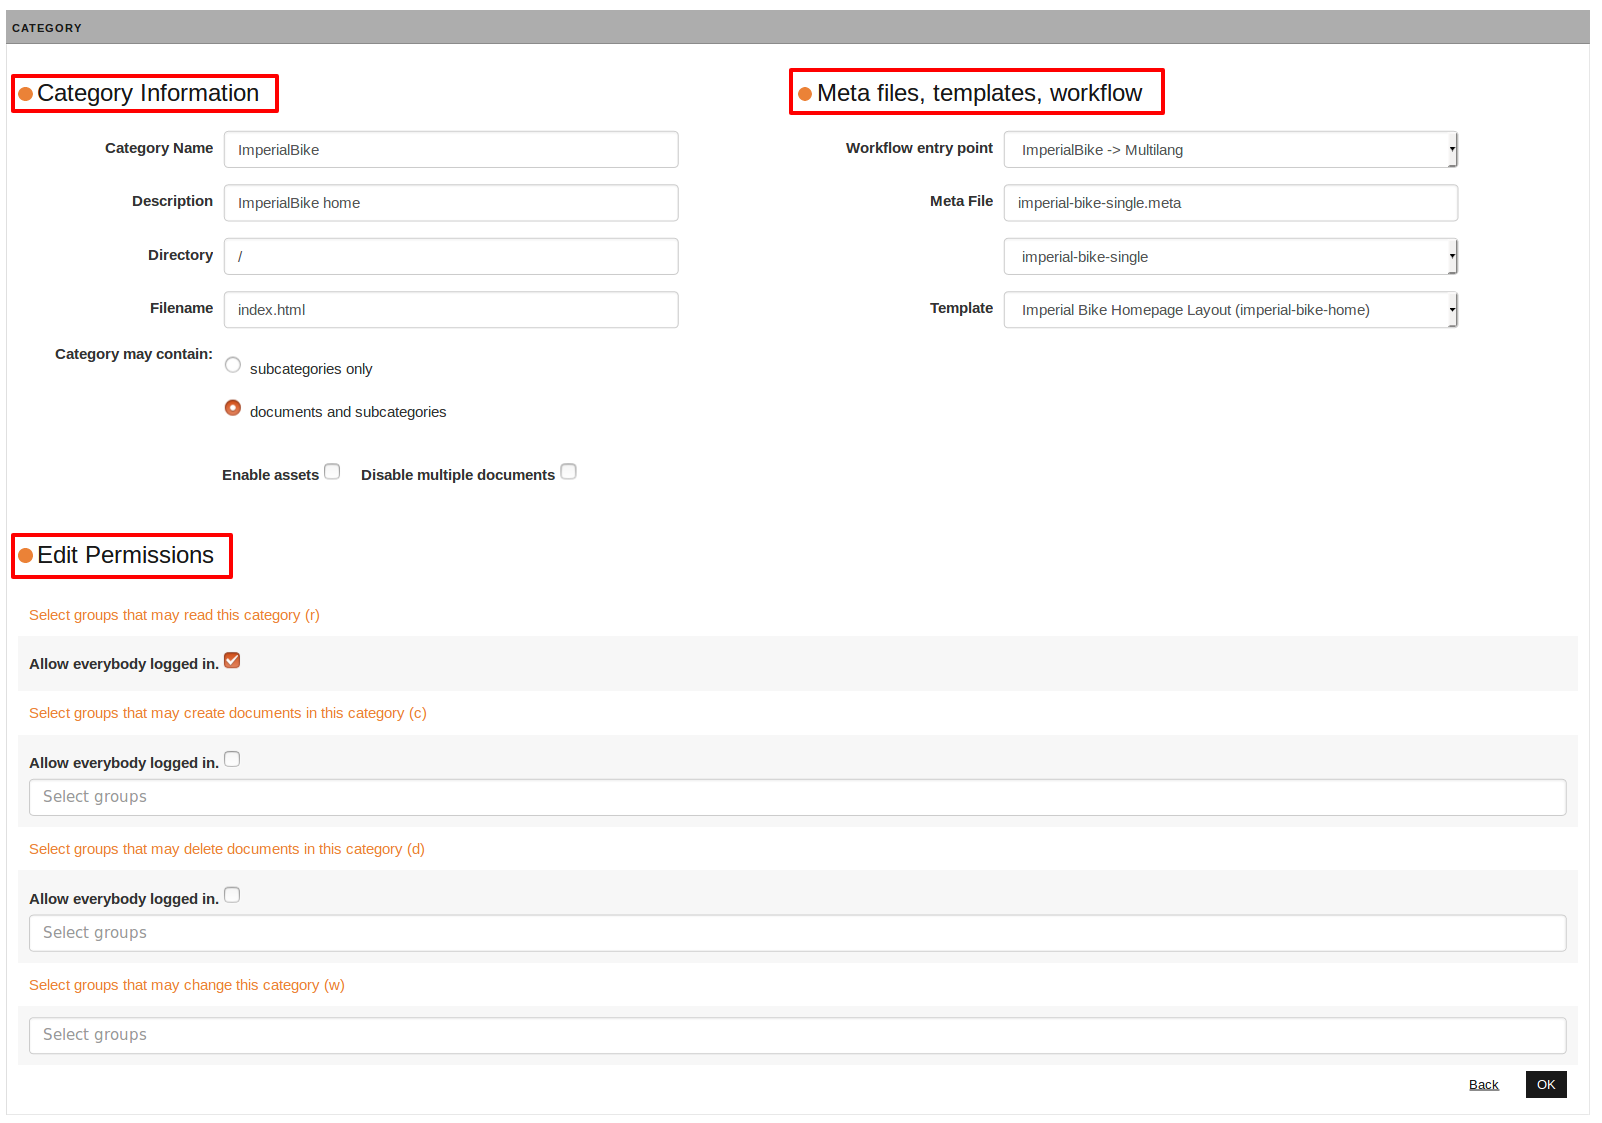
Property 'Category Information'#
Those category information serve as default settings for the documents generated in this category. These information can be changed at any time during a workflow by different plug-ins (e.g. different directory of a document than specified here).Enter the following information in this dialogue of the section:
| entry field / option | description |
|---|---|
| Category Name | Type the name of the category in the Category name field. This name appears in the category tree and for each document in the corresponding column of the Desktop. |
| Description | In the Description field, enter a brief description of the category. |
| Directory | Specify the directory (beneath htdocs) in which all generated documents in this section are to be saved, e.g. /sport/tennis. It is not allowed to use spaces in directory names.This value can be changed while a document goes through a workflow. |
| Filename | Enter the default filename for documents, created in this category, e.g. index.html. This value can be changed while a document goes through a workflow. |
| Meta Information | Click on the Edit link to set additional meta information about a category. This information is valid for all documents in this category, as well as in the subcategories. Already created subcategories do not “inherit” additionally added meta information. See Property 'Metainfo' for more information.Please note:When creating new categories, this link will only be displayed for subcategories, not top-level categories. But when editing a categoy, this link will be displayed for any kind of category. |
| Category may contain: | If the new category serves only to structure a tree, select the option subcategories only. No documents nor assets can be created in such a category.Important: If this option is selected, you won't be able to import any previously created in this category documents. This applies even if documents are to be re-imported from the Archive. The option documents and subcategories allows for both documents and subcategories to be generated within a category (default setting). With this option the created category can contain multiple documents or assets and subcategories. With the following two configurations you can substantiate this selection.Note: Categories need not to contain documents. They also can be used for structuring your project only. Therefore, (top-level) categories might only contain (sub)categories, too.You can change this property-setting anytime. By that, you 'freeze' the category so no more documents can be created there. |
| Enable assets | To create a so called asset category, this option has to be selected. This option is relevant for creating a category in the Media Asset Management, i.e. to enable assets.imperia dinstinguishes betweenn 'document categories' and 'asset categories'. All categories and their tree branches also appear in the Media Asset Management. |
| Disable Multiple Documents | With this option you can reduce the number of documents in the desired category. You are not allowed to create more than one document in this category. That means that an already existing document won't be overwritten, but reimported.Also in the category tree, the category stays grey when creating a new document.Example: A website should only contain one landing page. In this case, the category 'Home' should be enabled to contain only one document. |
Property 'Metainfo'#
In the following, the property Metainfo will be described to you.
This property is to be found:
- in the link Edit in the Category Information of each category or
- in the menu (at the end of the line of each cateogory):
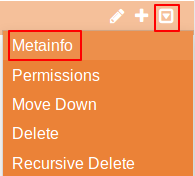
Edit Metainfo#
Please note
The option Metainfo is only available to users with 'write'-permission on the category.
- Open Metainfo.
The page META VIEW opens:
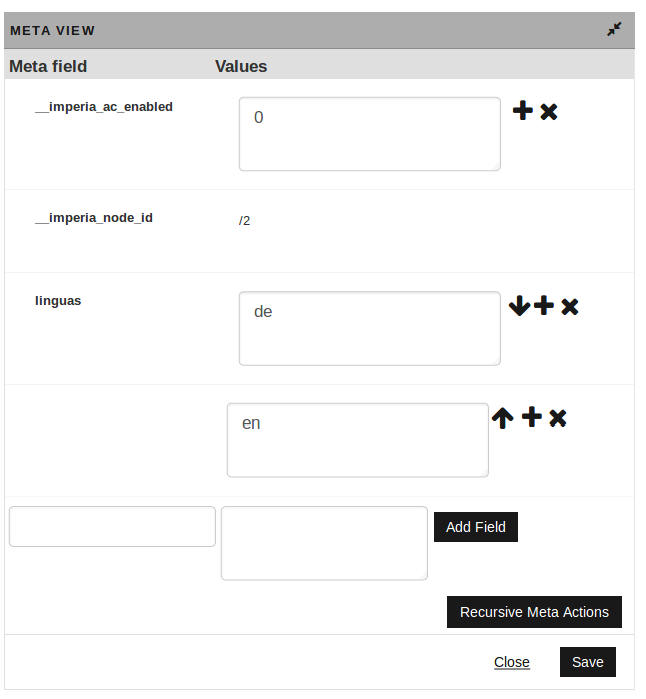
- In order to change a value of an existing meta field, click in the desired field and enter the new value.
-
You can edit existing meta fields with the following buttons:
- : Delete
- / : Move up/down
- : Adds new fields beneath the existing meta fields
-
In order to create new meta information, use the empty entry fields on the bottom of the page. Proceed as follows:
- Enter in the smaller left field the name of the new meta information.
- Enter in the right field the value.
- Select the button Add field.
- If you want to add multiple value as an array, click . A new, empty entry field will be displayed.
Background information#
The categories' metainfo are inherited automatically when creating subcategories. That means, the subcategory contains the same meta information as its parent category.
What is the use of metainfos?
- Instead of entering values in the DESCRIPTION field of the category in order to save e.g. variables for generating the navigation, you can here enter your own, comprehensive variables for the category.
- In this way, you can easily access via Perl: whenever a Nodeinfo-Hash returns or is entered, there is a Meta::Info-Object beneath the
META_INFO-key. The class Category::Category is extended bygetMetaInfo()andsetMetaInfo(). - When you are using the data storage File System and want to read or edit the meta information without imperia, you should consider that in this case, the Meta::Info-Object won't be stored, but the empty Hash-reference (that is not an object).In contrast, in a database the meta information will be stored in the new table
category_meta. - If the meta field
__imperia_category_templatecontains a valid template name, this template will be used for editing. If there is no meta field, the system-conf-variableCATEGORY_TEMPLATEwill be used or the default template.By that, you can restrict the use to only specific meta information. - Another application of the metainfo is to determine available languages for multilingual documents: Therefore, the meta field
linguasis provided (as seen in the second figure 'page META VIEW' in Edit Metainfo) . The meta field stores the desired languages in one array. Each value in this array complies with the ISO 639 language code (de, en, fr, etc.). imperia then builds the language selection for the MetaEdit (in the step 'Edit' of a workflow) according to these values. - Also,
__getAssociatedFiles()is an important variarble: This meta variable suppresses reference searching by the publisher. By addingreturn [] if $meta->getValues('__ifp_skip_associated_files');the checking of references in the document is suppressed. This is useful for large documents as XML documents.
Access to Meta Information#
- The access to meta information takes place as to any category information/field. An additional
[index]reads out the appropiate field of an array. - Alternatively, you can set
META_INFO_in the meta field to distinguish between categoriy fields and meta fields. This is useful when using the same name for category- as well as meta fields (although this is a rare case).
Example:Assumed, in a category 'Test' with the ID "/123/456/789" and directory /test the following metainfo is included:
example   | "example text"
DIRECTORY | "meta-info, not the directory"
list      | "one" | "two" | "three"
In the (document!-)template use:
category: <!--SECTION:NAME:0-->
example(M): <!--SECTION:META_INFO_example:0-->
example: <!--SECTION:example:0-->
DIRECTORY: <!--SECTION:DIRECTORY:0-->
DIRECTORY(M): <!--SECTION:META_INFO_DIRECTORY:0-->
List: <!--SECTION:list[0]:0-->
List: <!--SECTION:list[1]:0-->
List: <!--SECTION:list[2]:0-->
List: <!--SECTION:list:0-->
category-ID: <!--SECTION:__imperia_node_id:0-->
The template processor returns
category: Test
example(M): Ein Beispieltext
example: Ein Beispieltext
DIRECTORY: /test
DIRECTORY(M): meta-info, not the directory
List: one
List: two
List: three
List: one
category-ID: /123/456/789[/en]
Property 'Permissions'#
The access permissions (of a group) to a category can be set in two different ways:
- in the categories' properties in the section 'Edit Permissions' for so-called structure groups,
- with the option 'Permissions' for so-called functional groups.
structure groups:Since not every user should be able to create or edit documents in every category, you can set the access permissions to it.That means, it will be determined for every group which access permissions are granted to the category.Groups that can assign the access permissions of categories to other users are called structure groups.
functional groups: In order to grant different permissions for different groups to different parts of a category, users are assigned to functional groups. In most installations there are four functional groups: trainee, editor, editor-in-chief, administrator. When users select the menu item Create New Document they only see the categories they have access to. Furthermore, it is important that users have “read” permissions for all the upper categories.
Section 'Edit Permissions'#
Please note
If the CATEGORY_QUICK_CONFIG variable is set, this section is not displayed. To edit permissions in this case, use the option 'Permissions'.
In order to edit the permissions to a category for other users (groups), proceed as follows:
- In the category manager/tree structure click the desired category.
The page CATEGORY opens where you find the section 'Edit Permission':
-
The permissions to a category can be assigned in four different levels:
Abbreviation description meaning r read users of this group can see the content of the category c creating documents users of this group can create documents in this category d deleting documents users of this group can delete documents of this category w change category users of this group can change the properties of this group and can create subcategories -
For each level, all or only certain groups can be assigned.
- For every category you can assign the permissions differently. These permissions determine how a user can edit a document in this category.
Please note
The permission to create documents in a given category also entails the permissions to publish these documents.Apart from the create permissions to a category, a user also needs read permissions to the categories of all associated files (usually MAM objects) in order to be able to publish documents.
Option 'Permissions'#
The main difference to the 'Edit Permissions' dialog above is that here, the permissions can be set recursively. That means you can set access permissions for whole branches in the category tree.
Proceed as follows:
- In the menu select Permissions:
 The page MODIFY PERMISSION opens:
 The page is sorted into two sections:
 - In the upper part you can determine if the setting of the permissions are recursive (including subcategories)/is also valid for parent categories/etc.
-
In the second part, you assign the permissions to certain or all groups:
- Either activate the checkbox Allow everybody logged in. or select certain groups in the field Groups.
-
Under Manage Priviliges in the left column mark the desired action :
- Add priviliges (+): This action adds the priviliges (rights) to already existing ones of the selected group.
- Remove priviliges (-): Thereby, marked priviliges will be revoked.
- Set priviliges (=): This action sets the rights of the group exactly to the marked priviliges.
-
In the right column choose the desired priviliges you want to modify. In order to choose multiple rights, simultaniously holding the
Ctrlkey.Important
Not marked priviliges will be revoked from the group.
-
Save your settings by clicking OK.
Property 'Meta File, templates, workflow'#
Determine the meta file, template and workflow to be used in a category.
Please note
These are only default settings that may be overwritten by the template selection during the meta information input.
When adding sub categories, the following information are inherited from the parent category by default.

-
Workflow entry point:
- Select the workflow to be used. As a workflow can have multiple entry points, not only the workflow, but also the entry point is determined.
- Each document created in a category is assigned a copy of the set here workflow and it passes through all workflow steps. Documents that are within a workflow are not affected if this workflow is changed.
- All the entry points of all available workflows can be found in the drop down menu Workflow entry point in the form:
workflow name -> entry point name
-
Meta files:All meta files, located in
/site/metafiles, are listed in the Meta File drop down list.Please note
Even if there is no MetaEdit step in the selected workflow, a meta file should be specified.
-
Templates:
- All templates, located in
/site/templates, are listed in the Template drop down menu. The list contains the name and description of the available templates.
- All templates, located in