Working with the archive
All changes that a user has made to a document are stored in the archive. This makes it possible to restore any processing status of a document that a user has saved on the way through the workflow.
Each document version has a timestamp and can be restored at any time by an authorized user. How to track changes is described under Tracking changes.
The structure of the archive corresponds to the category structure and is also displayed as a tree.Media assets are archived as well and can be accessed via this structure or directly in the MAM.
When a user saves a modified document, this document version is stored in the respective document branch of the archive. If this document is edited ten times, ten different versions will appear in the archive, all of which can be restored.
You can import documents and document versions from the archive back into the workflow, or delete them. If a document branch is selected for import, then the last, resp. the published version, will be imported automatically.
When you delete an entire document, all saved versions of this document are deleted as well.
Warning
This operation cannot be undone.
Layout and functioning of the archive#
-
Open the archive via Menu -> Documents -> Archive.
-
Alternatively, click on the desired category in the Document Browser and execute File -> Archive in the menu bar. You will get directly to the corresponding document or to the category in the archive.
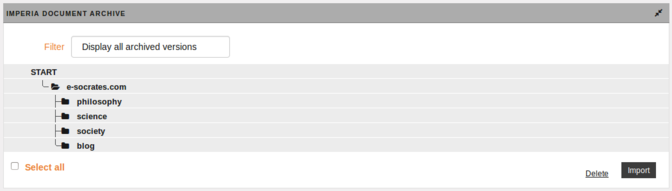
In the upper area, you can restrict the display of the archive versions using the Filter option:
-
Display all archived versions If this setting is selected, all document versions, including the published ones, are displayed. For workflows with multiple steps and documents with a longer lifespan there could be a lot of versions. Accordingly, it can take a long time for the browser to completely build the category tree.
-
Display finished archived versions Choose this setting if you want to see the versions of a document that have completed the workflow. This setting is recommended for documents with large-scale workflows and/or longer lifespan.
The category tree is displayed starting from the root category. The individual categories are displayed in rows with a gray background color. (Sub-)categories or contained documents can be opened by clicking .
Note
In order for the archive page to be set up as quickly as possible, the archive browser always displays only the content of the category you are currently in, as well as the nodes or categories that connect them to higher levels of the category tree.Click on START to display all the main categories again.
Documents are also displayed in rows.
- Click on a document entry to view all its archived versions.
- To display the document in the document preview, click on Preview in the submenu or click on a specific version of the document.
- To select a specific document or version, click the checkbox in front of the corresponding name. Then optionally perform one of the actions described below.
The following Actions are available for each document version:
-
Importing and editing in workflow
 : For more information see Restoring from the archive.
 -
: A click on this symbol opens a submenu with further functions:
- History: Use this option to open the document history of the respective document. Note, that the history is write-protected.
- Preview: If you are at the level of a document entry, the preview displays the most recently finished version of this document. Click on the name of a document version to view it in the preview.
- Examine differences: You can use this option to display changes between two or more document versions. For more information see Tracking changes.
-
Delete: For more information, see the sections Deleting from the archive and Restoring from the archive.
Restoring from the archive#
All changes made to a document by a user are saved in the archive. Each document version that has left the workflow, gets a (finished) status in the archive. If the version is on a target system a shield icon appears next to it.
It is possible to re-import every version of a document.If a document branch is selected for import, the most recent or published version is automatically imported.
Warning
The imported documents are set back to the beginning of the workflow intended for them and must pass through the workflow before they can be published again. Use this setting with care.
1. Choose document/version
- To import a document, i.e. the last finished version of this document, click on next to the document entry.
- To import a document version, click on in the row of the desired version.
- To import multiple documents/versions simultaneously, select the checkboxes in front of the documents/versions. Then click on the Import button.
-
To import all documents/versions simultaneously, select the Select all checkbox. Then click on the Import button.
Note
With the Select All option, a large number of documents may end up on the desktops of all users.
2. Import document/version
- Before you successfully import the document/version, you are taken to the document history where you can make an optional entry and send it to other users by e-mail.
- Click on OK to proceed to the next step.A status report is displayed.
- Confirm the import with OK.
3. Edit document/version in the workflow
- If only one document is re-imported, you are directly taken to the first workflow step and can start editing the document immediately.
- If more than one document is reimported, there is an Edit button next to each entry in the status report. Select the desired document for editing and click Edit. You reach the first workflow step.
Deleting from the archive#
Warning
- Documents that have been deleted from the archive are irretrievably lost. As soon as you delete a document from the archive, all versions of this document are also deleted.
- In contrast to previous versions of imperia, since version 9 it is no longer possible to leave documents on the target system which do not have a version on the development system.
- If you want to delete one or more documents permamently from the archive, activate the corresponding checkboxes before the respective document/version or alternatively select the checkbox Select all and click on Delete. A status report will be displayed
- Confirm the deletion with OK or return to the archive browser.
Tracking changes#
imperia allows you to track changes that have been made to a document during its existence. To do this, you can compare two different versions of a document. Newly added, changed or deleted texts or images are highlighted in color. Modified images are displayed with a colored frame and a link that opens another window in which both the old and the new image are displayed.
The colors used to display the changes can be defined system-wide or via the template used.
Changes to a document can be tracked from the archive, from a separate column on the desktop, or from the Approval plug-in menu.
Tracking changes from the archive#
To access the tracking changes feature, proceed as follows:
1. Open dialog Differences
- Open the Menu -> Documents -> Archive The Archive will open.
- Click on at the end of the row of the desired document. The dropdown menu appears.
-
Select the menu item Show changes.
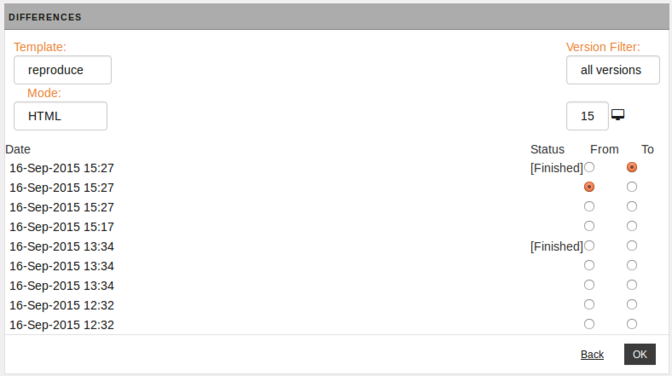
- All existing versions of the corresponding document are displayed in a list. The one with the Date of the last modification is displayed on the left side, the Status of the document is displayed on the right side.
- Optionally restrict the list with the Version Filter or the number of versions to display per page.
2. Select versions
- In the Template field in the upper left corner, choose between the template with which the document was created and a tabular view.The tabular view allows you to also see changes in meta variables which have no visual representation in a document (e.g. the meta variable
directory). - In the Mode field, specify how you want the changes to be displayed (HTML/source text)
- Use the radio buttons in the From and To columns to select the versions you want to compare.
- Click the OK button to see the changes . The changes may be displayed as follows:
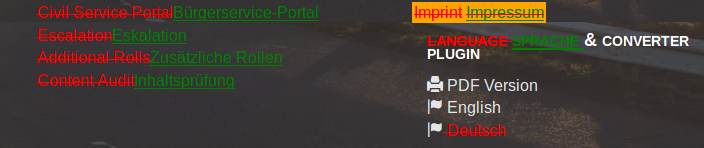 Changes between the selected versions are highlighted in color: Newly added content is green and underlined, deleted content is red and crossed out.
However, these colors and text properties can be changed using a special stylesheet or the template.
Changes between the selected versions are highlighted in color: Newly added content is green and underlined, deleted content is red and crossed out.
However, these colors and text properties can be changed using a special stylesheet or the template.
3. Open slideshow with changes
If you want to start a slideshow of all filtered versions, use  .In addition to the dialog just described for displaying the differences in the documents, a dialog for operating the slideshow is opened:
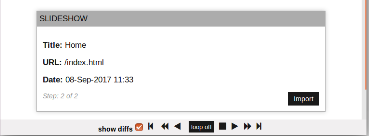
- To display the changes, click show diffs.
- Use the familiar controls to start, fast forward, rewind, pause, or stop the animation.
- Click on Import to import the old versions again. Confirm the definite import in the dialog that appears.
Tracking changes from the Desktop#
If a document is still within the workflow, you can see from the desktop which changes have been made to this document in the individual workflow steps.
Any previous version can be compared with the current version or another previous version. Differences in these versions are displayed in different colors, as described above.
- To display the changes to a document from the desktop, you must first add the Differences column to the desktop view.
- Open Menu -> Desktop.
- In the Differences column of the respective document, click the link of the same name. Proceed as described in Tracking changes from the archive.
Displaying changes during approval#
Note
A preview with tracked changes is only available for re-imported documents.
Changes to a document version that are to be approved can be displayed in the Approved workflow step in comparison to the last completed version.
- Click Differences to display the changes. (The Preview button only opens a preview of the corresponding document without making the changes visible.)
 Another dialog box appears, displaying the document with the changes.