Quick overview with the dashboard
After logging in to imperia, the start page of the imperia dashboard opens.
The dashboard consists of individual functional components, the so-called widgets, and can be designed according to your needs and wishes. For example, widgets contain overviews of upcoming events such as documents to be unlocked or soonly ending documents, display general information or list shortcuts for menu items.
You can also create more than one dashboard for yourself, so you can customize the working environment to optimally serve your different needs. imperia administrators (users of the "superuser" group) can also create standard dashboards and assign them to a specific group.
Creating a dashboard#
- In the title bar, click the symbol.
- Select Manage Dashboards from the drop-down menu
- In the dialog that opens, click Create new Dashboard.
- Enter the name of the dashboard.
- Two variants are distinguished here (which dashboard templates are provided depends on your user rights):
- Predefined dashboards: Select this variant if you want to create a dashboard with already inserted widgets.
- Blank dashboard layout: Choose this variant if you want to create a dashboard with an empty layout. You can add the desired widgets to it later, as described in Adding widgets.
- Save your settings by clicking Save.
The dashboard is applied directly to your current system. This will also automatically rename the current browser window in which your imperia system is located and can be set as a new bookmark.
You can now assign groups to the created dashboard. Read more about this below.
Editing a dashboard#
This feature is mainly used to assign dashboards to specific groups only.
- To edit an existing dashboard, click the symbol in the title bar.
- Select Manage Dashboards from the drop-down menu
- In the dashboard list, open the desired dashboard by clicking .The currently used dashboard is highlighted in red.
- Click on the section Group assignment.
- Select the groups which should have access to the dashboard.
- If necessary, make further changes. You can also change the dashboard name or layout in this dialog
- Save your settings by clicking Save.
Deleting a dashboard#
- To delete an existing Dashboard, click the symbol in the title bar.
- Select Manage Dashboards from the drop-down menu.
- In the dialog that opens, click next to the desired dashboard.
- Confirm the security message that appears with OK.
The selected dashboard is irrevocably deleted with all configured widgets.
Adding widgets#
You can add widgets to existing dashboards at any time.
- Click the symbol in the title bar.
- Select Add Widget from the drop-down menu. A list of all available widgets opens. For a detailed description of each widget, see Available widgets.
- Click on a widget.
The widget is added to the top of the first column of the selected dashboard (depending on the selected Layout).
You can add any number of widgets here and move them later.
Moving widgets#
You can move the widgets to the desired position by clicking in the menu bar of the widget and dragging the widget to the new position.
Tip
In addition to the selected column layout, there is always a row above each column configuration that extends across the entire dashboard width. This line can contain widgets that require more space.
How widgets work#
The functions described below can be found in the widget's menu bar.
Removing a widget from the dashboard#
This function is used to remove an inserted widget from the dashboard:
- Click on More in the widget menu bar.
- Click Remove.
Updating the widget content#
Some widgets whose content can change more frequently offer the option Reload to update the content if necessary.
Tip
For these widgets, it is often also possible to define an automatic update interval in the settings, see widget Resubmits
Configuring a widget#
Use the Edit function to configure the widget.
- Click on More in the widget menu bar.
- Click Edit. Depending on the widget, different fields appear for the settings of the widget.
- Save your changes by clicking Save.
Minimizing and restoring a widget#
With the Minimize funcion you can hide the widget window so that only the menu bar is displayed. The Restore function opens the widget window again.
To access the function, proceed as follows:
- Click on More in the widget menu bar.
- Select Minimize or Restore from the drop down menu.
Displaying a widget in full screen mode#
If you choose the full screen view of a widget, it is displayed as the only widget in the full area of the dashboard. In this view you can reconfigure the widget. In addition, you can bookmark the page in full-screen mode (in the browser) so that you can call it up later.
The widget's full screen configuration is saved in the user data and will be reused for this widget the next time you switch to full screen mode. Since the configuration for full screen mode is independent of the configuration of the widget in the dashboard, these settings do not affect the (normal) dashboard view of the widget.
- Click on More in the widget menu bar.
- Click Fullscreen.
- To exit the full screen mode, click More in the widget menu bar and then Close.
Available widgets#
The widgets described below can be added to a dashboard.
In How widgets work you find the descriptions on how to open the configuration for editing, changing the size, etc.
Expiries#
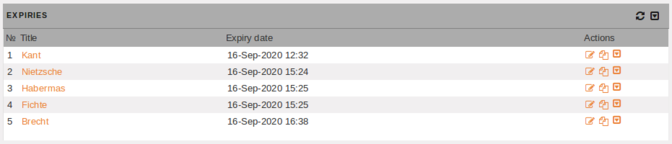
This widget displays a list of documents that are about to expire. The list is sorted so that the documents that will expire next are displayed at the top.
Configuration
Click More in the widget menu bar and then Edit to open the configuration for the widget.
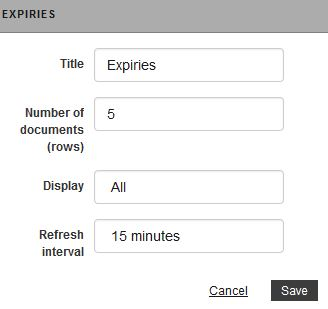
- You can rename the widget in the Title field. The name is then displayed in the widget's menu bar.
- In the Number of documents (rows) field you can set the number of documents displayed in the widget. If more documents meet the above criteria, this is displayed in the widget with the More(+n) option. Click on this link to view all documents.
- In the Display field, select the type of information or functions that can be accessed in the document.
- In the field Refresh interval you can specify whether and after what time the widget should be automatically reloaded.
- Save your changes by clicking Save.
Documents to Publish#
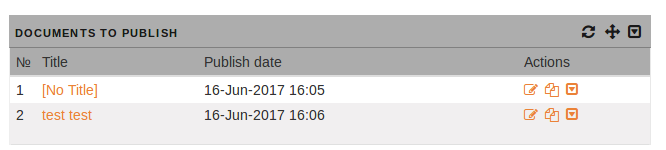
This widget displays the list of documents that are automatically published. The list is sorted so that the documents that are published next are displayed at the top.
Configuration
Click More in the widget menu bar and then Edit to open the configuration for the widget.
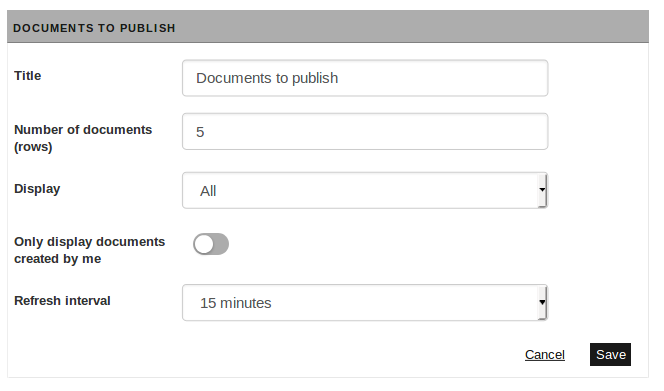
- You can rename the widget in the Title field. The name is then displayed in the widget's menu bar.
- In the Number of documents (rows) field you can set the number of documents displayed in the widget. If more documents meet the above criteria, this is displayed in the widget with the More(+n) option. Click on this link to view all documents.
- You may also choose to display only documents created by yourself by selecting the checkbox Only display documents created by me.
- In the field Refresh interval you can specify whether and after what time the widget should be automatically reloaded.
Hermes Status#
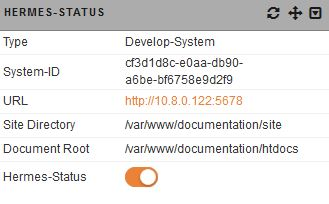
This widget displays the operational status of site_hermes.pl
- Type indicates the type of system Hermes is currently working for.
- System ID is the identifier for a particular system.
- URL indicates the path where the system can be reached.
- Site Directory specifies in which directory the system is installed.
- Document Root is the root directory for the documents.
-
Hermes-Status activates the monitoring by Hermes. By default, this setting is enabled for your system. For more information, refer to the chapter Target Systems in the admin's manual.If the field Hermes-Status is not visible, you must activate monitoring for the Hermes service in the relevant target system:
- Open the menu System -> Target Systems.
- Select the target system.
- Activate the checkbox Monitor remote hermes in the settings that appear.
- Confirm your changs by clicking Save.
You can insert several Hermes status widgets for your different target systems. To do this, add the widget again and then select the desired target system.
Configuration
Click More in the widget menu bar and then Edit to open the configuration for the widget.
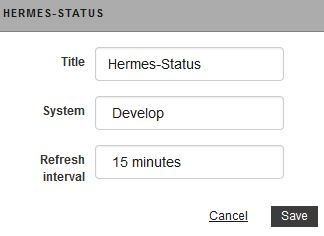
- You can rename the widget in the Title field. The name is then displayed in the widget's menu bar.
- In the System field, select the target system for which the Hermes status is to be displayed.
- In the field Refresh interval you can specify whether and after what time the widget should be automatically reloaded.
- Save your changes by clicking Save.
Imperia News#
This widget contains the latest news about imperia. You can access the website via the links provided.
This widhet offers no further configuration options.
Imperia Release News#
This widget displays news about the currently installed release.
This widget offers no further configuration options.
Logfile#
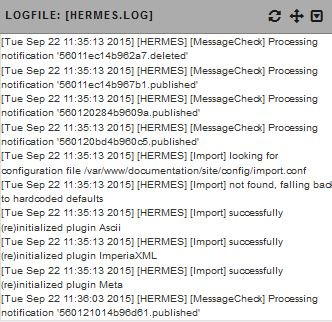
This widget displays the last n lines of a log file.
Configuration
Click More in the widget menu bar and then Edit to open the configuration for the widget.
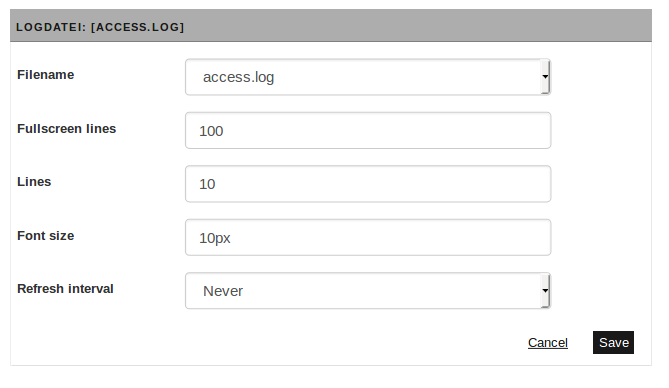
- In the drop-down menu Filename you can select which log files should be displayed (access.log/hermes.log/error.log).
- The number of lines in full-screen mode is set in the fullscreen lines field. The default value is
100. - In the field Lines the number of lines in the widget is set. The default value is 10.
- In the Font Size field, you can specify the unit of measurement as well as the numeric value. For example 10pt or 0.9em. Default value is
10px. - In the field Refresh interval you can specify whether and after what time the widget should be automatically reloaded.
- Save your changes by clicking Save.
My Documents#
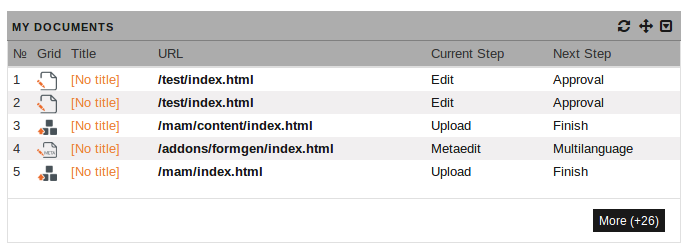
The My Documents widget displays documents that you have edited yourself and to which you as an author have write access.
This list also contains the documents that were imported automatically (e.g. by the system service) in order to perform an import, an escalation or a resubmission.
The list is sorted so that the documents last edited are displayed at the top.
Configuration
Click More in the widget menu bar and then Edit to open the configuration for the widget.
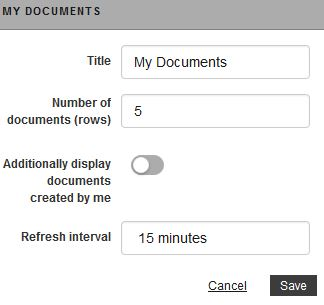
- By filling in the Title field, you set the header's title.
- In the Number of documents (rows) field you can set the number of documents displayed in the widget. If more documents meet the above criteria, this is displayed in the widget with the More(+n) option. Click on this link to view all documents.
- In the field Refresh interval you can specify whether and after what time the widget should be automatically reloaded.
- Save your changes by clicking Save.
Menu#
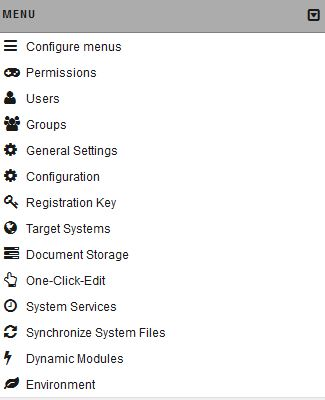
This widget represents the submenus of one of the imperia menus.
Configuration
Click More in the widget menu bar and then Edit to open the configuration for the widget.
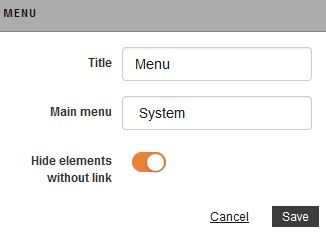
- You can rename the widget in the Title field. The name is then displayed in the widget's menu bar.
- In the Main Menu field, specify the menu for which you want to display the submenus (main menu/Documents/Structure/System/Account).
- If you activate the checkbox Hide element without link, only menu items that contain a direct link appear.
- Save your changes by clicking Save.
Note#
This widget is a sticky note on which you can leave your notes.
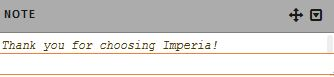
This wighet offers no further configuration options.
Static HTML#
In this widget you can implement HTML.
Configuration
Click More in the widget menu bar and then Edit to open the configuration for the widget.
- You can rename the widget in the Title field. The name is then displayed in the widget's menu bar.
- In the field Content enter any content in HTML.
- In the Footer field, you can enter content that appears below the content.
- Save your changes by clicking Save.
Clock#
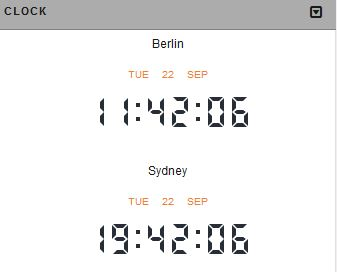
In this widget you can display one or more clocks.
Configuration
Click More in the widget menu bar and then Edit to open the configuration for the widget.
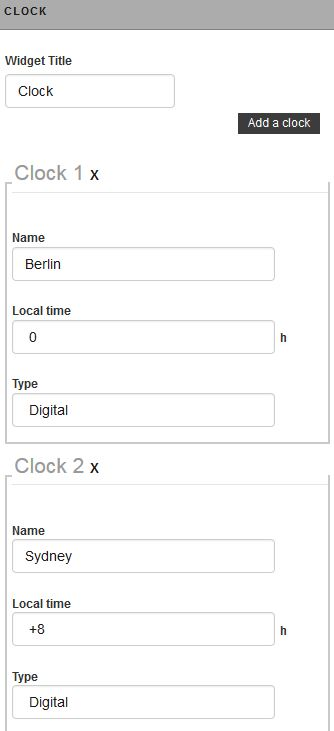
- You can rename the widget in the Title field. The name is then displayed in the widget's menu bar.
- Click Add clock if you want to add a new clock within the same widget.
- In the field Name enter the name of the clock.
- In the Local time field, select the offset to GMT.
- In the Type field, select whether the clock is displayed in analog or digital format.
- Save your changes by clicking Save.
Resubmits#
This widget contains a list of documents to be resubmitted soon. The list is sorted so that the documents that are presented next are displayed at the top.

Configuration
Click More in the widget menu bar and then Edit to open the configuration for the widget.
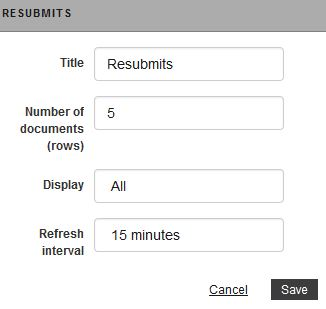
- You can rename the widget in the Title field. The name is then displayed in the widget's menu bar.
- In the Number of documents (rows) field you can set the number of documents displayed in the widget. If more documents meet the above criteria, this is displayed in the widget with the More(+n) option. Click on this link to view all documents.
- In the field Refresh interval you can specify whether and after what time the widget should be automatically reloaded.
- Save your changes by clicking Save.
Last Published Documents#
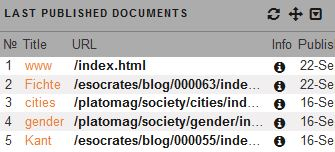
This widget shows the documents that were last published.
Configuration
Click More in the widget menu bar and then Edit to open the configuration for the widget.
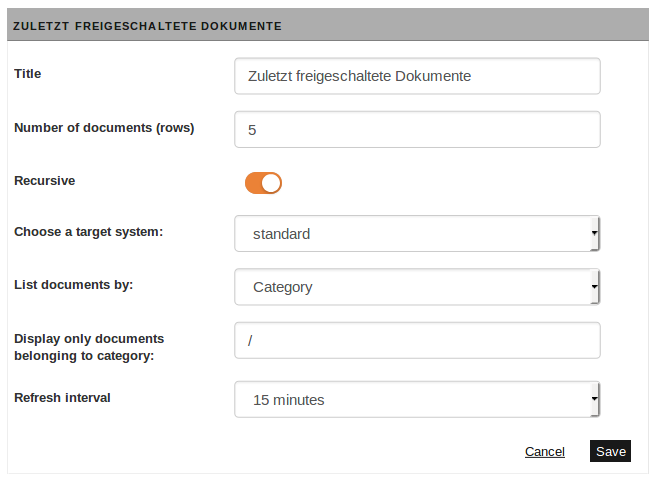
- You can rename the widget in the Title field. The name is then displayed in the widget's menu bar.
- In the Number of documents (rows) field you can set the number of documents displayed in the widget. If more documents meet the above criteria, this is displayed in the widget with the More(+n) option. Click on this link to view all documents.
- In the field Choose a target system you can choose from which target system documents are to be displayed.
- You can restrict the directory in the Display only documents belonging to this category field.
- In the field List documents by you can select the type of document listing (category/URI).
- In the field Refresh interval you can specify whether and after what time the widget should be automatically reloaded.
- Save your changes by clicking Save.