imperia basics
This chapter provides a general description of imperia and gives an initial overview of the work with the program modules belonging to imperia.
Tip: UserEcho
Before we start we would like to introduce our new feedback tool UserEcho. You can reach the platform at https://pirobaseimperia.userecho.com.
- There you can submit your own suggestions for new features or improvements.
- You can also leave comments below each suggestion so that customers can discuss the relevance and benefits of a feature
- We hope for an active participation, so that we can better understand the wishes of our customers. First suggestions from us and our support center have already been added.
How does imperia work?#
Before we get into the details of imperia, we would like to give you an overview of the basic concepts of imperia. This chapter is intended for authors and users who are new to imperia.
Staging#
"Staging" in the content management system enables the creation of content at various steps.
imperia consists of a development system and at least one target system.
Development system: On the development system, the project is structured and the content is entered by the users. The development system is usually thematically sub-divided into categories in which new documents are created. In this way, a structure of the content is already built when a document is created. Whether you can create documents in a category at all depends on the rights that you may have in the system and that are assigned by authorized users.
Target system: The imperia documents are transferred to the target systems as soon as all necessary steps have been completed. This process is called Publishing. Publishing can be done automatically or manually. Documents are published automatically only after a scheduled time - the publication date - is reached. A typical example of a target system is an Internet-connected web server where your site is located and publicly accessible. You can also surf on a target system and change pages directly with a special module, One-Click-Edit (OCE), if you have the necessary permissions. It is also possible to let your content be published simultaneously to several target systems and stored in different formats.
The working principle of imperia is simple:
-
Your project is divided into several categories. For each category there is a template, in which the layout of the documents in this category is defined. Certain areas of these templates can be edited and are filled with content by the users when editing the document.
-
The steps that a document goes through from creation to publication are called workflows. The sequence of the individual steps is also defined within the workflow. Example:
- First, the information about a document, the metadata, is entered.
- In the next step, a user enters the content in the editable areas.
- Another user then checks the document and finally activates it.
-
There can also be workflow steps that do not require any user input, but are executed automatically, such as the retrieval of data from an additional data source. You can edit a document at one or several points in a workflow. Example: You are responsible for creating new documents and entering up-to-date information. Or your task is to check documents from other authors from a legal point of view. Or you can determine which images belong to which texts. Or you are the one who decides if and when a document will be published.
-
The key to this is your current group. All your rights depend on it and therefore also the possibilities you have with imperia.
- You can also have several groups and switch from one group to another as required. Usually a group only allows you to create content in specific categories: A sports editor should not write reviews on the newest theatre play, but concentrate on the National Footbal League. Nevertheless, if you work also in the news room, you simply change the group and start creating news.
- When you edit a document, it is locked for users with the same group, and cannot be edited by them. Another user can remove this lock if he needs to comment on what was logged in the document history. When a document is being edited by two users simultaneously, this causes a conflict which must be resolved.
Users and Groups#
Anyone who wants to work with imperia must first have a user account before logging into the system. The user account consists of a username and a password and is created by a user who has the respective permissions. To ensure that the system recognizes which tasks and areas a user is allowed to perform or see, user accounts are assigned to at least one group.
The current group gives a user access rights, both to categories, and thus to certain documents, as well as to imperia functions and thus to the user's scope of action in the system, such as creating new users or setting up system services. Since various groups can be assigned to a user account, you can perform various tasks or see different system parts. All you have to do is adopt another group assigned to you. Read more about user permissions in the section Access Permissions in imperia.
Due to this group concept, you will rarely or never be allowed to process a document from creation to release. A document usually only appears on your Desktop in one workflow step and disappears once you have completed this step. In this case, your current group does not give you the right to move on to the next step.
Documents#
When you click on the menu item Create new document and select a category, not really a file in a directory, but only a collection of key-value pairs is created. As soon as you select a category, the first keys in this collection will have certain values, as for example the target directory for the document and the document filename, etc.
Meta variable
When you edit a new document, that is, enter text in input fields or select an image in the media database, you assign one or more values to other keys. A “key” is nothing more than the name of the field that must be filled; the entered content is the value. The keys in imperia are referred to as meta variables. imperia documents, thus, consist of many meta variables and their values.
Meta variables can store a variety of information entered by you or other users. These can be URLs to images from the media database, text that you have entered, headings to articles or links to other documents.
There are meta variables which values cannot be edited from within a template, because not every user is allowed to modify the information they contain. These include, for example, the document's path, the used template or the publication date. Such information can nevertheless be modified, but this usually happens unnoticed in the background.
In other words, imperia does not treat documents as files, but as a collection of content in which each piece of information belongs to a certain key and is stored accordingly. Therefore it is very easy to publish the content in many possible ways: as HTML page, as XML document, in a database, on several target systems in different formats, etc.
Meta Files#
Metafiles are a special type of template that can be used to collect information about a document before it is edited. They create the so-called "meta page" and often represent the first step in a workflow, the so-called "meta edit". In this step you specify the template for the new document. However, there are many possible uses for metafiles, which are described in the Developer manual
Tip
Metafiles can still be used for historical reasons; they were an integral part of the first imperia versions. You can now do without metafiles and have the meta information entered in a separate template or directly on the content template itself.
Templates#
imperia templates are input forms in which the user enters content into the input elements provided for this purpose. Templates form the backbone of a project. With them a programmer gives the user an easy to understand possibility to enter content, on the other hand he can already prepare the further processing of the content in the template.
Other than the known web forms operating elements, such as text fields, checkboxes, drop down menus and select boxes, imperia templates offer a variety of imperia-specific control elements such as flex modules, imperia blocks, word modules, etc.
Templates are also used to store content independently from a website's layout. imperia separates content and layout. The content is stored - as described above - in the key-value pairs of the imperia document, the layout is defined via the template. From the key-value pairs of the imperia document and the layout information from the template, an HTML page, an XML document or a data record is generated in a database as soon as the imperia document has run through the workflow to its end and is released.
Templates can represent different modes. This includes the
- Edit mode,
- Preview mode,
- Save mode.
Edit mode A document is in this mode when you enter content in meta fields, that is, when you fill the template elements intended for this purpose. In this mode, the document is locked for all other users.
Preview mode A document is in this mode when you preview it. The current status of the document is taken into account, i.e. all data entered up to the current time is displayed. This mode is practically identical to the Save mode.
Save mode In this mode, changes to a document are saved. A document enters the Save mode when you click the Save button and exit the Edit mode.
There are other modes, but they would go too far at this point. For details on these modes, see the Developer manual.
Workflows#
In imperia, a workflow is a series of processing steps that a document must undergo before it can leave the development system and be transferred to a target system. You can define this sequence in imperia for each category. In this way, each document automatically passes through the workflow that is assigned to the category in which the document is created.
Each workflow step is represented by a workflow plug-in; the sequence of the plug-ins forms the workflow that a document must go through. Some of these plug-ins require user input and provide a corresponding input mask, while others are completely automatic and run unnoticed by the user.
Note
- The workflow is assigned to a document when the document is created. The document receives a ticket in which the workflow steps are stored. Changes to the workflow, for example the addition or removal of work steps or changes to the sequence, are not integrated in this ticket.
- The sequence of steps for a document is taken from the ticket when it is processed. Therefore, changes to a workflow are ineffective for documents that are already being processed at the time of the change.
To perform a workflow step, certain rights are required, which are granted via the group. If you are not assigned to the respective group, you cannot perform the next step and the document does not appear on your desktop. Steps, like approving changes or final publishing, can be performed by users with privileged groups only.
Once a document has been created in a category, it is at the start of the workflow. A standard workflow, already provided in imperia, consists of the following steps:
-
Enter metadata
-
Edit document
-
Approve changes
If the changes are not approved, the user with the approval rights has the option of resetting it to a previous step or throwing it into the trash. Ideally, the workflow reflects the process chain of a company.
Getting started in the system#
imperia is a web-based application and is accessed in your browser. All actions that you perform on or in the system take place in your browser or are started from your browser. This means that you can use imperia from any workstation or device with a browser installed. With the following browsers you can work well with imperia:
-
Microsoft Internet Explorer version 8 or above for Windows
-
Mozilla / Firefox version 3.0 or above for Windows, Linux and Mac OS X
All operating elements, dialogs and input fields as well as their contents are dynamically generated by imperia and displayed as HTML pages in the user's browser.
The user works with imperia by using hyperlinks or other known controls such as checkboxes, radio buttons, input fields, drop-down fields etc. The look and feel of imperia therefore corresponds to a web application, so that you can find an easy access to working with imperia with basic knowledge of how to use the Internet.
The actual appearance of the imperia interface depends on the user rights set by the imperia system administrator, the widgets open and the bookmarks set.
The default system language is English. See Changing the system language for more information on how to change the system language.
Layout of the imperia interface#
The following describes the general layout of the imperia interface with title bar, menu and editing forms. A detailed description of the individual editing forms is given in the descriptions of the individual use cases.
Title Bar The title bar is located at the top of the imperia's interface.

In the left area, it contains the product logo and the version number as well as the symbol for expanding and collapsing the imperia menu.
The right area displays various options and an input field for the full text search.
-
: Use this option to define a favorite for pages or frequently used menu items and dialog boxes.
-
: The internal mail system is opened via the envelope symbol. If there are no messages for you in your internal mail system, this is indicated by the white envelope symbol . If a new message has arrived for you, the color of the envelope changes into orange.
-
: This option takes you to the Add-ons page.
-
: This option contains a submenu with various contextual settings and functions as well as the Logout option.
- [User name]: The current user name is displayed here. Clicking on the user name opens the [user settings](user.basics.md#user-settings
- Available groups: This option opens the dialog Adopt a group.
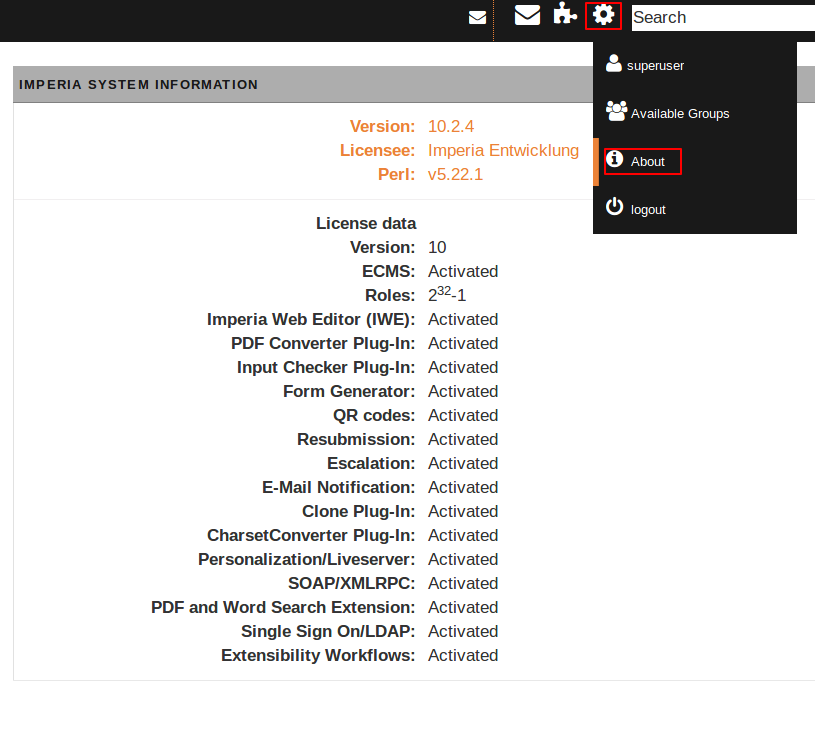
- About imperia: Use this option if you want to obtain information about imperia (version, licensee, license data).
Menu Below the logo on the left in the title bar you will find the menu. The menu is the main control element that you can use to call imperia functions you are allowed to access. With a few exceptions, this navigation option is available to you at all times. Functions that you are not allowed to execute are automatically hidden.
If you move the mouse over the menu symbol, the submenus are expanded:
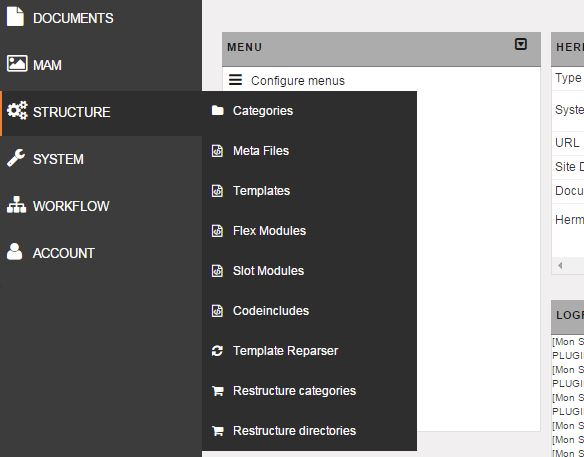
For each submenu, a page opens in which you can execute the corresponding function.
Editing forms Clicking on a submenu takes you to the corresponding editing form, in which you will find all options and selection elements required for executing the function. Example:

- Depending on the function, additional dialog editing forms open via buttons.
- Use the Maximize / Minimize symbol if you want to change the size of the editing form:
- If you minimize the editing form, the view changes to two columns.
- If you maximize the editing form again, the dialog boxes are displayed one below the other (default view).
Working with favorites#
Frequently used functions can be stored in the favorites menu. The bookmarks are then displayed on the right side of the title bar. The favorites appear with the corresponding icons from the menu. These icons give you quick access to all functions of your work, especially the functions available in the submenu items. The settings for favorites are user-specific. So you can create your own personal menu, which could look like this, for example:

If you have not added any favorites yet, the menu is empty.
Adding or Removing Favorites
-
Open the page/function that you want to add to the favorites.
-
Click on the right side of the title bar. The icon of the selected page/function is now added as a favorite in the title bar.
-
To remove the page/function from the title bar, click again on the now filled icon. The respective icon is removed.
Tipp
You get an overview of your set favorites under the menu item Account -> Edit favorites. There, you can also delete favorites more simply by selecting in the respective row: 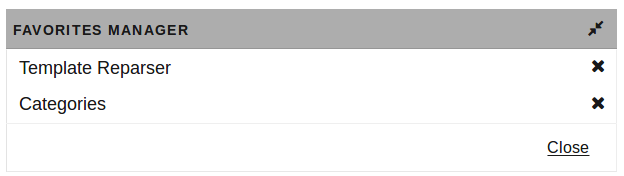
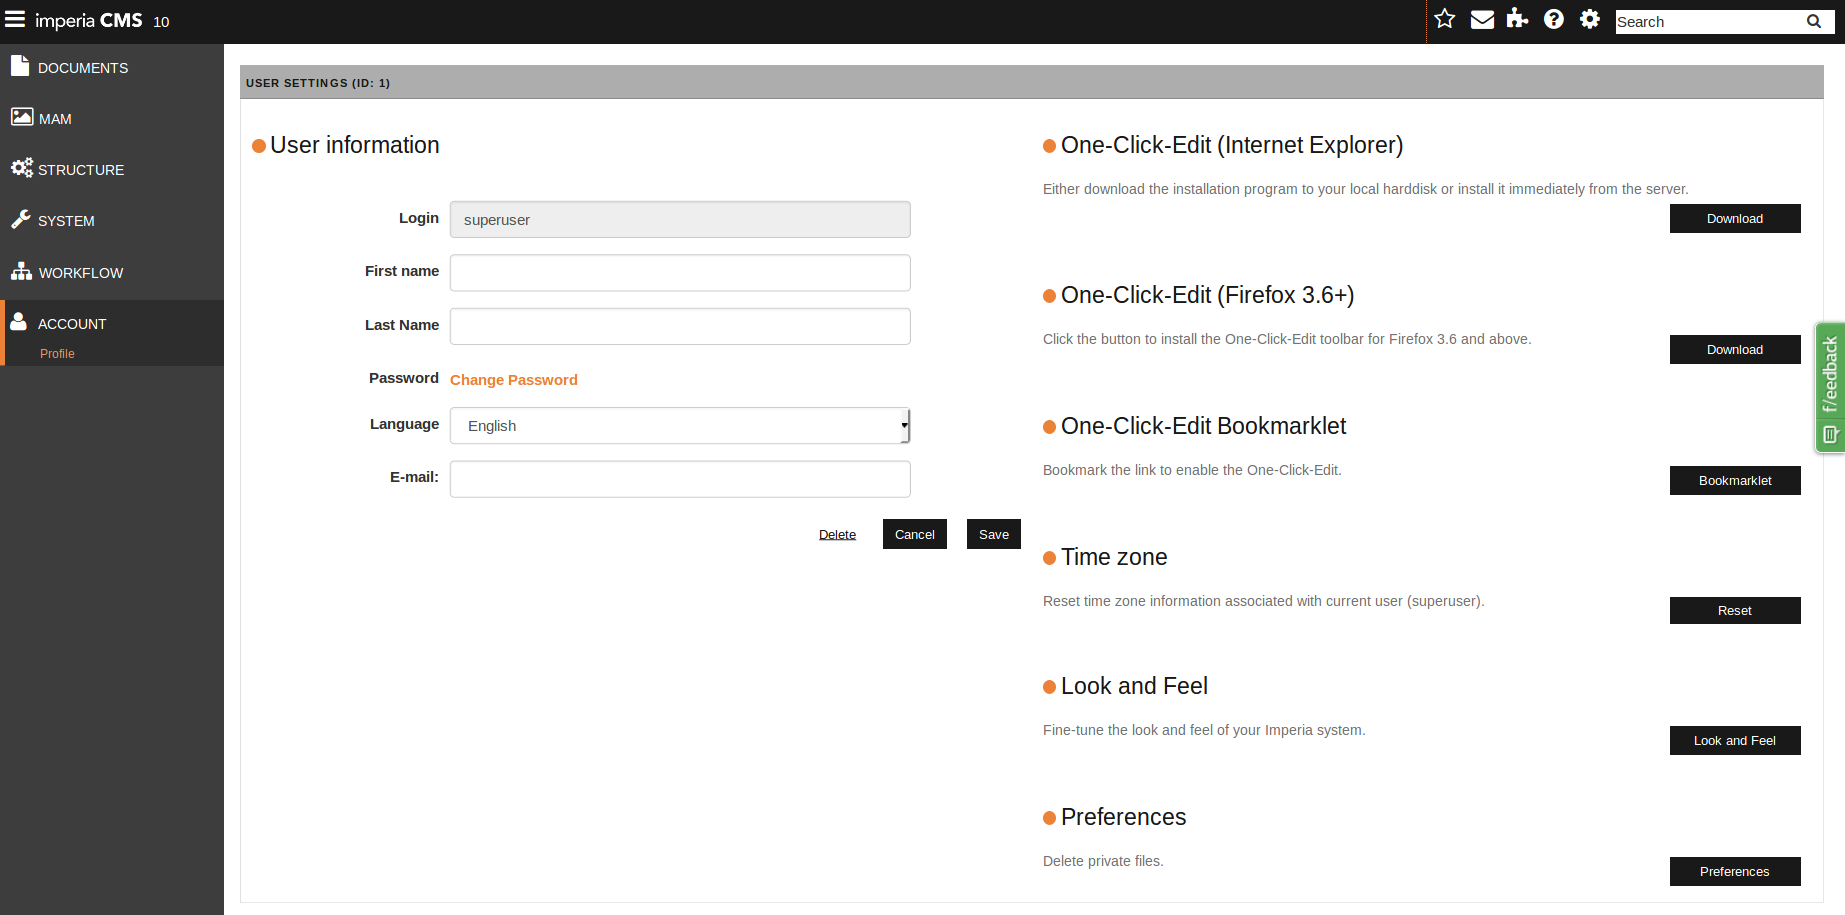
Customizing the user settings#
You can individually change and save certain user settings. This includes, for example your password, the user interface language as well as optional information, like address and e-mail address. Only the imperia administrator (superuser) can change the name and login. The administrator creates all user accounts and determines their (first) passwords. When you log on to the system for the first time, you should therefore change your password
If you want to change your user settings, choose Account -> Profile.
- Make the required changes.
- Save the changes by clicking Save.
- Use Cancel to close the editing form without saving the changes.
Besides the first and last name, the following user settings can be changed:
Changing the password#
- Open Account -> Profile.
- Click on the link Change password.
- Enter your old password in the corresponding input field.
- Enter your new password and repeat it in the corresponding input fields.
- Confirm your changes with Save.
You can now use your new password the next time you log in.
If you forget your password, the imperia administrator can assign you a new one.
Changing the system language#
The default system language is English. This means that all imperia menus and system messages are displayed in English.
However, the imperia administrator can change the default system language.Individual users can also individually select a system language that differs from this standard:
- Open Account -> Profile.
- In the drop down menu Language, choose your preferred language.
- Confirm your changes with Save.
The language will be changed immediately after saving.
Deleting user files#
You can delete all settings and files stored in your user profile.
Note
When deleting user files, your personal settings will be reset in MAM / Dashboard / Desktop /....
- Open Account -> Stored Settings.
- Click on at the end of the corresponding line.
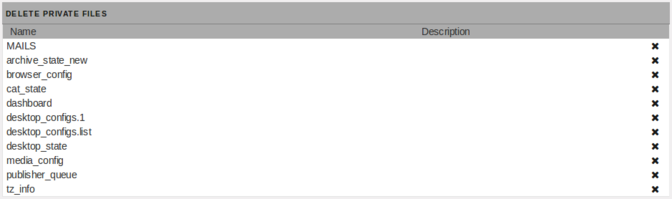
The files are deleted from the system.
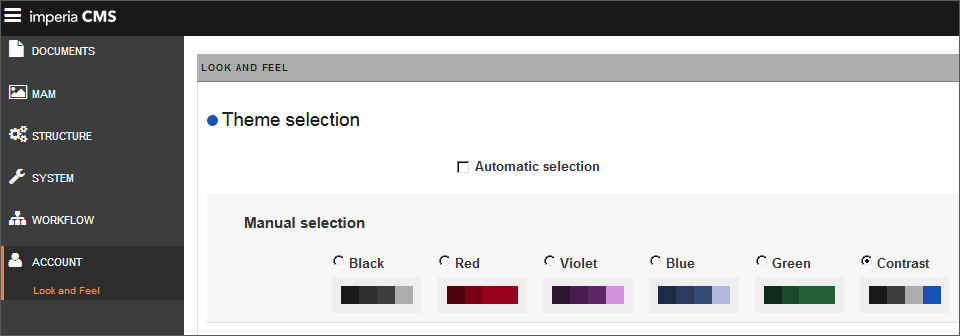
Configuring Look and Feel#
In the menu item Look and Feel you can make other system-wide settings in addition to the design settings of your imperia system. For example, in the My Documents section, you set the filter for the desktop.
Note
- The settings here will only be applied to your imperia system.
- Only the system administrator (Superuser) can make changes of the look and feel for all users.
- In the Profile menu, choose Look and Feel or click Account -> Look and Feel.
- Make the required settings.
- Confirm your settings with Save.
Available options for the look and feel might be:
-
Theme selection: Select your individual color theme if you do not want to adopt the one defined by the system administrator. Deactivate the checkbox Automatic selection to display the available color themes. The Contrast color scheme is a web-accessibility scheme that displays links on a white background in blue instead of orange to increase readability. According to the Guidelines for Accessible Web Content (WCAG) 2.0, the blue link colour achieves an AA value for normal text, whereas the contrast values of the orange link colour on a white background are too low.
-
Main menu behavior: Decide whether the main menu should stay hidden/displayed or whether it should close/open automatically after a certain time.
-
My Docments: Set the filter for the desktop by activating the filter checkboxes.
Tip
If you move the mouse over the menu, mouse overs with the description of the individual menu items appear. This is especially useful when the menu is collapsed.
Access permissions in imperia#
All access permissions within imperia depend on the groups a user may have. The group defines the following:
- the workflow steps that a user can process,
- the categories that a user is allowed to see and thus also the documents that he is allowed to edit,
- the menus and modules available for the user,
- the groups that a user can adopt.
For a user to see a document, the user must adopt a group which has the access rights to the corresponding workflow step and to the category.
Access to documents is controlled by the access permissions to the corresponding category. On the desktop, a user sees all documents of the categories that he can access due to his groups and whose current workflow step he is allowed to execute.
Adopting a group#
When creating your user account, the system administrator has defined which groups you can adopt, and thus which imperia functions you can use and in which categories you can work. While working with imperia you can change between these groups to perform tasks that are not intended for your current group. It is also possible to adopt several groups at the same time.
- Open Account -> Change Group. Alternatively, choose -> Available Groups) in the title bar.
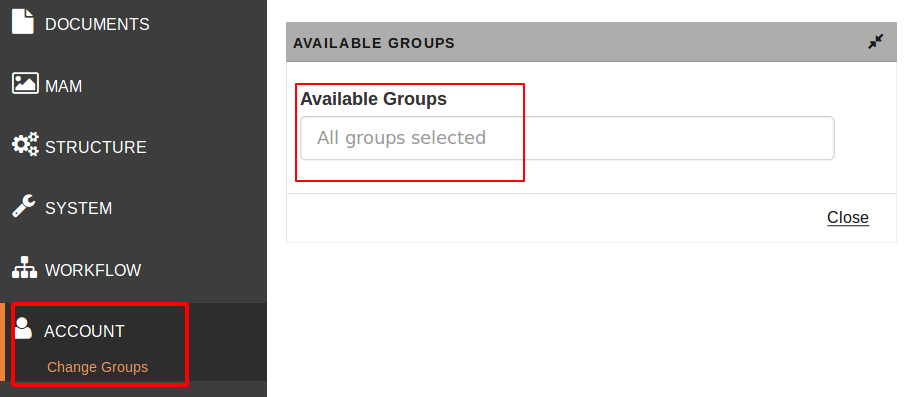
- Click into the field All groups selected to display all groups that you are assigned to:
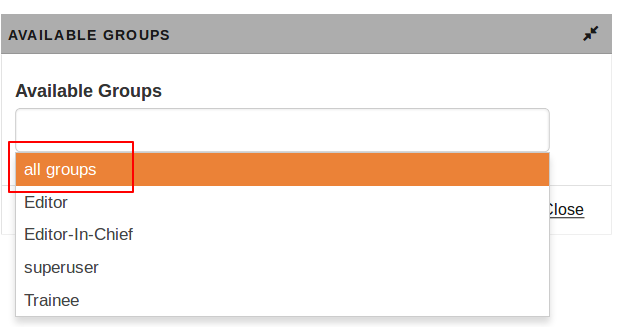
- Adopt either all groups or select individual groups that you want to adopt.
- Click OK to save your settings.
Your user profile is now active in the selected group. You can now execute all functions for which your groups are authorized.
The internal editor#
With the help of the internal editor, templates, metafiles, flex modules etc. can be edited directly in imperia. You call the internal editor by clicking the button Edit in a files list. The editor then opens in a separate dialog:

The internal editor consists of the working area for displaying the source code to be edited and options for saving changes, resizing the working area, and closing the internal editor.
Editor The source code of the selected file is displayed in the working area. In the title bar of the working area you will find the respective file name.
In this dialog the search function of the browser is available. This function is started with the shortcut Ctrl. + F under Windows® and Alt. + F under UNIX®.
You can change the dimensions of the working area by clicking in the lower right corner and moving the area to the desired size.
Options
- Save and close: Use this option to save the changes and close the internal editor.
- Save: Use this option to save your changes without closing the window.
- Close: Click this link if you want to leave the internal editor without saving the changes. Unsaved changes will be lost.
Add-ons#
In imperia you get an overview of the add-ons installed and (de)activated in your system as well as other system information such as the current imperia version:
- In the title bar, click .
- In the sub menu, click About.
- To list the most important available add-ons in your imperia interface, choose in the title bar Add-ons.
- On our market place you will find a complete overview of our add-ons that can be used to extend your imperia system.