Working with the desktop
The desktop is a central element of imperia. In a table view, it displays all the tasks related to the documents you currently need to edit and provides you with the functions required for editing them.
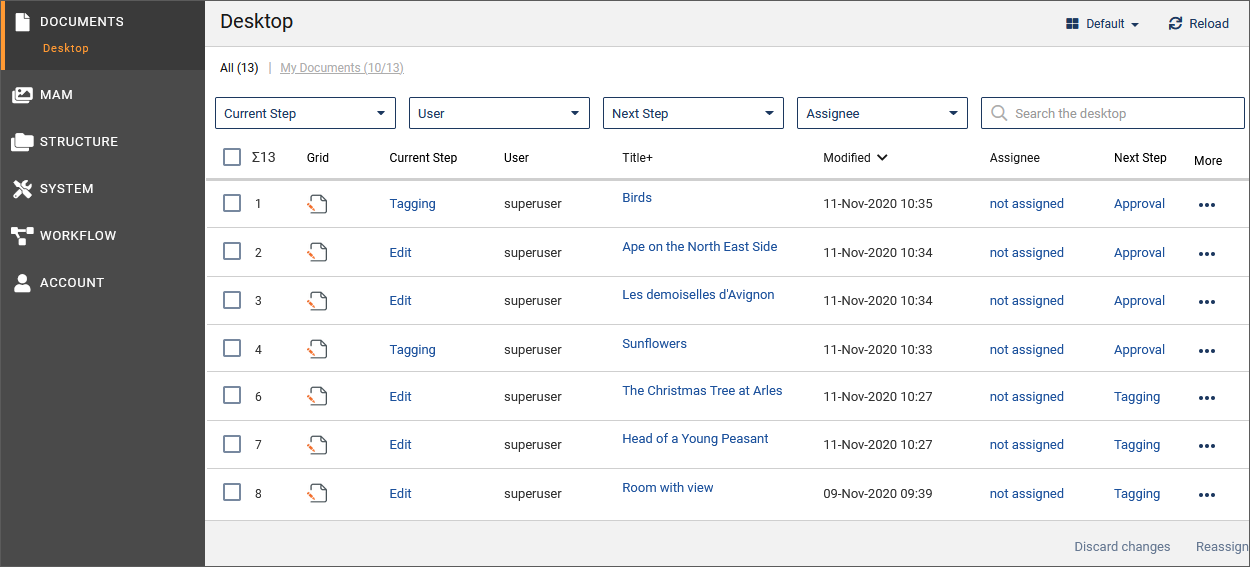
The Desktop provides an overview of all documents that you are allowed to edit or view depending on your current group. From here - according to the rights of your group - all processes belonging to the defined workflow are started:
- Execute current workflow step for a document
- Finish current workflow step for a document
- Check out a document
- Delete document from the Desktop
- View and add entries to the history of a document
- Check links
- Add meta information
Structure and function of the Desktop#
All information and functions available for a document are displayed in columns, with each document appearing in its own table row. Which information is displayed and in what form depends on the Desktop view. You have the option to create your own Desktop views. Different views may be created that display completely different information about the same documents. You can switch between the different Desktop views. imperia system administrators can create desktop views and make them available to all users.
Desktop views#
imperia is delivered with four standard views, each of which offers different views of the documents to be processed. In addition, you can customize your desktop to your individual needs and save these settings in different views. Since imperia 9 the configuration of the desktop can be done easily by Drag&Drop.
The different views contain different columns with the functions required for your workflow task.
The columns contained in the current view appear in the header of the desktop. In order to get a compact representation of the desktop, several column headings can be displayed under each other in one column of the header line.
Desktop columns#
You can add the following columns to your Desktop:
| Column name | description |
|---|---|
| Title + | Contains the most important Desktop functions in one column (in the form of links). The functions appear when hovering the mouse over the title. This column is useful, if you want to design a Desktop with only a few columns without having to renounce these functions. |
| More | Contains (unlike Title+) the less important desktop actions in a drop-down list. The functions appear when hovering the mouse over the title. This column is useful, if you want to design a Desktop with only a few columns without having to renounce these functions. |
| Bottom | Contains a link that takes you to the bottom of the Desktop page (see also column Top). |
| Category | Contains the name of the category a document belongs to. |
| Category Description | Displays the category description, contained in the Description field of the Category Manager. |
| Current Step | Contains a button to execute the current workflow step. |
| Created | Contains the date on which a document was created. |
| Filename | Contains the filename which will be given to a finished document. |
| Debugger | Opens the Debugger-Tool to examine the rendering of the document in every step of the template-chain. |
| Delete | Contains a link to delete the respective document from the Desktop and thus remove it from the workflow. This does not affect any document versions in the Archive or on a target system. |
| Delete (+Changes) | Contains a link to delete the respective document from the Desktop and thus removes it from the workflow. This also deletes the document versions in the Archive. |
| Differences | Opens the Diff-Tool of the archive to examine differences between document versions. |
| Directory | Contains the directory where a document is stored, starting from the document root. |
| Expiry date | Shows a document's expiry date. |
| Grid | Displays the icon of the current workflow step. By clicking this icon you execute the current workflow-step as in the function "Current Step". This icon is the same as the icon of the plugins used in the Grid (the module for creating and maintaining workflow). |
| History | Contains a link to open the document history. |
| imperia | Contains a link to imperia's home page. |
| Last editor | Contains the name of the user who last edited a document. |
| Link Checker | Contains a link to the LinkCheck that verifies all links in a document. |
| Locks | This column displays existing locks set on a document and a link for removing locks. |
| Modified | Contains the date on which a document was last modified. |
| Meta file | Displays the name of the used meta file. |
| Meta view | Contains a link that opens the meta viewer (see Meta Viewer). |
| Multiple action | Contains the available actions in case the current workflow step has more than one exit (e.g. Approve). |
| Next step | Contains a link to move a document to its next workflow step. |
| NodeID | Contains the internal NodeID of a document. |
| Publish date | Contains the date on which a document will be automatically published. |
| Server Version | Opens the version of the document in its current state on the server. |
| Template | Displays the name of the template used for the current document. |
| Title | Displays the document's title. |
| Top | Contains a link that takes you to the top of a Desktop page (see also column Bottom). |
| UID | Contains the user ID of the user who last edited the document. |
| URL | Contains the document's path. |
| User ID | Shows the user ID of the user editing a document. |
| User | Displays the name of the user who created the document. |
| Workflow | Contains a link to open the Workflow Manager where you can execute workflow steps. |
| WorkFlow-Step | Displays the workflow step the document is currently in. |
Changing the Desktop view#
Select the desired view from the list of all views in the drop-down box at the top right. The Desktop will be updated automatically.
Creating a Desktop view#
When you create a new desktop view, it is based on an existing view which you can then reconfigure.
- Open the Desktop via Documents -> Desktop.
-
Click the Manage Views option.

-
Click the desired view in the list of available views.
-
Execute the New View option to design the new view.
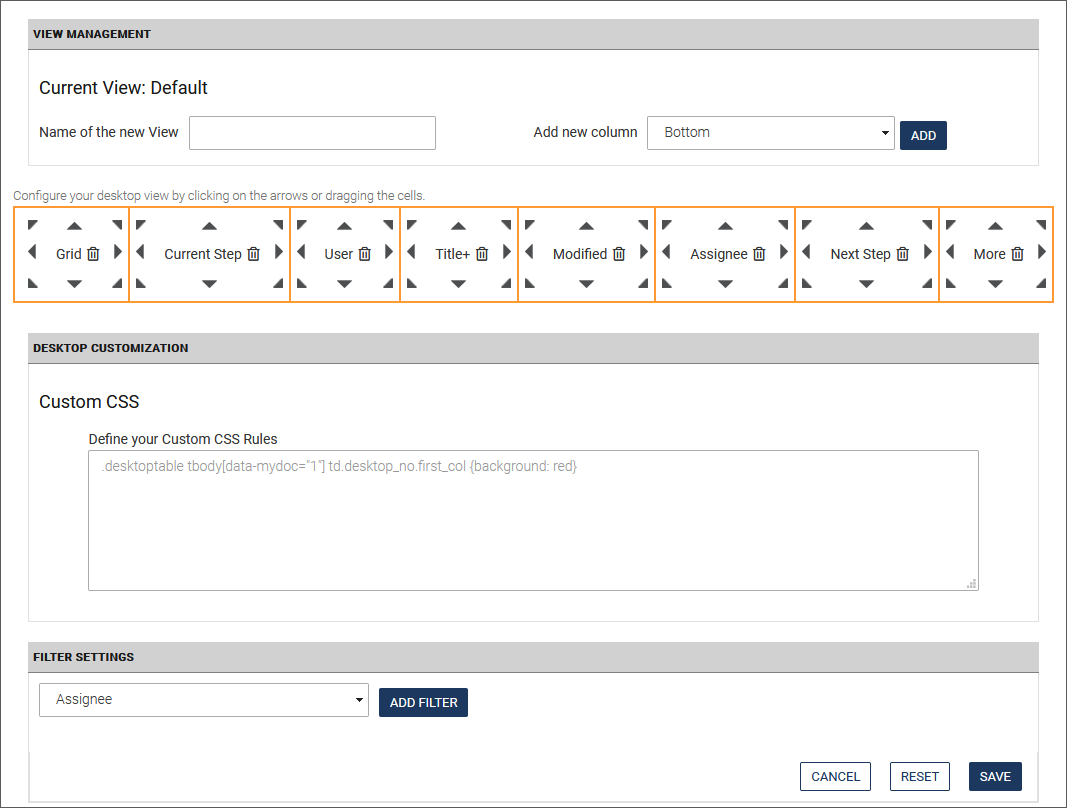
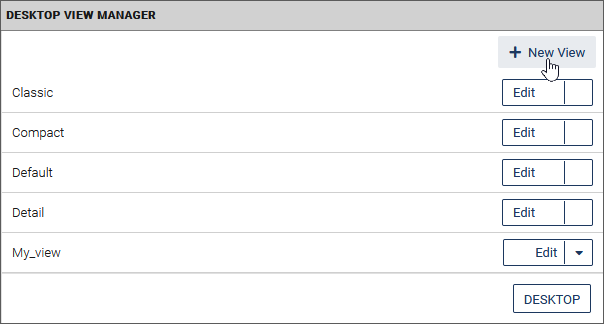 Under Current View, the view you selected as a template is displayed.
-
Enter a unique name under Name of the new View.
- In the drop-down box Add new column, select the desired columns and click Add.
- Arrange the columns in the way you want them to appear on the desktop. Use the gray arrows to move the cells to the desired position. Alternatively, you can use Drag&Drop to move the cells by simply dropping the column on an arrow of another cell.
- Optionally define your own CSS rules under Custom CSS.
- In the Filter settings area, set filters for the desktop so that only documents that meet the specified conditions are displayed:
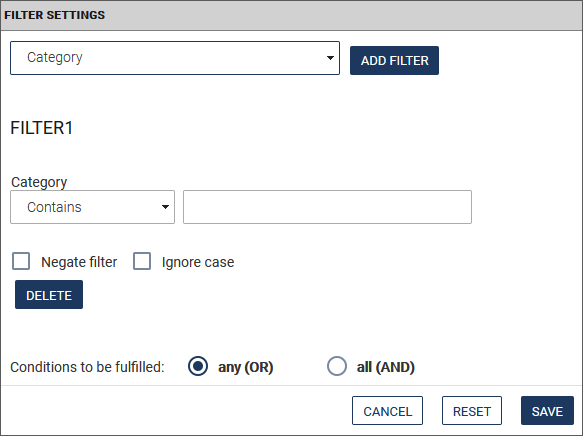 However, this is not necessary at this point since the Desktop filters are available in every desktop view.
If you want to preset the filters here , select the column to be filtered by and enter the filter criterion in the field below.
You can link several filters by a logical
However, this is not necessary at this point since the Desktop filters are available in every desktop view.
If you want to preset the filters here , select the column to be filtered by and enter the filter criterion in the field below.
You can link several filters by a logical ANDorOR. A filter can also be negated if you want the documents that match the filter to be hidden. - Click Save to save the new view with your settings..
The Desktop view is available immediately.
Editing a desktop view
You can edit all views later by opening the desired view as described under Creating a Desktop view and customizing it to your needs.
Deleting a desktop view
All user-defined desktop views can also be deleted. However, the standard desktop views provided by the system ("Classic", "Compact", "Default" and "Detail") cannot be deleted.
- Open the Desktop via Documents -> Desktop.
- Click the Manage Views option.
- Click on Delete next to the desired (user-defined) view.
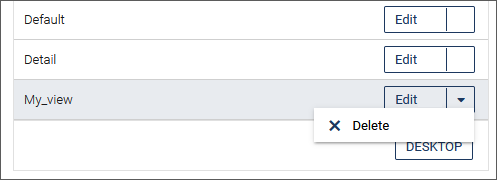
The view is removed
Desktop filters#
You can limit the amount of information on the desktop by filtering the documents according to predefined criteria. Filters help you keep the overview on your desktop. They are part of each desktop view and can be set individually in each session.
You can combine the filters listed below to display only those documents that meet all the criteria.
Note
The filter results are sorted alphabetically.
-
As described in Creating a Desktop view you can "pre-filter" the Desktop views yourself.
-
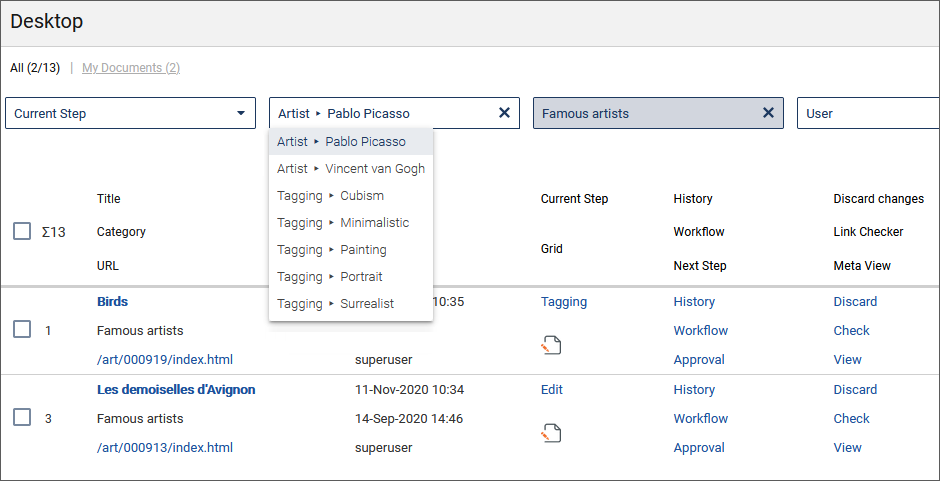
In each Desktop view, the filters All and My documents are located in the form of links in the upper left corner of the screen. The numbers in brackets indicate the total number of documents on your Desktop, how many of the documents are yours as well as the number of documents that correspond to the selected filters.
-
The Search the desktop search field on the right also appears in each view. Here you can filter by a term of your choice.
-
Filter by Columns: Each filter corresponds to a column in your currently selected desktop view. An activated filter is indicated by an orange frame around the selection box. With a click on in the selection field of the filter you can remove the filter again. Current Step: Filters by the selected workflow step in which your documents are currently to be found, in the example above "Meta-Edit". Next step: Filters by the next workflow step.
Category: Filters by the selected category in which the documents were created. Assignee: Filters by the selected editor to whom the document has been assigned. Tag: Filters by the realms and their tags assigned to the document.
Sorting documents#
You can sort the displayed documents according to the column content. If you move the mouse over the column header, it becomes a link and can be clicked. Columns that cannot be sorted by do not have a link as title.
- Click on the column header. The documents are sorted in ascending order by this column.The sorting direction is indicated by the arrow behind the column title.
- Click on this icon to reverse the sorting direction.
Working with the Desktop#
When you have finished working on a document within a workflow step, you finish the workflow step. The document then appears on the desktop of all users who are allowed to process the document in the next workflow step and, via their group, have access to the category in which the document was created.
So when you finish a workflow step, the document you have just edited may disappear from your desktop because your current group does not give you the right to edit the document in the next workflow step.
Each new document is provided with a copy of the workflow. Changes to the workflow therefore do not affect a document that has already been created. However, if a document is imported from the archive, it is assigned the workflow valid at the time and not the workflow with which it was originally created.
The following describes the most important functions that can be performed from your Desktop. Due to your current groups, some functions may not be available to you at all or only to a limited extent. If in doubt, contact your system administrator.
Each document passes through all the workflow steps that were defined in the workflow when the document was created. A document that is displayed on your Desktop is therefore in a workflow step that you must carry out.
Executing the next workflow step#
This function is also available in the column Title +.
- On your Desktop, click in the Current step column in the row of the desired document. The current workflow step is initiated. For interactive steps the corresponding input mask opens.
- Perform all necessary work and save your changes. Depending on the current workflow step, the next workflow step is then executed (for example, Meta-Edit) or you return to the desktop.
- Proceed with the upcoming workflow step until all work has been completed.
- When you complete a workflow step, you release the document for the next workflow step. To complete the current workflow step, click next to your document in the Next step column.
The current workflow step is completed. The document may no longer appear on your desktop if your current group does not have the appropriate permission. However, you can re-run a workflow step that has already been completed and for which you are authorized.
Repeating a finished workflow step#
This function is also available in the column Title +.
If you repeat a workflow step that has already been completed, the document is reset to the position of this workflow step and passes through all subsequent workflow steps again.
- On your Desktop, click on the link next to your document in the Workflow column (you may need to add this column first). The opening Workflow Manager displays information about the current document:
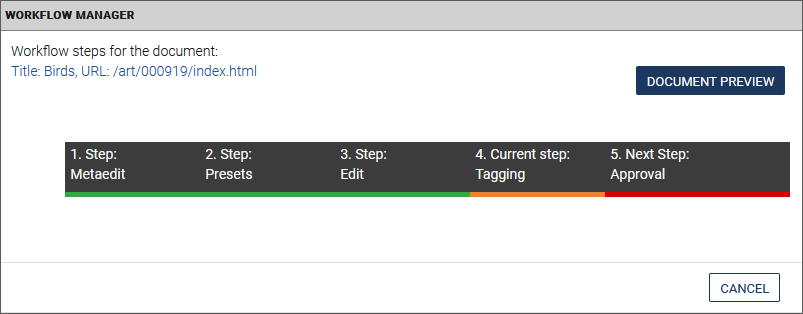
This dialog shows the following information about the current document:
Title: The title of the selected document appears here.
URL: If you click on the URL of the selected document, the document is displayed in a new window.
Current step: Click this entry if you want to execute the current workflow step.
Next step: Click this entry if you want to complete the current workflow step.
You may return to any of the other displayed steps by clicking on it.
Document preview: Click on the Document Preview to open a preview of the document in the same window.
Previewing a document#
As you can preview a document while editing, you can also do this from your desktop:
- On your Desktop, click the displayed path in the URL column (you may need to add this column first).The selected document opens with the current status in a new tab in your Internet browser. A toolbar at the top offers different output formats for the preview mode of your document.
- Close the browser tab to exit the document display.
Editing the document history#
All stages of the document that it has passed through, as well as the actions that have been performed with it, are recorded in the so-called "history" of the document. Every user who edits the document can create entries in the history or edit existing entries to give other users hints or leave comments.
- Click in the History column of the desired document (you may need to add this column first).
The document history is opened with all existing history entries.
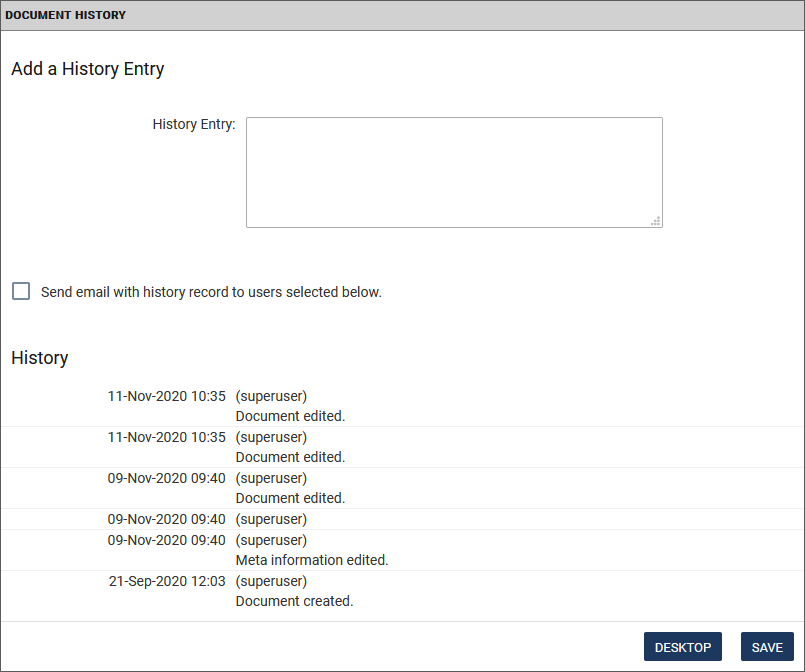 An existing history entry contains the following information:
- Date: The date on which the entry was made.
- User: The name of the user who made the entry.
- Text: The text entered by the user.
- Optionally, add a new entry in the History Entry input field.
- If you want to send this entry to other imperia users, activate the checkbox Send email with history record to users selected below and select the desired recipients.
- Click Save to save the entry and send the emails if required. You will then return to your desktop.
- Click Desktop to leave the document history without saving an entry.
Deleting a document#
Note
Please note that two functions are available for deleting a document: Discard (changes) and Discard all changes.
- Discard (changes): The document is only removed from the desktop, that is, the current workflow step of the document is discarded. Already published and/or archived versions are preserved.
- Discard all changes: All changes and the associated objects of a document are discarded.
To delete a document, your current group should have the permission to execute the following two actions:
-
Deleting in the current workflow step, which is inherited from the category by default
-
Deleting documents in the corresponding category
The following steps also apply to the Discard all changes function:
-
Choose the documents to be discarded:
-
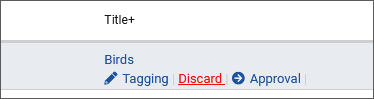
Click the context menu in the More column. Alternatively, hover over the column Title + of the desired document.The Discard option is displayed.
-
-
If you have selected more than one document, click Discard changes at the end of the desktop.
- The document history dialog opens, where you can optionally add an entry.
- Click Save to discard the document.
Link Checker#
The Link Checker is used to check internal and external links within a document.
You can find the Link-Checker at different places:
- in a separate Link Checker column,
- in the sub menu of the column More (you may need to add this column first),
-
as button Link Check Documents in the lower bar of the Desktop - if you have selected several documents via the checkboxes (for this the Link Checker column must be added before).
-
Click Check in the Link Checker column to initiate the Link Checker.
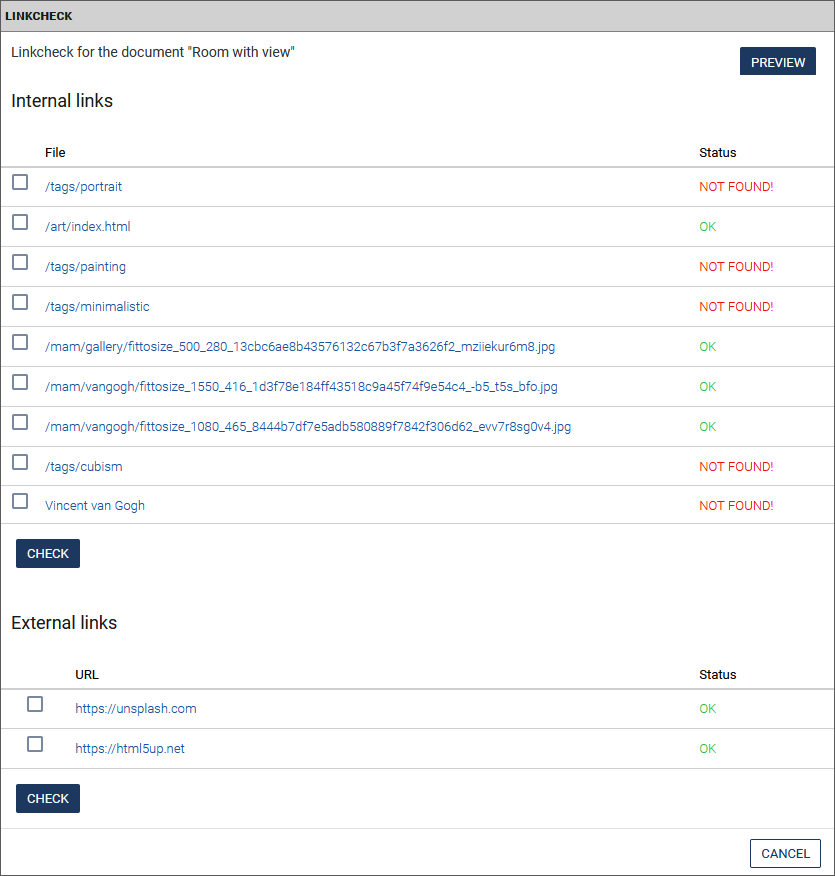
Internal as well as external links are checked.
- "Internal" links refer to other documents on the website as well as to media such as images, PDF documents, audio files, etc.
-
"External" links refer to other web sites (http://www.domain.top).
Note
External links can only be checked, if the link checker has been activated in the General Settings.
The status column tells you whether the link was set correctly.
- Call up the preview of the document or page by clicking on the relevant path.
- Click Check to restart the check for internal or external links.
Performing multiple actions#
Some workflow steps, such as approving or finishing a document, can be performed for multiple documents simultaneously. To do this, you need to display the desk column Multi Action. The Multi Action column displays the next workflow step for each document.

- Select the documents you want to perform a multiple action to by activating their checkboxes.
- Under ... More in the bottom bar of the desktop, click the button Execute action.
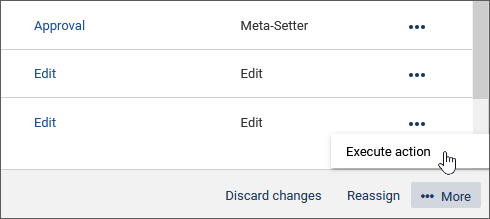
Note
This button is only visible if you display the Multi Action column on your desktop.
The system then executes the relevant action for the selected documents (for example, Meta-Edit, Approve, Exit, Upload Asset, Multilingualism, and so on) and displays a report for this.
- If the next workflow step of a document requires user input, you can call it directly from the multiple action report.
A special case is the workflow step Approval that contains a select field, assuming you have the permission to approve.
- Select whether you want to approve or reject a document and then execute the multiple action.
Approved and rejected documents are then automatically transferred to the next step in your workflow.
Locked documents#
imperia ensures that only one user can work on a document at a given time. This prevents changes made by one user from being overwritten by changes made by another user and thus being lost. For this purpose, a lock is used that is automatically applied to a document when it is edited by a user.
However, the locked document is worthless if the information it contains has become obsolete. Or maybe the locked document is a key document for an otherwise terminated project. In this case, an unresolvable document lock would possibly endanger the project's success .To prevent this from happening, imperia offers the possibility to remove foreign locks.
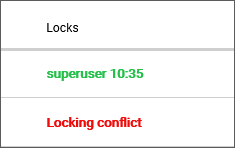
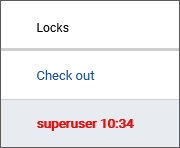
The document lock is displayed on the Desktop of all authorized users in the Lock column (you may need to add this column first).
Locking/Unlocking a document#
Locks for documents are set up in the Document Check-out/Check-In dialog:
1. Locking a document
-
On your Desktop, in the Locks column click the Check out link of the desired document.

-
Click the Check out button.
The document is now locked. The lock is displayed to all authorized users in the Locks column. The entry contains the name of the user who locked the document and the time of the lock.
2. Removing your own lock
-
On your Desktop, in the Locks column click on the user/time stamp, see figure above.
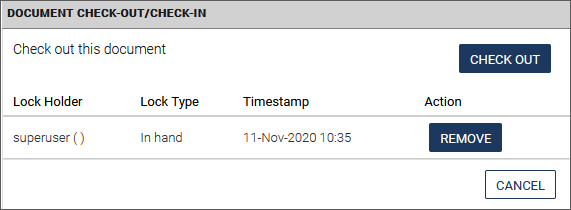
The following information is displayed in this dialog:
- Lock Holder: This column contains the name of the user, who holds the lock to a document. This column remains empty when a new lock is set.
- Lock Type: This column contains the lock type.
- Time stamp: This column contains the date and time of the lock.
-
Action: Possible action for the locked document.
-
In the Action column, click the Remove button.
The document is unlocked and can be edited again by all authorized users.
Solving conflicts#
A conflict occurs when a user ignores the lock of another user. However, you should refrain from ignoring locks. In any case, the reasons should be documented if you ignore them.
Scenario 1: For users who want to edit the locked document
If you are attempting to open a document locked by another user, you receive a notification in the Locking Conflicts dialog. You can then choose your further procedure from a list of alternatives:
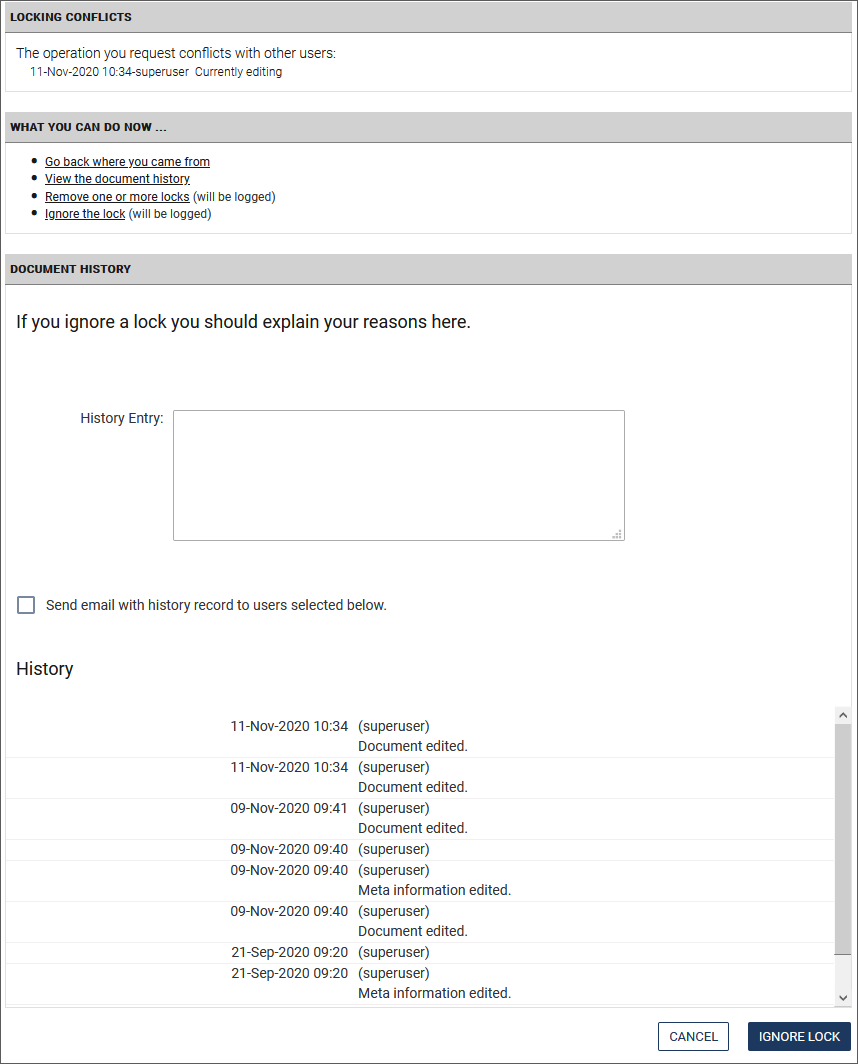 The following alternatives are available:
-
Go back where you came fromIf you select this alternative, you return to the desktop. You can then edit another document.
-
View the document historyThere you can check the document history to see who is currently editing the document and whether this user has left a comment in the history.
-
Remove one or more locks (will be logged)By this option you remove the document lock.
-
Ignore the lock (will be logged)Selecting this alternative produces a conflict. The existing lock is removed and you can edit the document. At the same time, an entry is added to the history of the document. The user who locked the document also receives a notification, see next scenario.
Scenario 2: For users whose lock was ignored:
As soon as a user has ignored your lock, you receive the following message if you want to continue processing the document:

This dialog shows you which user ignored your lock at which time. You then have the option of choosing your further procedure from various alternatives:
-
View the document historyThe user who ignored your lock may have left a reason here. Ignoring the lock is always logged.
-
Return to your Desktop and discard your changesHere you discard "your" changes and allow the user who ignored your lock to stop working on the document. When the user stops working on the document, it is released again and you can view its changes and add your changes if necessary.
-
Ignore the conflict and proceed anyhowThis alternative discards the existing lock of the other user and you can edit the document. As soon as the other user wants to save his work, the Sad News dialog opens.
Removing foreign locks#
A user who tries to open a locked document gets a hint in the dialog Locking Conflicts which other user is currently editing the document. He can then unlock (ignore) the lock in the What you can do now... dialog.
Warning
You should only remove locks in exceptional cases.
-
On your Desktop, click the link in the Locks column that is highlighted with red color:
Note
Note that a lock conflict also occurs when you click on Check out.
-
In the Action column, click the Remove button.
The document lock is now removed. The process of removing a document lock is complete and you can lock the document under your profile again. The user who has locked the document will receive a notification if he processes the document further, see scenario 2 in Solving conflicts.
Assigning documents#
In imperia, you can assign documents to other users who have read permission for the document. You can also "adopt" the document yourself by assigning it to yourself. You can do this from the desktop. The assignment can also be realized automatically using a workflow plug-in. Find more information on the latter procedure in the Admin manual.
The following describes the procedure from the desktop:
- Select the required document. You can select several documents by activating the checkboxes in front of the documents.
-
Click on Reassign at the bottom of the desktop. Alternatively, in the User column of a document, click on the name or on the not assigned link (you can also filter by this column).

The documents you want to assign are shown in the upper left corner.
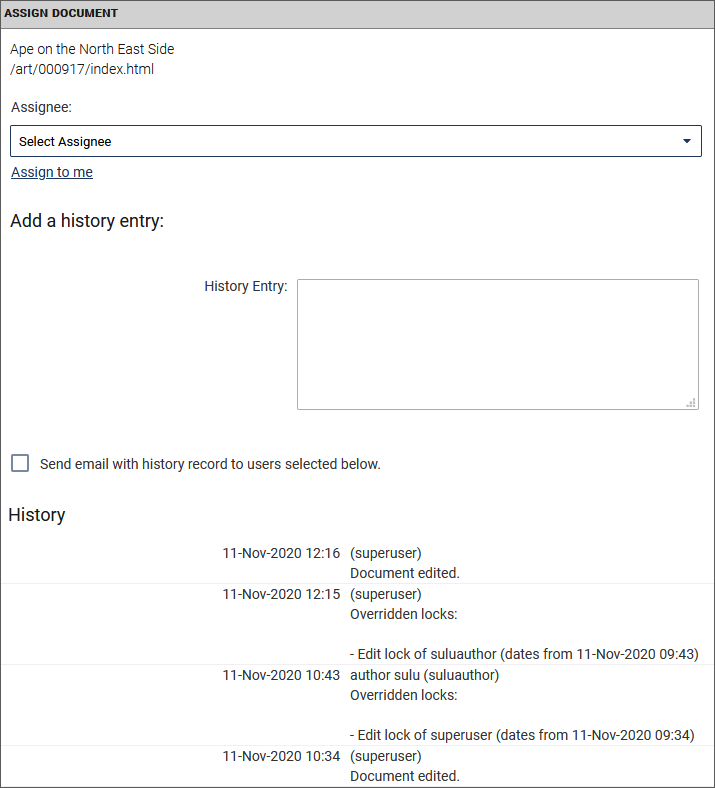
-
From the Assignee drop-down menu, select the user to whom you want to assign the documents.
- If you want to assign the documents to yourself, click on the link Assign to me.
- Under History Entry, optionally enter a reason for the assignment. If you assign only one document, the complete history of the document is also displayed below.
- Click Save to finally assign the document to the selected user.
As soon as you have been assigned a document, you will receive a notification via the internal mail system.
Approving documents#
Within the workflow that a document passes through, there can be workflow steps that check and approve the processing status of the document. This is often implemented as the last workflow step before the document finally leaves the workflow. Only certain groups, such as the "Editor-in-Chief" group, have access to these approval steps.
Depending on whether the responsible user approves the document or not, the subsequent way of the document through the workflow looks like:
- If the user approves the document, it is passed to the next workflow step, for example it is automatically published.
- If the user does not approve the document, it returns to the processing step of the workflow or ends up in the trash. The further way the document actually takes if it is not approved depends on which workflow steps are planned for this case.
As soon as a document reaches an approval step in the workflow and you edit this step as the responsible user, the following dialog opens:
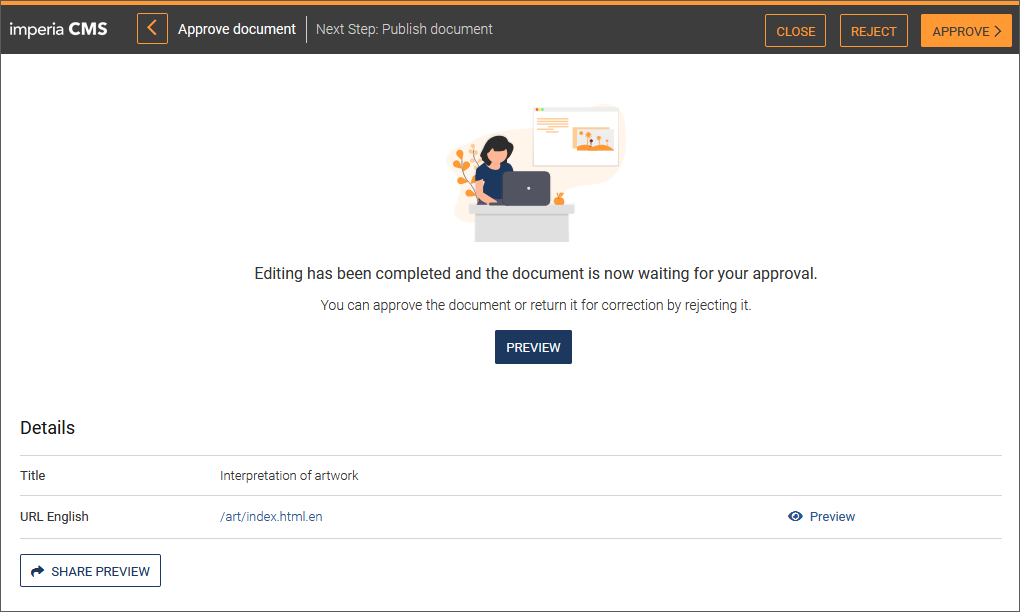
- Choose how you want to proceed with the document:
Approve: The document is approved and reaches the next workflow step. This could be the Finish step. Note, that the next workflow step can be different depending on the workflow.
Reject: The document is moved to the workflow step which is provided in case the document is rejected. This could be the Edit step.
Preview: A preview opens showing the current status of the document.
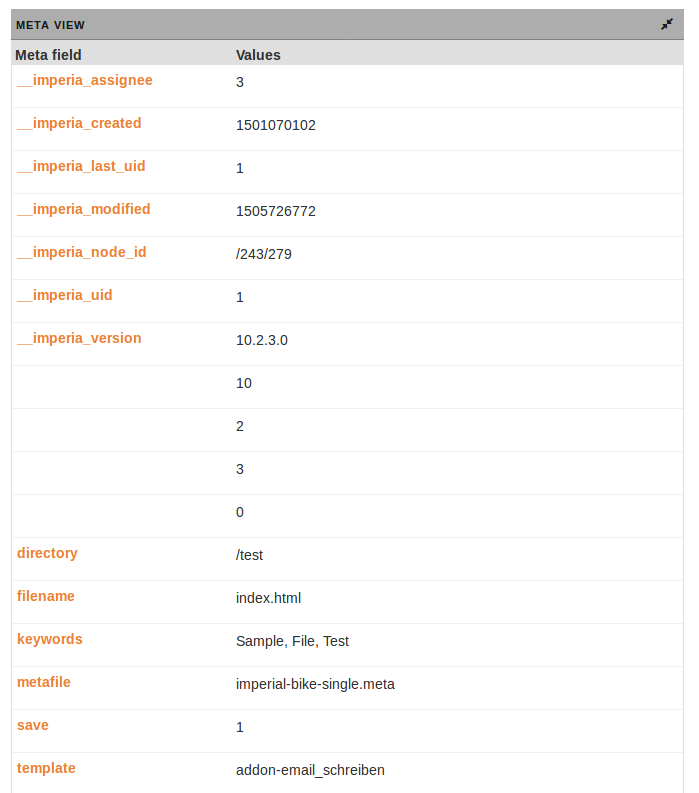
Displaying meta variables of a document#
The meta viewer is mainly used for debugging during the development phase of a project. You can use the meta viewer to display all existing meta information of a document.
Warning
Only if you have the necessary rights, you can change the meta information if necessary and add new meta fields and field values to the existing ones. Find more information in the Admin manual for more information.
- In the Meta View column, click on the View link. A new browser tab with the meta viewer is opened. For each meta variable, the table contains a row in alphabetical order. This row contains the name of the meta variable in the Meta field column and the values of this meta variable in the Values column. If you are allowed to edit the meta information, the existing values appear in editable text fields.