Managing media
In Media Asset Management (MAM), assets are managed the same way as documents.
In Media Asset Management, unstructured asset data is enriched with structured data that can be used by imperia. In addition, imperia versions and archives all assets so that you can find older versions in the archive and import them at any time. You can also track whether and where an asset is used in documents. The upload of new assets follows a defined workflow.
The MAM thus represents a process-oriented document management solution.
Definition of term
With the term Asset, borrowed from the financial world, one summarizes any digital contents in the content management, in particular media files such as graphics, videos, music files and texts.
Layout and functioning of the MAM#
Open the MAM via Menu -> MAM.
In the left area, the asset categories are displayed in a tree structure, which you can also use as navigation:
- Click on the category name to display the content of the category in the right area.
- Click on the plus symbol to expand a category and display its sub-categories. To collapse an expanded category, click the minus symbol.
The assets are displayed in the right area. This is where you will also find the preview , which you can display by clicking the arrow on the right.
Note
The settings you have made are saved individually for each user. The settings are also retained the next time you call them up.
Working with the category tree#
Assets are stored in directories that correspond to the categories of imperia documents. The categories are also displayed in the usual tree structure. There you navigate as in the category tree.
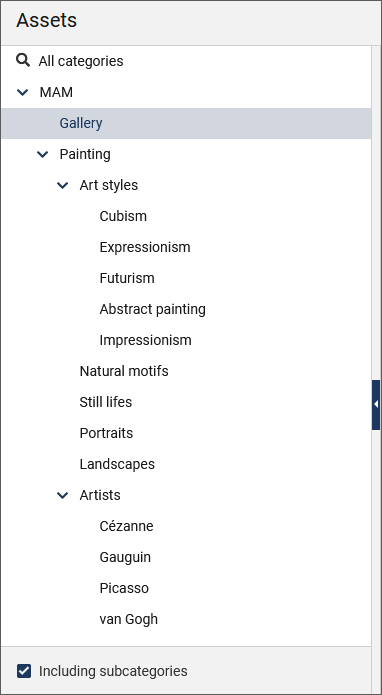
The category tree can be hidden and shown again by clicking on the arrow symbol of the separator line.
- Select the checkbox Including subcategories under the category tree if you want the subfolders to be displayed as well.
Using the context menu of a category, you can edit the category , create subcategories or delete the category. Here you also find the options for uploading assets.
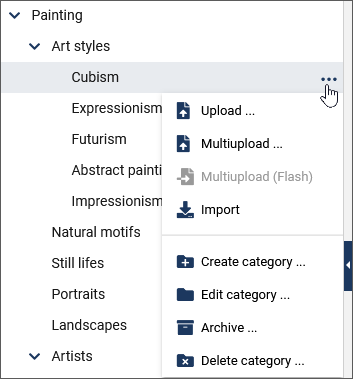
- The Archive option takes you directly to the archive of the selected category, from where you can select an asset and import a previous version.
Finding assets#
The search in Media Asset Management works in the same way as the search in the Document Browser: To find assets, you can choose between a Standard search, which can be further restricted using filters, and an Advanced search, which allows you to perform individual and complex search queries.
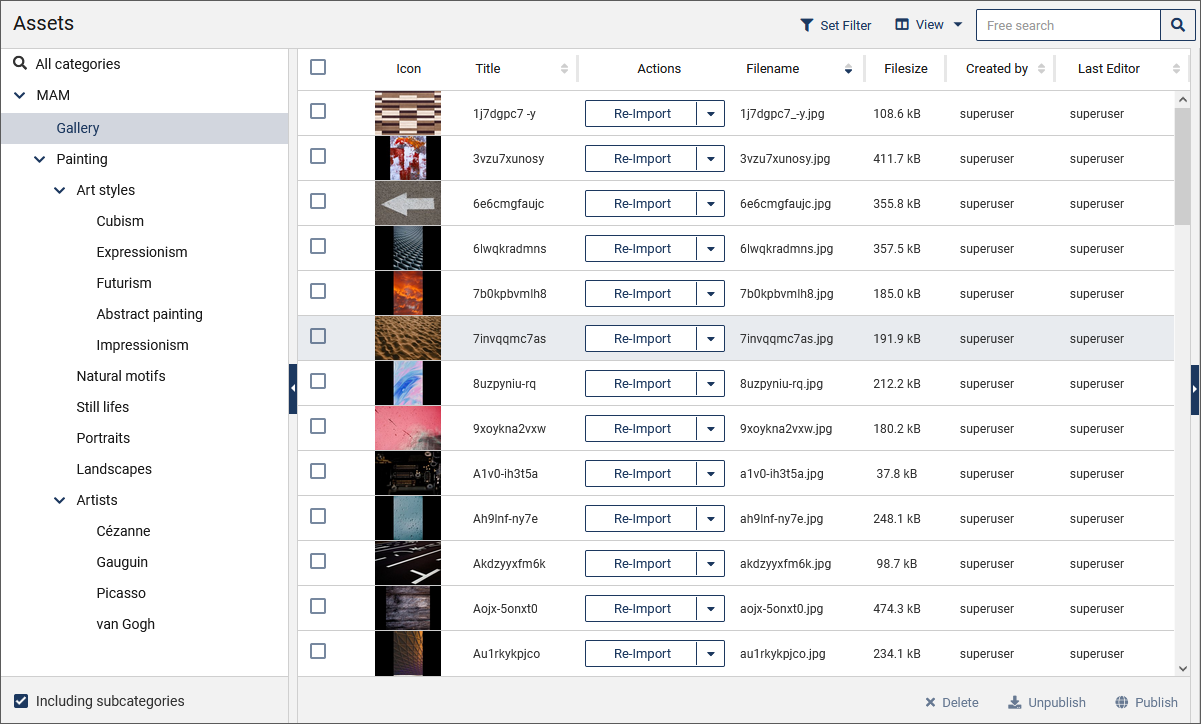
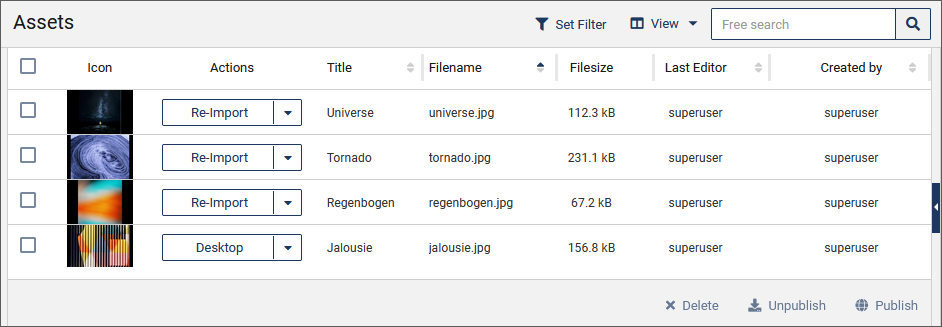
Working with assets#
The assets contained in a category are listed in a table. Information about each asset and possible actions are provided in columns.
-
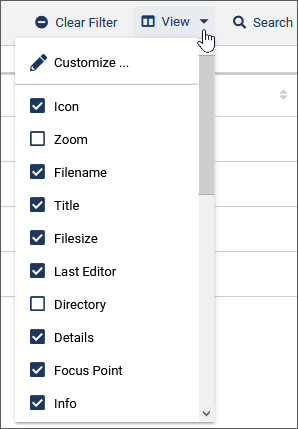
If you want to add a column in the table, use the View option, and then select the checkbox in front of the desired column to display it.
-
Alternatively, you can change the sequence of the columns and the selection fields offered in them under View / Customize. Use drag & drop to move the columns or fields to the desired position.
You have the option to sort by specific columns such as Last Editor or Generation Date. Note that the sort function is not available in all columns.
- Click on the corresponding column header. The column is sorted in ascending alphabetical order.
- Click the heading again to sort the column in descending order.
Uploading asset(s)#
Note
For uploading assets, you need write permission for the target category in the MAM.
If your target system runs on Windows®, set the variable "DISABLE_8BIT_FILENAMES" = "1". Please also refer to the Admin Documentation.
There are several ways to upload assets. The following naming conventions apply to all options:
- imperia replaces umlauts in the file name with two underscores "__" when storing the file in the file system.
- imperia converts uppercase to lowercase.
- Spaces in the file name are replaced by a single underscore. However, spaces remain in the name that appears in Media Asset Management. Example:
hüsker_dü_-_eiffel_tower_high.mp3will be converted to the filenameh__sker_d___-_eiffel_tower_high.mp3. The titleHüsker Dü - Eiffel Tower Highis proposed automatically. The proposed title can be modified afterwards.
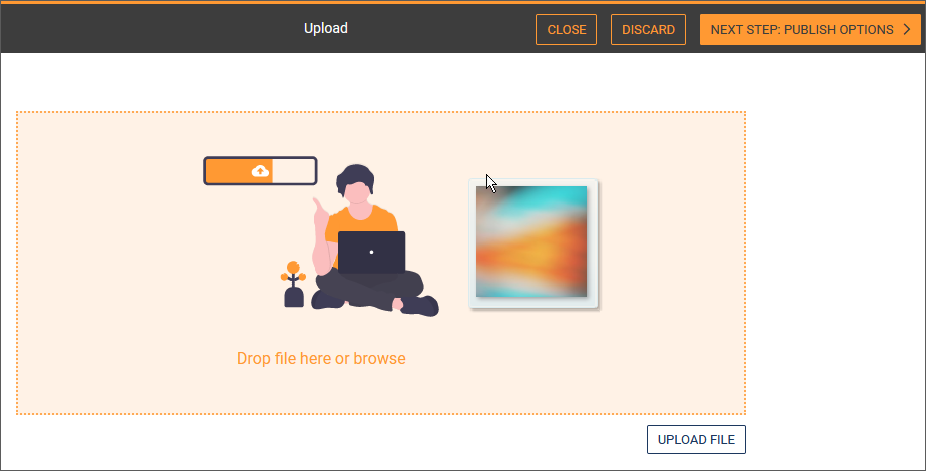
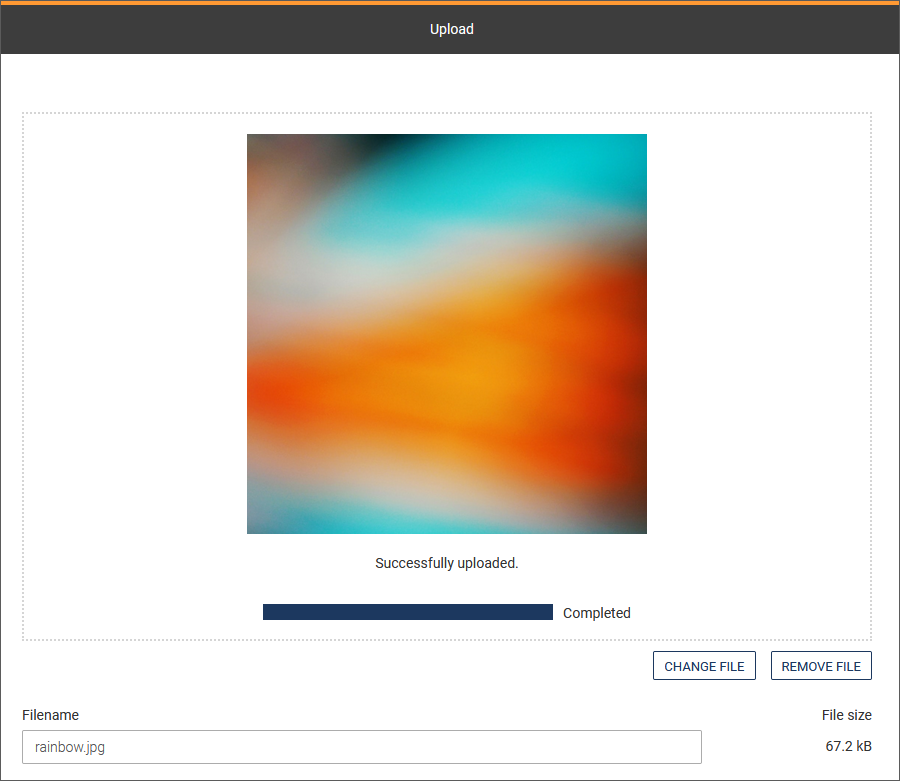
1. Uploading an asset via the file manager
- In the tree structure select the category, in which you want to insert an asset.
-
In the context menu of the category click Upload.

-
Drag and drop a file into the drop zone. Alternatively, select the desired file in the file manager via Upload file.
-
Enter the required meta information such as the file name. Make sure to comply with the naming convention.
- Click on Next step to move to the next workflow step. A click on Close will take you to the desktop where you can still see the asset as a document in the workflow.
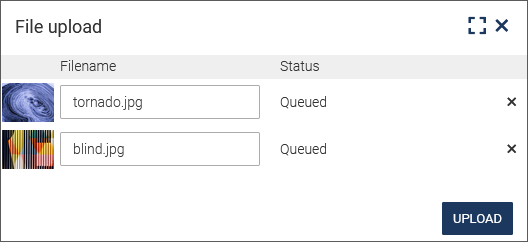
2. Uploading multiple asset(s) via drag&drop
- In the MAM, click on the desired asset category in which you want to add the assets.
-
Drag the selected asset(s) from your file manager into the List view display area. This will turn into a drag&drop area where you can now drag the assets you want to upload.
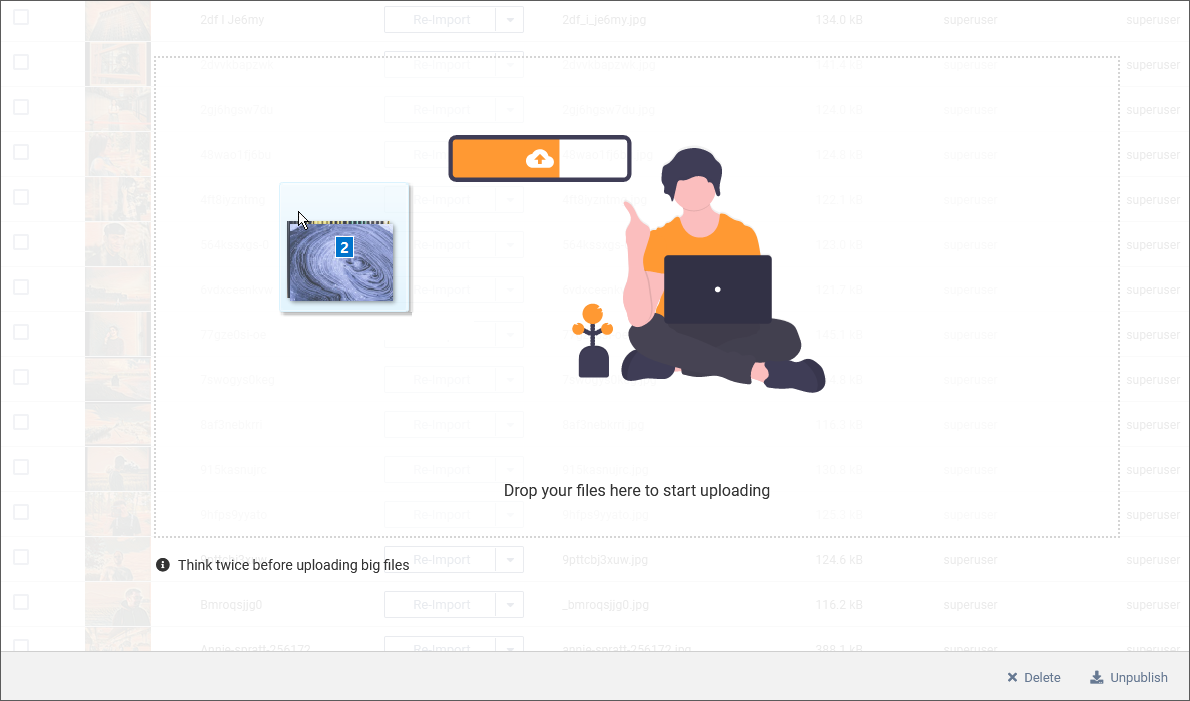
-
If necessary, change the names of the asset(s) by entering the new name in the Filename input fields.
-
In case an asset with the same name already exists in the MAM, you may choose to overwrite it by selecting the checkbox next to its name or remove it, using .
- Click on Upload.
The assets now appear in the Asset List.
Note
The asset upload template may differ on your system. The option described above is based on the default imperia template.You can create your own templates for this. Find more information in the syntax reference for imperia templates in the programming manual.
3. Multiupload
This option allows you to upload multiple assets to an asset category in a single operation.
-
Choose Multiupload in the context menu of the category.

-
In the Number of Uploads select box specify how many assets you want to upload to the Media Asset Management at the same time. Depending on your selection, imperia duplicates the set of input fields for uploading an asset.
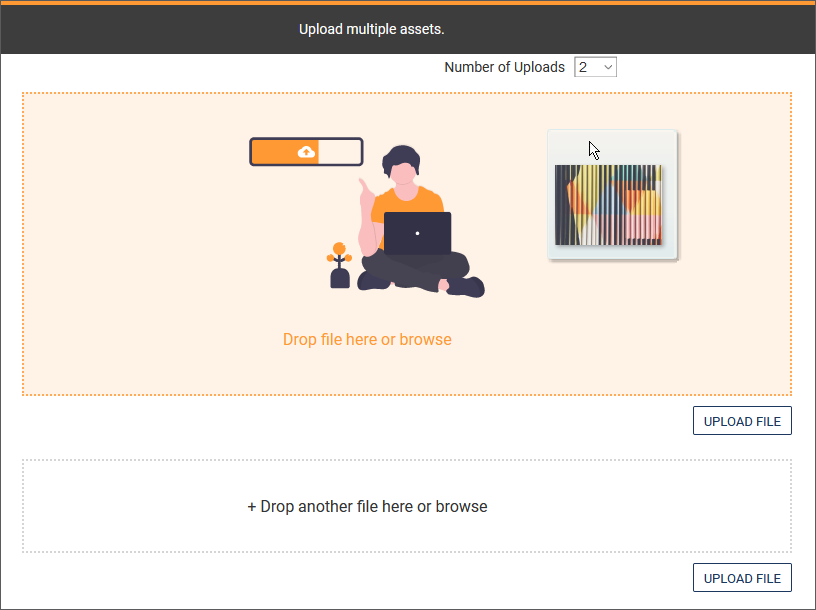
-
Select the files from your file system.
- Click Save to start the multiupload.
Publishing asset#
In MAM, you have the option to publich assets directly and independendly from documents (refer also to the Admin's Manual).
The asset is published for the target system with the corresponding variants.
- Select the checkbox in the row of the asset.
-
Execute the Publish option in the toolbar below the asset table.

The asset will be published directly. A new page opens with an overview of the publishing.
Changing asset properties#
Asset properties can be changed using the meta fields located in the asset details.
Note
An imperia administrator can enable or disable meta fields for editing.
1. Open details
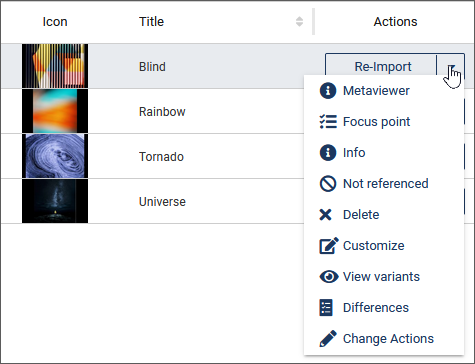
- Execute the Metaviewer option in the context menu of the asset.
The Details dialog box displays the meta information of the asset:
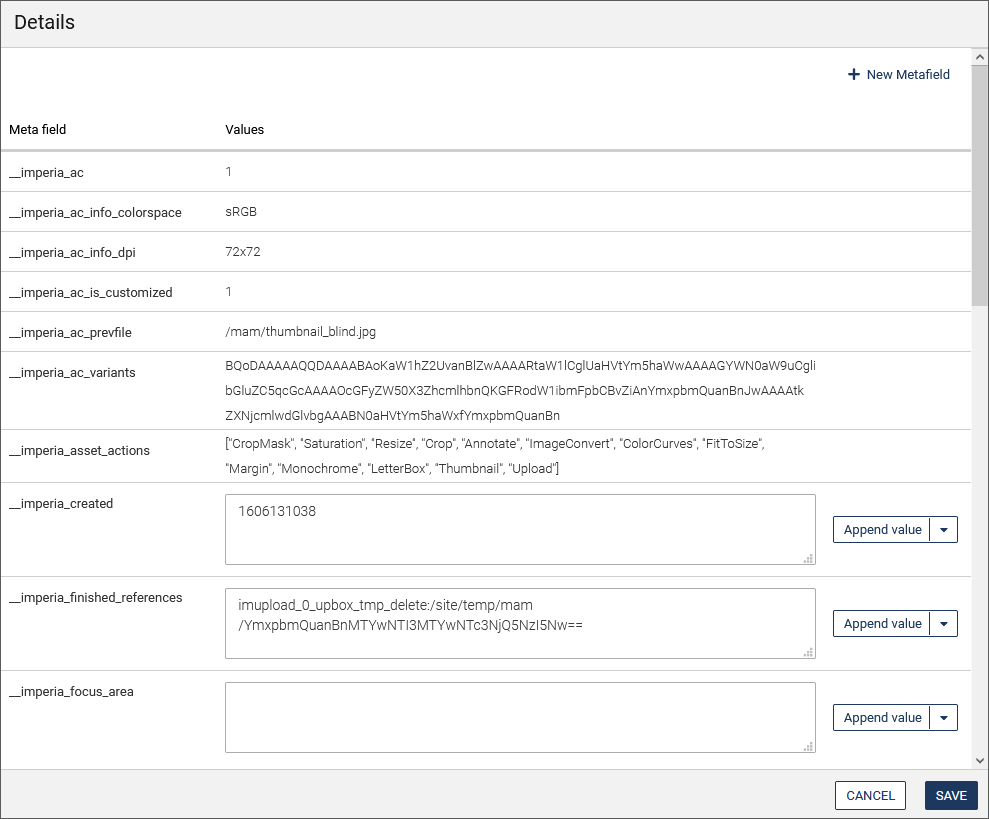
- Enter the desired values in the input fields or change existing values.
- If necessary, delete a metafield by clicking on Delete metafield in the dropdown-menu behind the metafield. Metafields without this option cannot be changed or deleted.
- Create new metafields for the asset by clicking New Metafield.
- In the dialog that opens, enter the name in the Metafield input field and determine the value. Then click Create to add the meta field.
- Click Save to save your changes.
Deleting asset#
Note
To delete an asset, you need write permission for the appropriate asset category.
-
Open the drop-down list with the asset's action options in the Actions column.
-
Choose the Delete option.
-
Alternatively, choose Delete in the toolbar. You can delete multiple assets by first selecting the desired assets by activating their checkboxes and then calling the function.
-
Make further settings in the dialog box that appears:
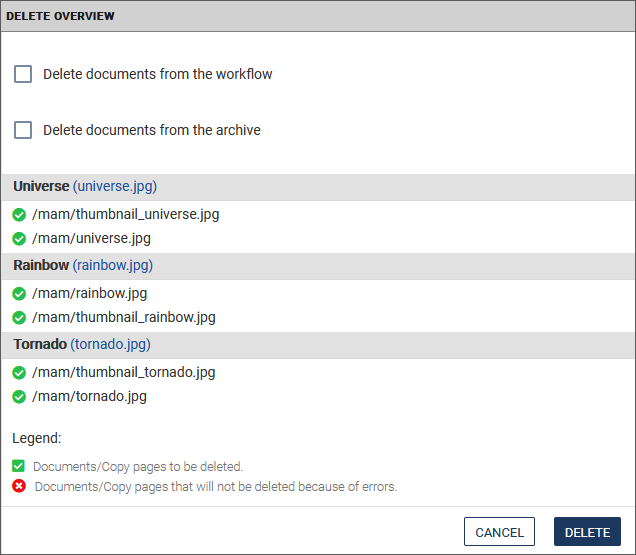
- For assets referenced in documents, you have the option to ignore the references, but this is explicitly not recommended.
- You can delete assets from the workflow or from the archive (irrevocably).
Setting focus point#
The Focus point function is very useful if you need the same image in multiple formats, such as 4:3, 16:9, or 21:9.
This function generates images with an image area of your choice for all available formats.
Prerequisite
As usual, the feature 'Focus point' is to be found in a column. Make sure that you have added the column to the MAM.
-
Open the drop-down list with the asset's action options in the Actions column.
-
Choose the Focus point option.
-
Click on the selection pane on the left side of the edit window.
On the right side of the edit window you can see how the position of the focus point changes the image in different variants.

- Click on Save to save the current setting and to return to the MAM.
When you insert the asset into a document, it is always visible with the focused section.
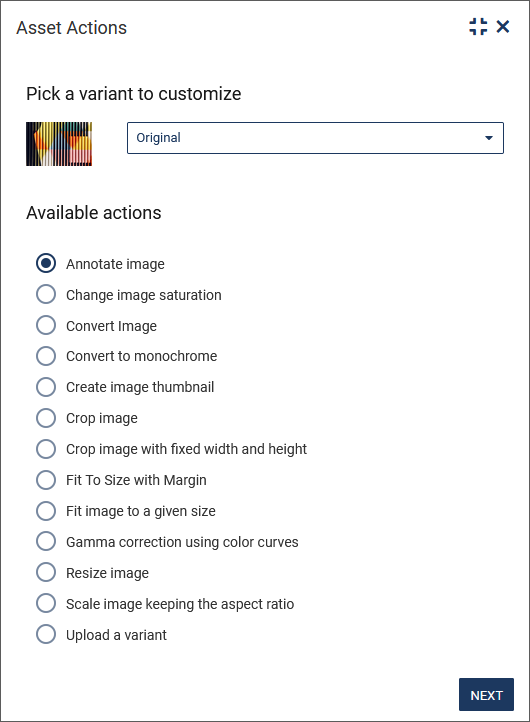
Editing images#
For each graphic asset, a variety of actions is available for editing and customizing the asset.
-
Open the drop-down list with the asset's action options in the Actions column.
-
Choose the Customize option.
-
Select the variant of the asset that you want to change. For example, you can choose between the original and the thumbnail.
-
Choose the desired action.
-
Depending on the selected action, make your changes in the corresponding editing window.
-
To apply the changes, click Next. The changes are saved directly as a new variant of the asset.
-
Click x to get back to the MAM.
-
Optionally specify the new variant as the default. Proceed as described under Defining an asset standard variant.
Note
The Previous button on the last page of the dialog box creates a new variant. Even if a variant of this asset action already exists, it will still be created again.
The following describes all the actions that are available for graphic assets.
Annotating an image#
-
Enter the desired information in the editing window of the action Annotate image.
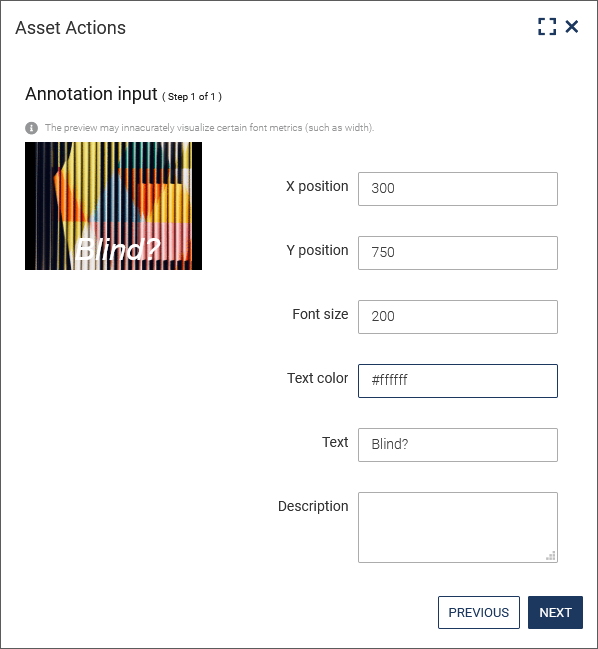
- X position, Y position: Enter a numeric value to determine the distance in pixels between the left and top edges of the text and the left and top edges of the image.
- Text size: Enter a numeric value that determines the size of the font in pixels.
-
Text color: Specify a hexadecimal color value to determine the text color.
Warning
Please don't forget to put a hash sign (
#) in front of the color information or the action will fail. -
Text: Enter your annotation text here.
- Optionally enter a Description.
-
Click on Next to display the result.
Changing the image saturation#
You have the option of determining the degree of saturation of the image.
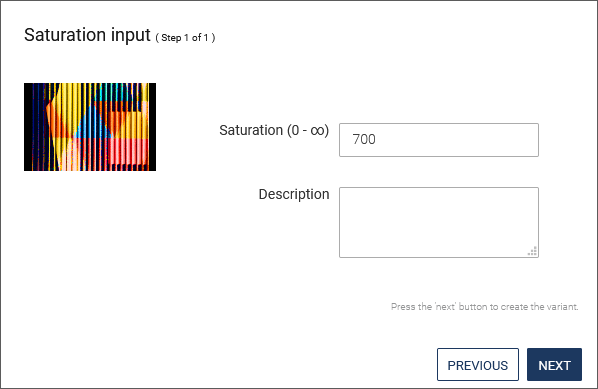
- Enter the desired value in the Saturation input field or alternatively use the arrow keys of the input field.
- Click on Next. The variant is created.
Note
- With values from 0 to 99, the degree of saturation is lower than with the original.
- Values above 100 generate a variant with higher color saturation.
- So you can create a black-and-white version of a color picture or make it a little more intense for a picture with pale colors.
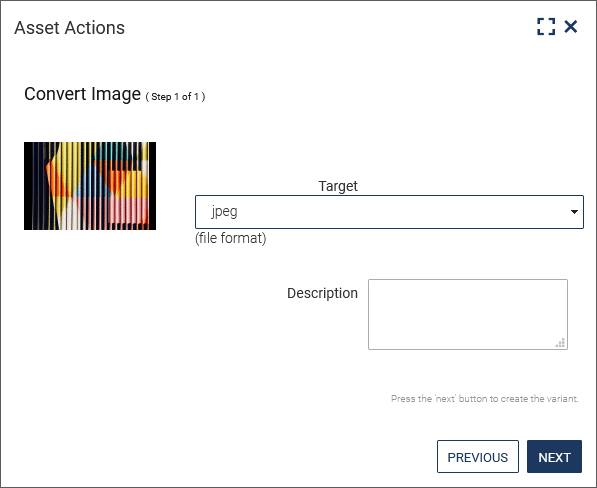
Converting an image#
With this function you can convert the image to jpeg, gif, png, tiff and bmp formats.
Note
The tiff and bmp formats are not recommended for web applications because not all browsers support them.
Converting image to monochrome#
The action Convert to monochrome allows you to convert a color image to a monochrome image.
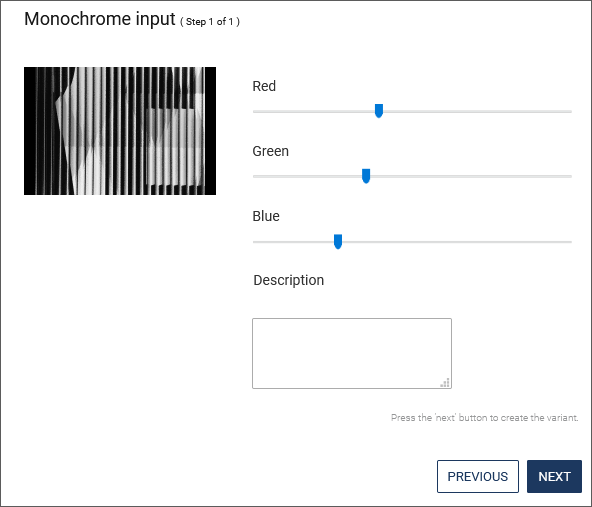
- Use the Red, Green or Blue channel slider bar to adjust the image.
- Click on the thumbnail if you want to display the variant in its original size. A window with the image variant opens. A click on the picture closes it again.
- Click on Next. The variant is created.
Creating an image thumbnail#
With this asset action you can generate a new preview image for the asset. The default dimensions of asset thumbnails are used.
Cropping an image#
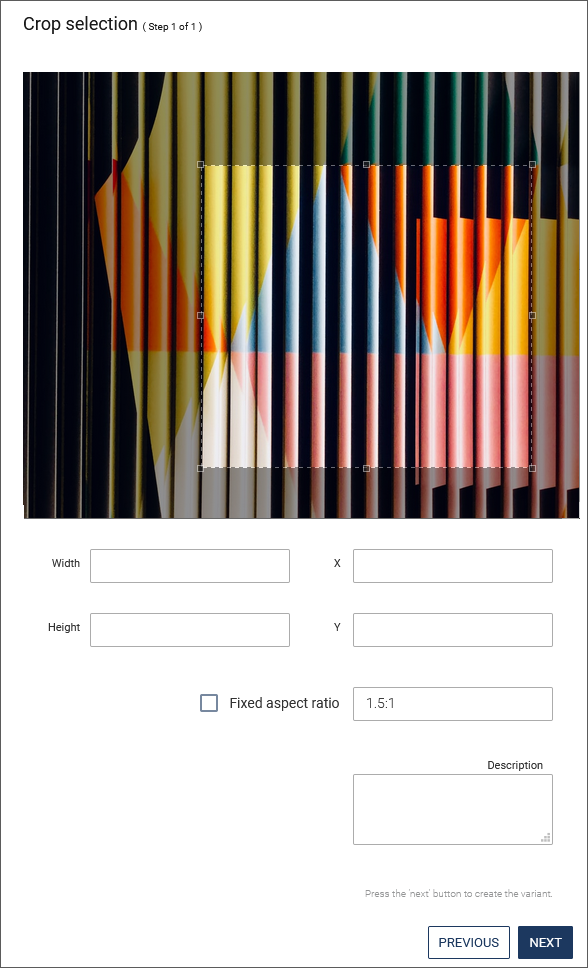
- Hold down the left mouse button and drag a rectangle to define the image section. At the four corners and in the middle of each edge of the selection rectangle there are handles that can be used to subsequently change the size of the section by clicking and dragging.
- Alternatively, enter the desired dimensions manually. Use the input fields Width, Height, X and Y below the image. X and Y determine the distance to the left and top corners of the image.
Note
If you call the action Create image via the link Customize in the MAM, the initialized image section has the same image format as the image in the template.
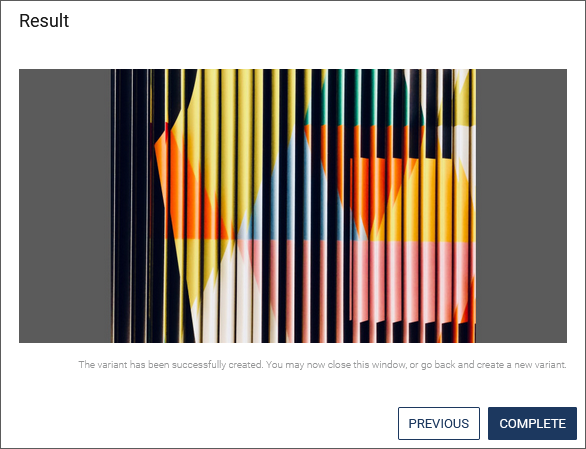
Fit to size image with margin#
With this action you create a variant which is cropped to a certain size, whereby the resulting edges are filled with a given color.
-
Enter the desired size in the Width and Height input fields.
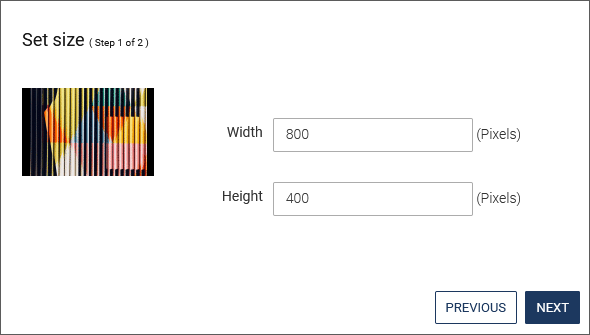
-
Click Next.
-
Select the desired settings for the background.
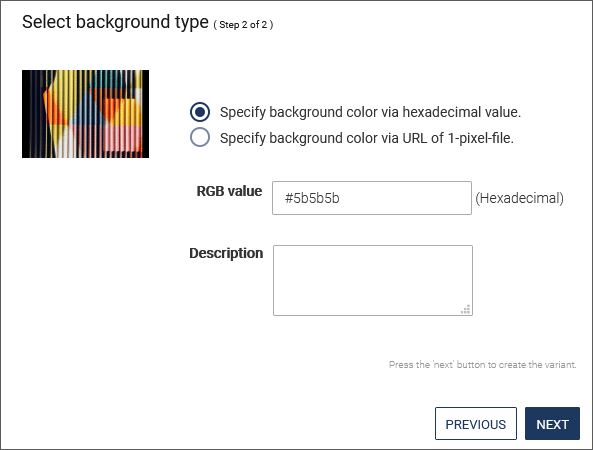
-
Click Next.
-
Click Complete The variant is created.
Fit image to a given size#
-
Enter the desired dimensions in the editing window of the action Fit image to a given size.
-
Click on Next to display the result.
Gamma correction using color curves#
This asset action allows you to perform a gamma correction.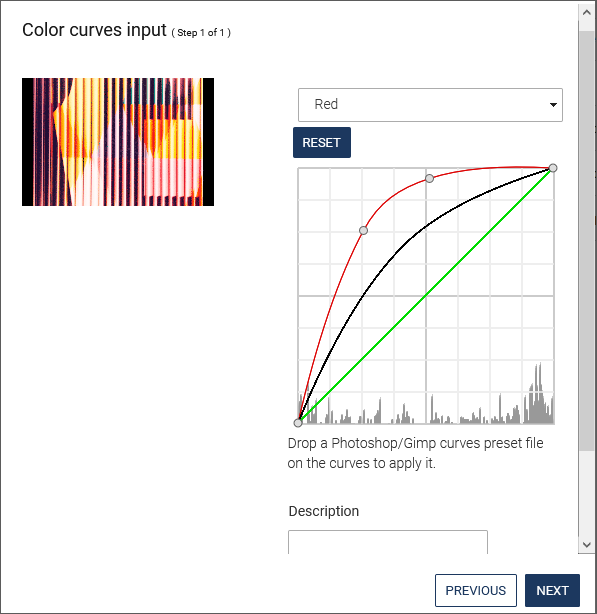
- In the drop-down menu above the curve diagram, select the channel (Red, Green, Blue and Alpha) you want to adjust.
- Use the mouse pointer to create a point on the curve diagram and drag it to the desired position.
- You can undo a previously made adjustment by pressing Reset. The reset only affects the curve you are currently editing.
- If you have already created a file with a preset curve using Photoshop or Gimp, you can drag and drop this file into the graph window. Your changes will be displayed in the thumbnail on the left side.
- Click on the thumbnail if you want to display the variant in its original size. A window with the image variant opens. A click on the picture closes it again.
- Click on Next. The variant is created
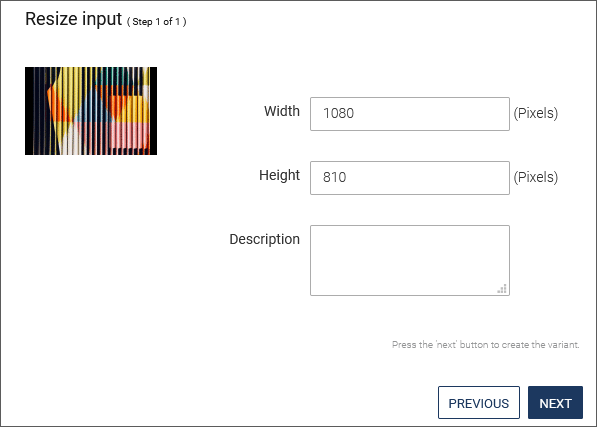
Resizing the image#
- Enter the desired dimensions in the editing window of the action Resize image.

- Click on Next to display the result.
imperia generates a variant resized to the dimensions you specified. So if you enter both page lengths and the result differs from the original in the aspect ratio, you get a distorted variant. If you enter only one side length, imperia automatically calculates the length of the other edge in the correct aspect ratio.
Tip
If you want to create a variant with given height and width, the action Cropping an image is the better choices.
Preserving aspect ratio during scaling#
This action creates a resized variant in which the image retains its aspect ratio. A background color can also be set here.
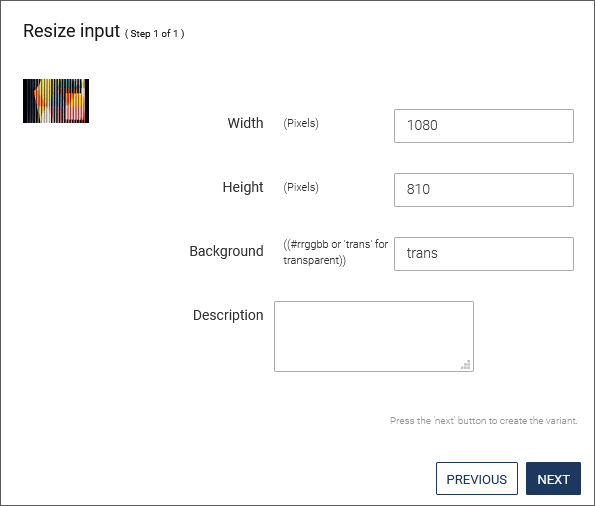
- Enter the desired size in the Width and Height input fields.
- Enter the background color or the value
trans. If “trans” (transparent) background color is selected, the result is a black background. - Click Next. The variant is created.
Uploading a variant#
Use this asset action to upload a new variant of the image.
- Click on Browse and select the desired file in your file system.
- Enter a description for the variant in the field of the same name.
Defining an asset standard variant#
With the asset actions mentioned above, you create different variants of an asset. One of these variants is the default variant which you select automatically when importing into a document by double-clicking on the relevant icon. Usually this is the unmodified version of the asset.
-
In the context menu of the asset, click on View variants.
-
In the first column Default, change the variant you want to define as default by checking the respective radio button.
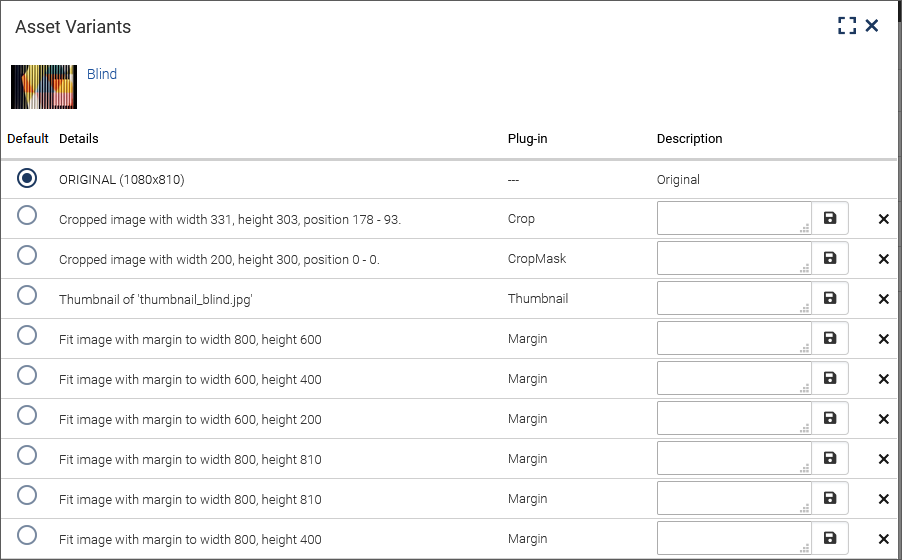
-
Click on the Details column to display the individual variants in a new window. The dialog shows you the available variants.
-
In the Plug-Ins column, you can see which action was used to create the variant in question:
Plug-in information in the dialog Asset Action Annotate Text annotation Crop Cropping an image FitToSize Setting the desired image size Resize Changing the image size Saturation Saturation Thumbnail Creating a thumbnail 5. Optionally, enter a description for the respective variant. 6. You my delete a variant by clicking on x behind the variant. 7. Close the dialog box. imperia saves the settings automatically.
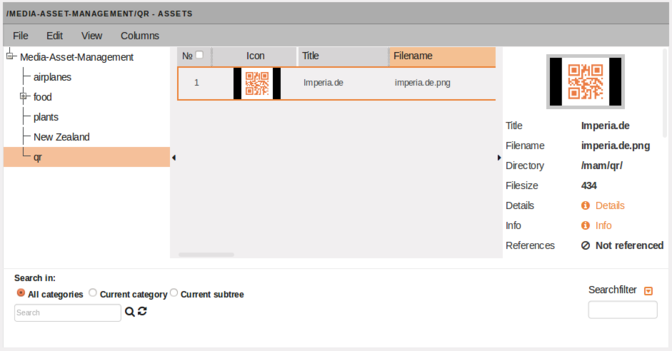
Generating QR Codes in the MAM#
Note
The QR code generator is an optional feature that must be licensed separately. Your contact person in imperia sales will be happy to provide you with further information.
Note
You need an asset enabled category with a specific workflow, that includes the QR Code plug-in, in order to generate and store QR Codes in MAM. In doubt, contact your system administrator.
To upload and store the QR Code in the MAM, proceed as follows:
- In the MAM, select the category in which the QR codes are managed:.
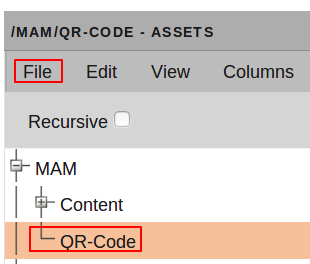
- Under File click on the option Upload
You are then guided through the corresponding workflow that was defined for generating QR codes.
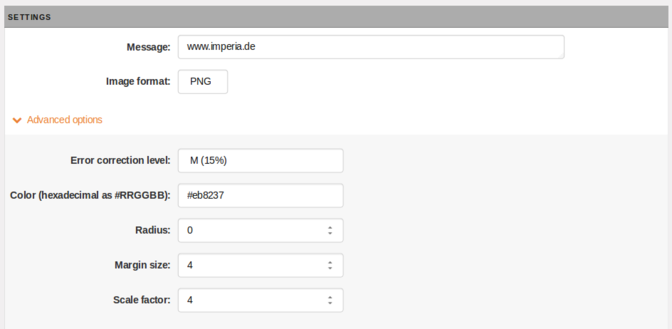
- In the Message input field, enter the website to which you want to link (e.g.
www.pirobase-imperia.de) or the file or text to be coded. This is a mandatory field and must be filled in accordingly. - If necessary, change the image format (
png,jpeg,ASCII). -
Adjust the display of the QR code under Advances options:
-
Under Error correction level, select the desired error correction accuracy from the drop-down list. Available values are
L,M,QandH(low to high accuracy).Note
In case you are using the Oil Paint filter to make the QR code look more stylized, make sure that the Error correction level has a higher value.
-
Define the Color of the generated QR code (#hexadecimal as #RRGGBB).
-
Select the Radius of the oil color filter. Possible values range from
0(default) to2.Note
Higher values can distort the QR code and make it unreadable for QR code scanners. It is recommended to use smaller values combined with a high error correction level.
-
Under Margin size, define a page margin for the generated QR code. The value range is between
0and255. - Use the Scale factor to define a scale for the generated QR code. The value range is between
1and255.
-
-
Click Save & Next.
- Enter the file name including the file extension, e.g.
Imperia.de.png. - Click Save to close the dialog.
The QR code is now available as an asset in the MAM.