Media import
In this chapter, you will learn how to import media files into the Media Manager.
Preparation and configuration#
Following adjustments must be made before importing:
- Set the
system.confvariableMAM_GET_UPLOAD_FILENAME=1.By default, zip files are imported from the/spooldirectory inside the/sitedirectory. Another directory can be used, but it has to be specified in thesystem.confvariableMAM_SPOOL_PATH. - Create the directory from which files are to be imported, and provide read permissions of the web server in this directory.Directory permissions can be set for the spool directory and subdirectories directly through “Spool Chmod”.
Examples:
-
"MAM_SPOOL_PATH" = "/mam_import"
The
MAM_MAX_SPOOL_SIZEvariable sets the maximum size of the imported assets. The value has to be in bytes. If this variable is not set, there is no limit to the import size. -
"MAM_MAX_SPOOL_SIZE" = "104857600" (Example limited to 100 MB)
To specify the library to be used for unpacking, use the
PLUGIN_ARCHIVE_ZIP_BINvariable. If the variable is empty, the system will attempt to use the Perl moduleArchive::Zip, if installed. -
"PLUGIN_ARCHIVE_ZIP_BIN" = "/usr/bin/unzip"
Note
Please note that
ZIPfiles should not exceed a certain file size, for this will cause problems when unpacking. For 32-bit systems, this is 2 GB and for 64-bit ones - 4 GB.
Importing via the Command Line Tool#
To call the command line script for importing assets, proceed as follows:
- Go to the root directory of the server.
- Call
site/bin/mam_spool_import.plwith the appropriate parameters. - To see the available parameters, call the command line script for importing assets without the appropriate parameters (see following examples) or write the following into the command line:
perl mam_spool_import.pl -hThis will open the “help” of the script, where all the available options are listed and explained.
Examples:
-
mam_spool_import.pl -c /1/15/143 -u 1 -f "company.jpg" -f "agb.zip" -f "logo.png"
The files
company.jpg,agb.zipandlogo.pngwill be uploaded to the 1/15/143 category by the user that has ID 1. The zip file is not unpacked. -
mam_spool_import.pl -c /12 -u 1 -e -l -f "images.zip"
The archive
images.zipis unpacked and the files are uploaded to the /12 MAM category or its subcategories. The directories contained in the zip archive with the name of the category are compared and the assets sorted into the existing categories. Not existing categories can be created. -
mam_spool_import.pl -c /12 -u 1 -l -d -w -f "importDirectory"
The files contained in the
site/spool/importDirectorydirectory will be uploaded into the /12 MAM category or its subcategories. The directories contained in the folder that contain the category's names are compared and the assets sorted into the existing categories. Not existing categories can be created. Existing assets will be overwritten.
Importing via the GUI#
To call the graphical interface of the MAM import, proceed as follows:
Open the MAM import dialog form File -> Import. The following dialog opens:
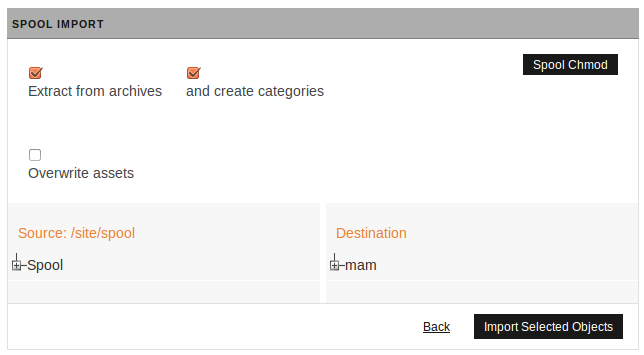
The dialog is divided into two sections.
In the upper area, the following options are available:
-
Extract from archives: If this option is selected, the zip file will be unpacked. This option is selected by default.
-
and create categories: Directories contained in a folder that contains the categories' names are compared and the assets sorted into the existing categories. If this option is selected, the non-existing categories will be created. The option is selected by default.
-
Overwrite assets: If assets with the same name exist, they will be overwritten if this option is selected.
-
Spool Chmod: This button takes you to the permissions dialog (see following figure) for importing assets from a directory. You can only change permissions for a single directory.
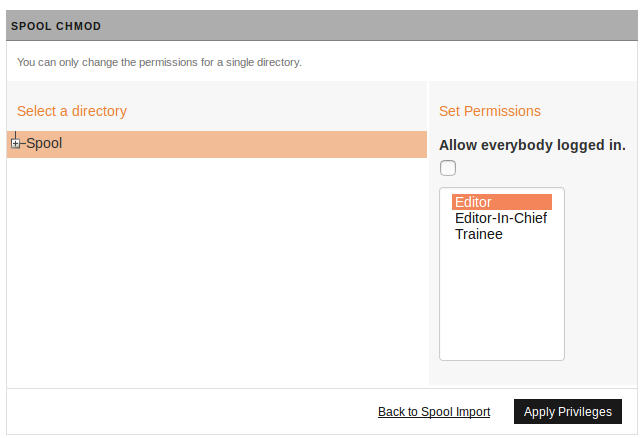
- On the left, there is a list with directories from which assets may be imported. Select the directory you wish to change the permissions to.
- On the right, there is a list of the groups in a system. Select the groups that should have permissions to import from the relevant directory. To select more than one group use the Ctrl key.
- Save the changes via the Apply Privileges button or exit without saving, using the Back to Spool Import link.
In the lower area of the SPOOL Import dialog, the following options are available:
-
Source: Select the source for the import. Click on the desired directory to mark it.
-
Destination: Select the destination of the import. Click on the desired category to mark it.
-
Click on the Import Selected Objects button to start the import. A status report will be displayed at the end of the import.