Social Media posting
imperia provides a comfortable way to connect with and manage your Facebook® and Twitter® accounts. You will be able to create imperia documents and a corresponding tweet and/or facebook post in one step. This means, you are able to formulate your tweet in advance and publish it all at the same time.
In this chapter you will find more information on how to:
-
create and configure your Facebook and Twitter applications (a Facebook- and/or Twitter Developer Account is needed for that),
-
how to configure imperia in order to be able to use the social media plug-in.
How to integrate the social media plug-in within a template, read the programmers' manual.
How imperia handles the social media publishing
-
After a document is published on a live system, the associated social media posts are sent. This is handled by the Hermes, running on your development system.
-
The copy pages will not produce several posts. This behavior is different for multilingual documents, where there will be a separate post for every language. Furthermore, if a new language is added at a latter stage, imperia will generate a new post/tweet only for that language version.
-
If for some reason, the transfer to the social media cannot be executed when publishing a document, you will have to reparse it.
-
After the associated social media posts have already been sent to a social media site, no duplicate posts will be generated when reparsing.
Configure the Facebook Application#
You have to create a Facebook App in order to run the imperia add on Social Media Posting and post your new content simultaneously to your Facebook page. To register a new application, read facebook for developers. In the following the most important steps for imperia will be introduced:
-
Log into Facebook as the user that has access to your Facebook page.
-
Register as a Facebook Developer. Follow the instructions from facebook for developers - developer account.
-
Create a Facebook App. Follow the instructions from facebook for developers - create app. Once you have created your Facebook app, you are redirected to the Facebook Application Dashboard, where you will receive the App ID and App Secret that you will need for the configuration of
channels.conf(see Configure Social Media in imperia):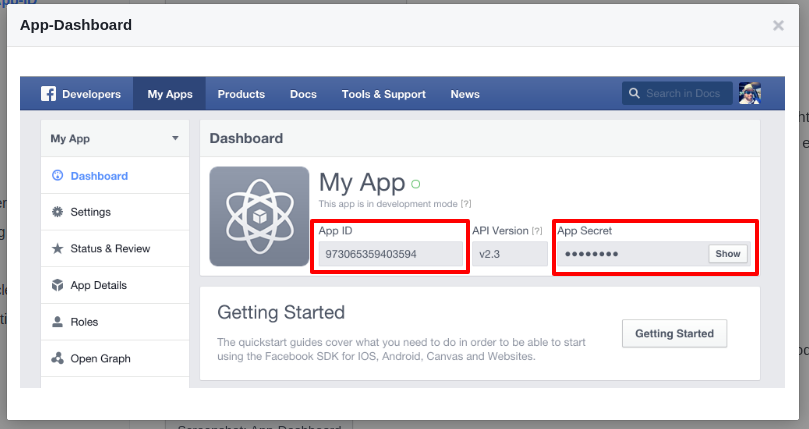
-
To see the App Secret, click on the Show button.
-
Submit your app for review at facebook in order to receive the required access rights for your social media plug-in facebook for developers - app review.
For more information on the Facebook App, read the developers' documentation.
Configure the Twitter Application#
You have to create a Twitter App in order to run the imperia add on Social Media Posting and post your new content simultaneously to your Twitter page. To register a new application, go to Twitter Apps. In the following the most important steps for imperia will be introduced:
-
Log into Twitter as the user that has access to your Twitter page.
-
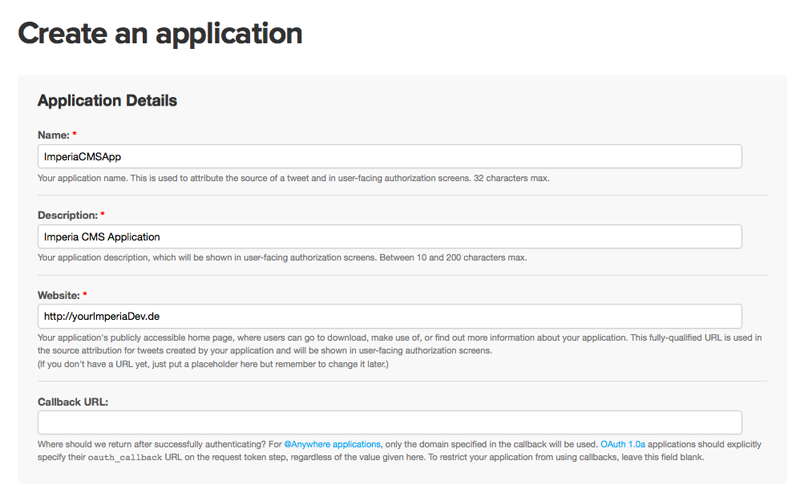
Create a Twitter App and provide the application's details,m see following example:
-
Once you have entered the desired settings, click on Create your twitter application to confirm.
-
Go to Settings->Application type, change the “Access” to “Read and Write” and activate the checkbox “Allow this application to be used to Sign in with Twitter”.
-
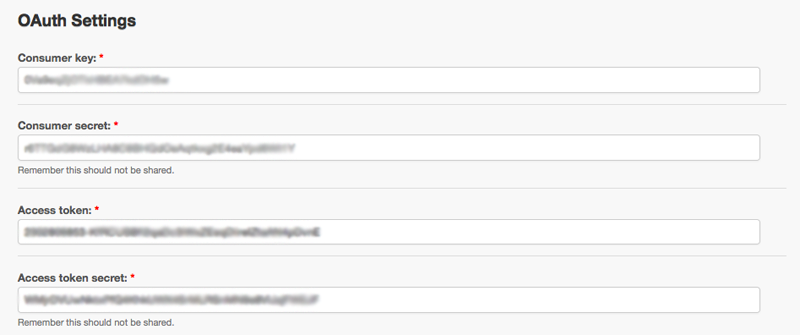
Get your access token by clicking on the Create my access token button (“Details” section). You will need these for the configuration in imperia (see Configure Social Media in imperia). You will be then able to see your access token in the “OAuth tool” section:
The described above configuration is the minimum requirement for your imperia social plug-in to work. For more information, refer to Twitter's Documentation.
Configure Social Media in imperia#
Additionally to the Facebook/Twitter apps, you will need to configure the socical media plug-in in imperia. Proceed as follows:
- Create the configuration file, located under
site/config/social/channels.conf. You will need to manually create theconfigas well as thesocialfile. - You can refer to the example
site/config/channels.conf.sample, see following:<channel> <@YourTwitterAccount> access_token_secret INSERT CODE HERE access_token INSERT CODE HERE consumer_secret INSERT CODE HERE debug 1 consumer_key INSERT CODE HERE service Twitter <!--@YourTwitterAccount--> <your.facebook.user.account> <page> <"Your Facebook Page"> OPTIONAL <!--"Your Facebook Page"--> </page> debug 1 consumer_secret INSERT CODE HERE access_token WILL BE INSERTED ON FIRST USE consumer_key INSERT CODE HERE service Facebook </your.facebook.user.account> </channel>
In the following, the example will be explained to you:
-
<channel></channel>A top level element that contains your accounts and pages (such a tag can contain more than one user and/or pages).-
<@YourTwitterAccount><!--@YourTwitterAccount-->These tags contain your Twitter channel information. The name of the tags corresponds to your Twitter account name.Important
This corresponds to the channel parameter set in
channels.config. -
<your.facebook.user.account></your.facebook.user.account>These tags contain your Facebook channel information. The name of the tags corresponds to your Facebook username. You can check your user name at Facebook→ Settings→General→ Username.Important
This corresponds to the channel parameter set in
channels.config.-
<page></page>The<page></page>tags contain information about your Facebook pages.-
<"Your Facebook Page"><!--"Your Facebook Page"-->These tags correspond to your Facebook page name. After the first use of the social plug-in for Facebook, the access token for the corresponding page will automatically be added within these tags.Important
If the name of the page contains whitespaces (as in the example), it must be placed within quotation marks
"".
-
-
debugIf this instruction is set, the Hermes plug-in provides additional information when an error has occured.
-
serviceThe service instruction contains the service to be used for the corresponding channel (e.g. “Facebook” or “Twitter”).
-
access_token_secret (Twitter)Copy your “Access token secret” from your Twitter application settings (see Configure Twitter Application; step 5)
-
access_token (Twitter)Copy your “Access token” from your Twitter application settings (see Configure Twitter Application; step 5)
- consumer_secret (Twitter)Copy your “Consumer Secret” from your Twitter application settings (see Configure Twitter Application; step 5)
- consumer_key (Twitter)Copy your “Consumer Key” from your Twitter application settings (see Configure Twitter Application; step 5)
- consumer_key (Facebook)Copy your “App ID” from your Facebook application settings (see Configure Facebook Application; step 3)
- consumer_secret (Facebook)Copy your “App Secret” from your Facebook application settings (see Configure Facebook Application; step 3).You can access your App ID as well as the App Secret from this site:
-
-
Facebook Application Access Token#
Unlike Twitter, where you receive your access token from your Twitter application settings, in the case of Facebook imperia requests them automatically when you first use the social plug-in.
If you are using a template, that contains the social plug-in processing instructions, you will be prompted for Facebook authentication, see following:

Facebook Login
-
You have to log in with the user, on whose Timeline you wish to post and/or with the user, who can manage the page you wish to post at.
-
If you change your password, you will need to generate the access_token again.
-
Also, the access token expires, if there is no activity on the user for more than 60 days. This does not apply to your Facebook pages.
- Click on the link in the dialog. A new window opens, where Facebook asks you to log in to your profile (if you are not already logged in) and then requests all the necessary permissions for the application (e.g. access to your friends list, post on your behalf, etc.).
- Confirm using the Ok button. Once you have granted all the required permission, you will see a conformation dialog: Now your
channels.conffile contains the access_token (for you user and/or pages).
The Facebook Application Access Token will be added in the channels.conf file (for the corresponding user and/or page).